Tools / Laser Engravers
User Manual for Creality Ender-3 Max Neo 3D Printer
Comprehensive user guide for the Creality Ender-3 Max Neo 3D printer. Includes detailed instructions for assembly, wiring, initialization, automatic leveling, filament loading, and printing procedures.
Table of contents
Manual images
Click an image to enlargeImportant Information
This manual provides essential instructions for the Creality Ender-3 Max Neo 3D printer. Before operating the device, ensure you have read all safety notes and completed the installation and initialization steps. The printer supports FDM technology with a printing size of 300x300x320mm.
Safety Notes
- Do not use the printer in unstable or vibrating environments.
- Keep the printer away from flammable or explosive materials.
- Always use the provided power cord and ensure it is plugged into a grounded three-hole socket.
- Do not touch the nozzle or hotbed during operation to avoid burns.
- Wear no gloves or accessories while operating to prevent entanglement with moving parts.
- Clean the nozzle with tools while hot; do not touch it with your hands.
- Children under 10 must be supervised by an adult.
- The printer has a safety mechanism; do not move the nozzle or platform manually while the power is on.
Product Installation
Gantry Installation: Place the gantry frame into the base slot and secure it with the four provided M5x65 hexagon socket head screws.
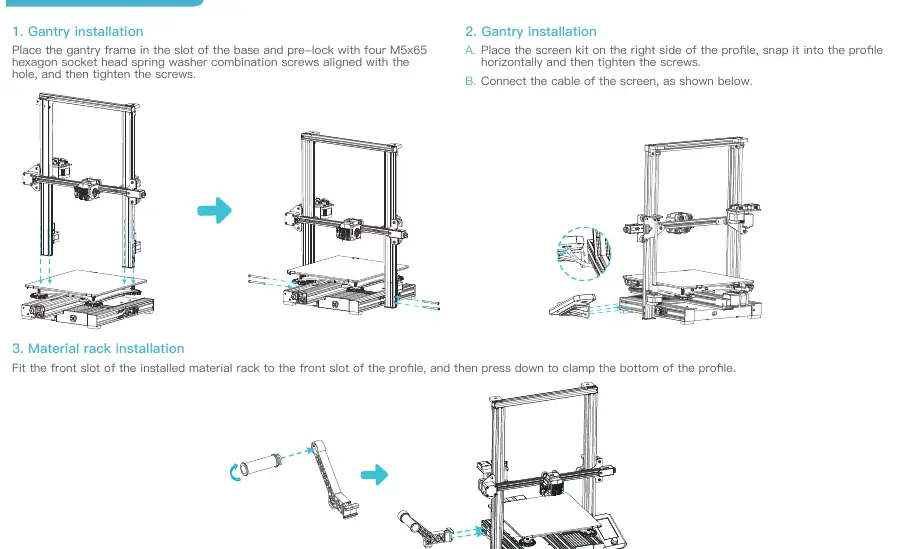
Screen Installation: Attach the screen kit to the right side of the profile, snap it into place, and tighten the screws. Connect the screen cable.
Material Rack: Fit the material rack into the front slot of the profile and press down to clamp it securely.
Equipment Wiring
Caution: Before connecting to power, verify the voltage switch on the power supply. Select 115V for 100-120V mains or 230V for 200-240V mains. The default is usually 230V.
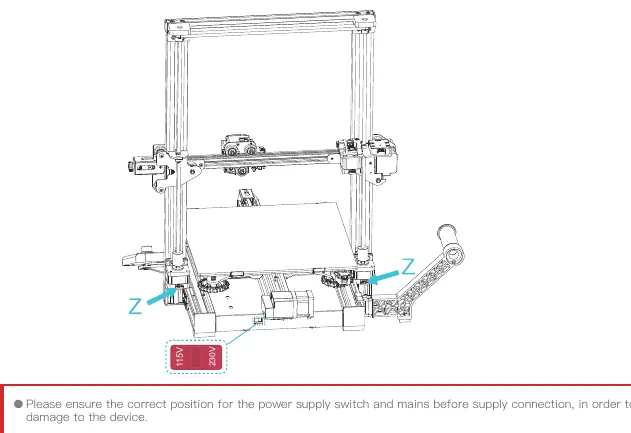
Connect the Z-axis stepper motor cables to the ports labeled on the printer.
Initialization and Leveling
Initialization:
- Navigate to Control → Reset configuration to reset parameters.
- Go to Prepare → Auto Home to return to the starting position.
- Go to Prepare → Move → Move Z and clear the value.
Leveling:
- Automatic Leveling: Select Leveling from the main menu. The printer will perform a 25-point calibration.
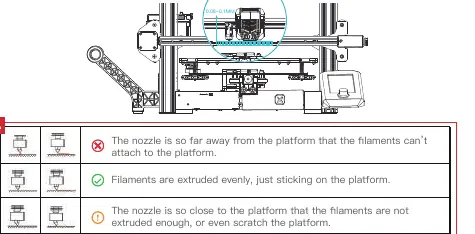
- Z-Offset Adjustment: Go to Prepare → Z-offset. Adjust the value until the nozzle height from the platform is approximately the thickness of a piece of A4 paper (0.08-0.1mm).
- Manual Leveling: Use the knobs at the bottom of the hotbed to adjust the four corners to match the A4 paper thickness.
Operation
Preheating: You can preheat the printer via Prepare → Preheat PLA or by manually setting temperatures in the Control menu.

Filling the Filament:
- Hang the filament on the rack.
- Press the extrusion spring and insert the filament into the extruder hole.
- Once the nozzle reaches the target temperature, filament will flow out, indicating loading is complete.
Start Printing:
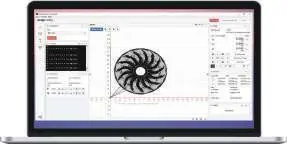
- Install and open the Creality Slicer software.
- Load your file, generate the G-code, and save it to the storage card.
- Insert the storage card into the printer, select the file, and start printing.
Manufacturer information
Shenzhen Creality 3D Technology Co., Ltd.
Practical help
Common problems
Nozzle is too far or too close to the platform
Adjust the Z-offset value in the 'Prepare' menu or manually adjust the bed knobs to achieve a gap of 0.08-0.1mm.
Filament not extruding
Ensure the nozzle is preheated to the correct temperature and the filament is properly inserted into the extruder.
Printer shakes or poor print quality
Ensure the printer is placed on a stable, flat surface and not near vibrating equipment.
Power supply damage
Always verify the voltage switch (115V/230V) matches your local mains voltage before connecting power.
Before use
- Check the voltage switch on the power supply (115V or 230V).
- Ensure the gantry and screen are securely installed.
- Verify all motor cables are connected.
- Perform Auto Home and Z-offset calibration.
- Level the print bed using A4 paper.
- Ensure the storage card is inserted correctly.
Specs in practice
- Printing Size
- Maximum build volume of 300x300x320mm.
- Nozzle Temperature
- Maximum operating temperature of 260°C.
- Heated Bed Temperature
- Maximum operating temperature of 100°C.
- Printing Speed
- Recommended speed is ≤60mm/s.
Images and diagrams
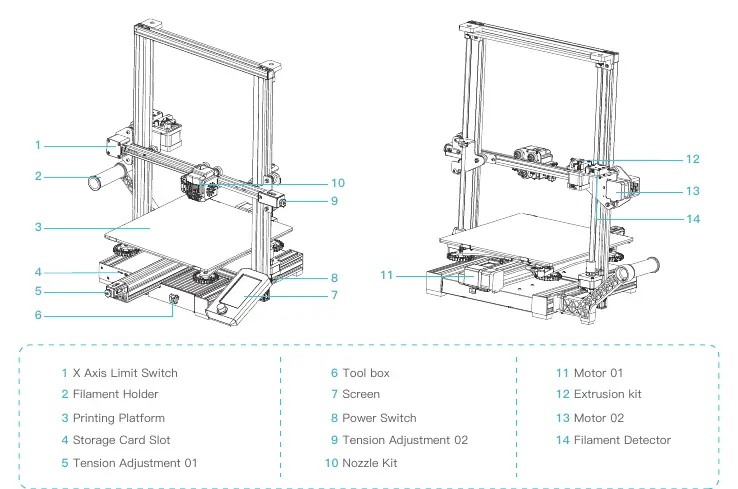
- Page 5: Overview of printer components including limit switches, filament holder, and nozzle kit.
- Page 8: Step-by-step guide for installing the gantry and screen.
- Page 9: Wiring diagram for Z-axis motors and location of the voltage switch.
- Page 12: Visual guide for Z-offset adjustment and nozzle height calibration.
Model compatibility
- Supported materials: PLA, ABS, PETG, Wood.
- Supported OS: Windows, Mac, Linux.
- File formats: STL, OBJ, AMF.

Manual page author
David Miller
Documentation analyst
Organizes user manual content into clear summaries, with attention to model details, product context, and everyday usability.