Electronics / Projectors
User Manual for Creality Laser Module
Quick start guide for Creality Laser Module (1.6W, 5W, 10W). Includes installation, wiring, software setup, and operation instructions.
Table of contents
Manual images
Jump to the sectionQuick Start Guide
This guide provides essential instructions for installing and operating the Creality Laser Module. Before starting, ensure you have read all safety precautions. The module is compatible with various 3D printers including the Ender-2 pro, Ender-3 series, and CR-10 series.
Safety Precautions
- Laser Safety: Always wear protective goggles. Never look directly at the laser spot.
- Environment: Operate in a well-ventilated, cool, and dust-free environment. Avoid humid conditions and thunderstorms.
- Fire Hazard: Most materials are combustible. Always place a laser-impenetrable flat object (e.g., aluminum alloy or stainless steel plate) under the material being processed. Keep a fire extinguisher nearby.
- Supervision: Never leave the machine unattended while running. Children under 10 must not operate the machine without adult supervision.
- Handling: Do not touch moving parts or the laser module while in operation. Do not plug or unplug cables while the power is on.
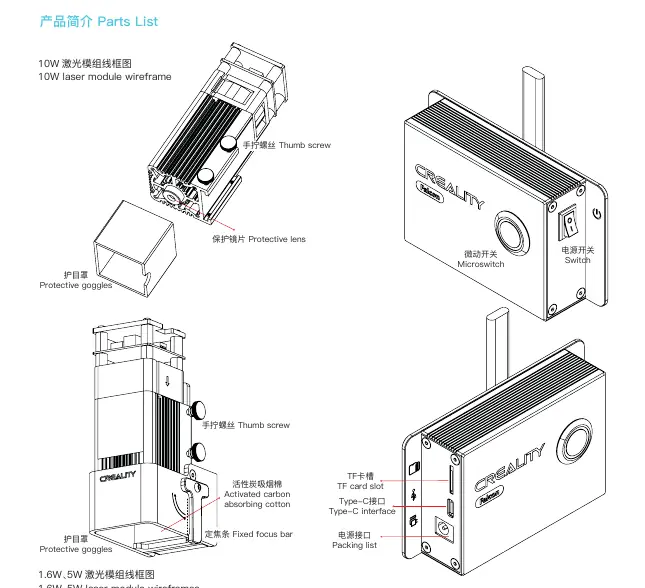
Parts List
The package includes the laser module, control box, mounting plate, cables (Type-C, power), fixed focus bar, protective goggles, and cleaning cloth. Ensure all parts are present before beginning assembly.
Assembly and Wiring
Installation Steps:
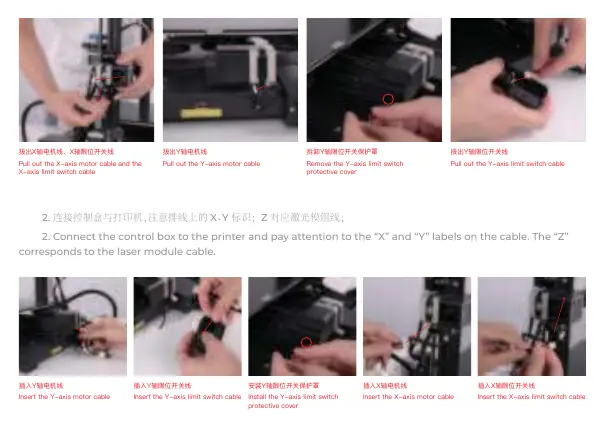
- Disconnect the printer power.
- Unplug the X-axis motor, Y-axis motor, and limit switch cables from the printer.
- Connect the control box to the printer, paying attention to the X and Y labels on the cables. The Z label corresponds to the laser module cable.
- Install the laser module fixing plate vertically and lock the screws.
- Attach the laser module to the plate using the provided thumbscrews.
- Connect the laser module cable to the Z port.
- Use cable ties to organize and secure all wiring.
Note: For specific models like Ender-3 S1/Pro/Plus, the Y-axis motor cable must be routed to the side to prevent pulling. Some models may require tilting the fixing plate slightly for installation.
Focusing
1.6W/5W Modules: Ensure the fixed focus bar is naturally vertical and touching the material surface. Lock the screws, then turn the focus bar clockwise until held by the magnet.
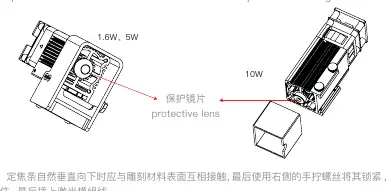
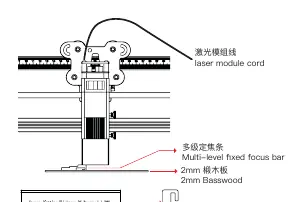
10W Module: Use the multi-level fixed focus bar to set the distance between the laser module and the material surface. Ensure the bottom of the laser module contacts the corresponding surface of the focus bar before locking.
Software and Configuration
The machine supports LightBurn and LaserGRBL. If your printer's X/Y print dimensions are not 220mm, you must modify the $130 and $131 configuration parameters in the console to match your printer model.
Operation
Online Operation: Connect the control box to your computer via the Type-C cable. Select the correct COM port in your software to control the machine in real-time. Do not insert a TF card or press the microswitch on the control box during online operation.
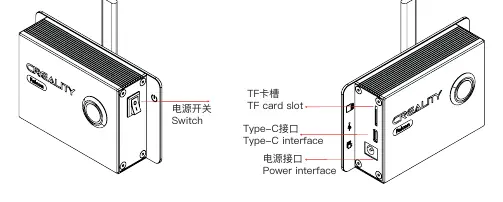
Offline Operation: Save your engraving file (.gcode/.gc/.g/.nc/.ngc) to the root directory of the TF card. Insert the card into the control box, power on, and press the microswitch to enter preview mode. Press again to start engraving.
Firmware Upgrade
Download the latest firmware from the official Creality website. Save the .bin file to the root directory of the TF card (delete other files). Insert the card into the powered-off machine, then turn it on. The machine will update automatically; do not power off during this process.
Manufacturer information
Shenzhen Creality 3D Technology Co., Ltd.
Practical help
Common problems
Z-axis movement during engraving
Lock the Z-axis by turning on the printer or using other mechanical locking methods.
Cable interference
Ensure the Y-axis motor cable is routed to the side to prevent it from being pulled during movement.
Firmware update failure
Ensure only the .bin file is in the root directory of the TF card and do not power off during the update process.
Before use
- Read all safety precautions carefully.
- Ensure the protective lens is clean.
- Adjust the focal length correctly using the fixed focus bar.
- Place a laser-impenetrable flat object (e.g., metal plate) under the material.
- Wear protective goggles.
- Ensure the machine is in a well-ventilated area.
Specs in practice
- Input Voltage
- 100-240V AC, 50-60Hz.
- Operating Temperature
- 0°C to 35°C.
- Safety Level
- Class IV (FDA classification standard).
Images and diagrams
- Parts List: Identifies the laser module, control box, cables, and mounting hardware.
- Wiring Diagram: Shows the connection of X/Y motor cables and limit switch cables to the control box.
- Focusing: Demonstrates using the fixed focus bar to set the correct distance between the laser and the material.
Model compatibility
- Compatible with Ender-2 pro, Ender-3 series, CR-10, and CR-10 mini.
- Requires LightBurn or LaserGRBL software for operation.

Manual page author
David Miller
Documentation analyst
Organizes user manual content into clear summaries, with attention to model details, product context, and everyday usability.