Electronics / Cable Management
User Manual for Dellonda 10ft & 12ft Super Steel Swimming Pool
Quick guide for the Dellonda 10ft & 12ft Super Steel Swimming Pool. Includes assembly instructions, safety guidelines, maintenance, water care, and troubleshooting for the filter pump.
Table of contents
Manual images
Click an image to enlargeQuick guide from the manual
This document provides instructions for the Dellonda 10ft (DL19.V2) and 12ft (DL20.V2) Super Steel Swimming Pools. Key requirements include a level setup surface with a maximum 3-degree slope, the use of a GFCI-protected power outlet for the filter pump, and regular chemical water treatment. Assembly requires at least two adults.
Safety Instructions
Electrical Safety: The pool must be accessible to a 110V or 230V AC outlet protected by a Ground Fault Circuit Interrupter (GFCI). The pool should be set no closer than 2m to the power source, but no further than the length of the filter pump cord. Never use an extension cord.
General Safety: Always supervise children in the aquatic environment. Never dive into the pool. Keep rescue equipment (e.g., ring buoy) and emergency numbers nearby. Do not use the pool while under the influence of alcohol or medication.
Positioning
Select a site that is firm, flat, and free of sharp objects, sticks, or stones. Do not use sand as a leveling agent. Ensure the area is not under overhead power lines or trees. The ground must be level with a grade not exceeding 3 degrees.
Pool Setup
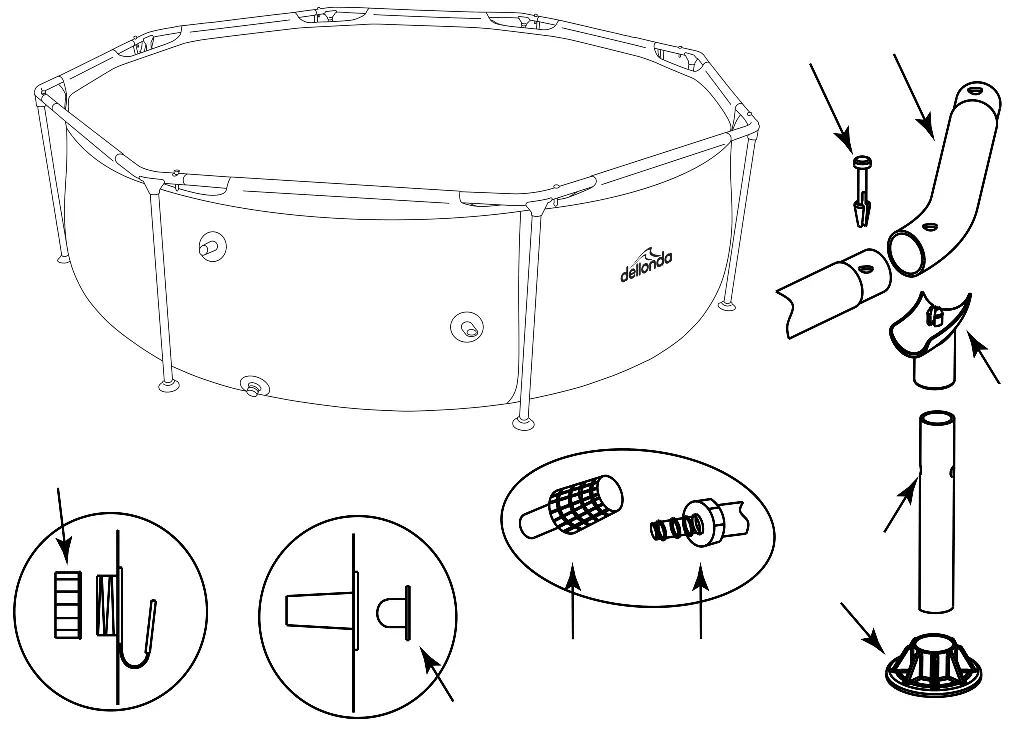
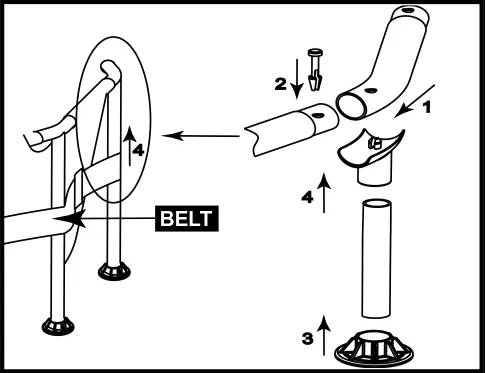
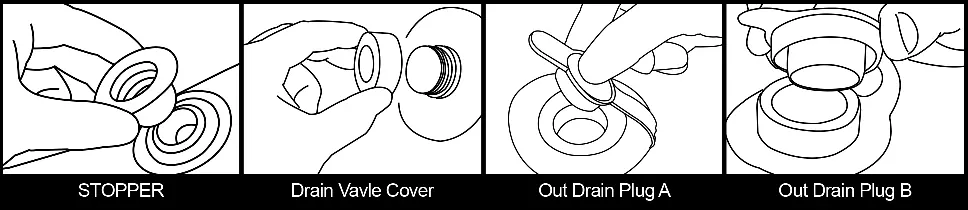
1. Account for all parts listed in the contents diagram. 2. Install the drain valve cover and stopper, ensuring the outer drain plug is inserted and the cover is screwed on tightly. 3. Assemble the horizontal beams and connect them using the T-joints. 4. Install the vertical legs into the T-joints through the belt. 5. Ensure all pins are firmly inserted into the holes of the connected tubes.
Filling the Pool
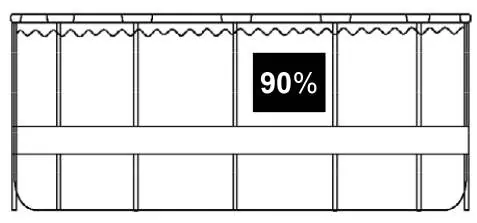
Do not leave the pool unattended while filling. If more than 1-2 inches of water collects on one side before filling the center, the pool is not level and must be corrected. Once about 1 inch of water is on the bottom, smooth out all wrinkles from the liner.
Maintenance and Water Care
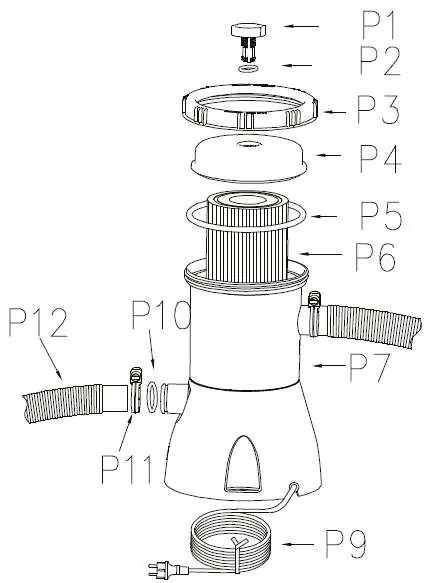
Chemical Treatment: Engage in a consistent regimen of chemical treatment (chlorine, pH adjusters, algaecides). Never add chemicals while the pool is occupied. Always add chemicals to water, never water to chemicals. Filter Pump: Check the filter cartridge every two weeks. If it is no longer white, spray it clean with a hose or replace it. Ensure the pump is placed 0.2m to 1m below the water level.
Winter and Long-Term Storage
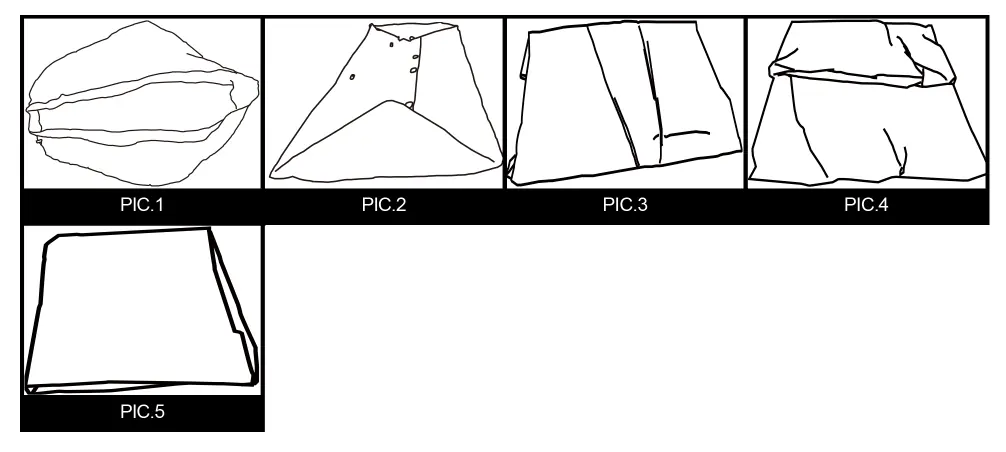
Drain the pool completely and ensure all parts are dry before storage. To fold the pool: 1. Fold protrusion sides inside to create a rectangle. 2. Fold each half of the rectangle. 3. Fold each end backwards. 4. Fold the ends together to create an ultimate rectangle. Store in a dry, ventilated location.
Troubleshooting
If the pool is not round, drain to 25mm depth and smooth out wrinkles or adjust the ground level. If the water is milky, adjust pH and check chlorine levels. If the pump does not operate, check for blown fuses or motor overheating. If the pump loses prime, ensure the water level is at least 5cm above the outlet pipe.
Practical help
Common problems
Pool is not round or slopes to one side
Drain pool to 25mm depth, smooth out wrinkles, and ensure the ground is flat and level.
Water is milky or cloudy
Adjust pH, ensure proper chlorine levels, and clean or replace the filter cartridge.
Pump motor runs but does not pump water
Check for obstructions in hoses, tighten hose clamps, and verify water level is sufficient.
Pump loses prime
Ensure water level is at least 5cm above the outlet pipe and check for leaks in suction piping.
Before use
- Ensure the setup area is firm, flat, and has a slope not exceeding 3 degrees.
- Clear the area of all sharp objects, sticks, and stones.
- Verify all parts are present according to the contents list.
- Ensure access to a GFCI-protected 110V or 230V power outlet.
- Confirm at least two adults are available for assembly.
- Check that the drain valve cover is screwed on tightly.
Specs in practice
- Pump Placement
- Must be 0.2m to 1m below the water level.
- Filter Maintenance
- Check cartridge every 2 weeks or more frequently with heavy use.
Images and diagrams
- Assembly sequence: Horizontal beams connect to T-joints, then vertical legs are inserted.
- Drain valve: Ensure the outer plug is inserted into the cap and the cover is tight.
- Folding: Follow the 4-step process to fold the liner into a compact rectangle.
Model compatibility
- Designed for storable, seasonal use only; not for permanent installation.
- Requires a GFCI-protected power outlet.
- Do not use an extension cord for the filter pump.

Manual page author
David Miller
Documentation analyst
Organizes user manual content into clear summaries, with attention to model details, product context, and everyday usability.