Garden / Swimming Pools
User Manual for EXIT Toys 12FTX30IN Frame Pool
Quick guide for the EXIT Toys 12FTX30IN Frame Pool. Includes setup instructions, safety guidelines, maintenance tips, and troubleshooting.
Table of contents
Manual images
Click an image to enlargeQuick guide from the manual
This manual provides essential instructions for the assembly, safe use, and maintenance of your EXIT Toys 12FTX30IN Frame Pool. Before starting, ensure you have all parts and at least two adults available for installation. The estimated assembly time is 30 to 45 minutes, excluding site preparation and filling.
Safety Guidelines
WARNING: To ensure safety, strictly observe the following:
- Supervision: Never leave children unattended in or near the pool. At least one responsible adult must supervise at all times.
- No Diving: Never permit diving or jumping into the pool. The water is too shallow and this can lead to serious injury or death.
- Electrical Safety: Ensure the pool is located at least 3.50 meters from any electrical appliance. Use a GFCI-protected outlet. Do not use extension cords.
- General Safety: Keep the area well-lit. Prohibit rough-housing. Keep emergency numbers (Fire, EMS, Poison Center) posted nearby.
Site Selection
Choosing the right location is critical for the pool's stability and longevity:
- Surface: The ground must be firm, flat, and extremely level (maximum 3° slope). Do not use sand as a leveling agent.
- Clearance: Ensure the area is free of sticks, stones, sharp objects, or underground pipes/cables.
- Environment: Avoid areas under power lines or trees. Choose an open location exposed to direct sunlight to help warm the water.
Assembly Instructions

- Account for all parts: Lay out all components and verify them against the part reference diagram.
- Drain Valves: Install the drain valve cover and ensure the outer drain plug is inserted tightly.
- Horizontal Beams: Slide the combined beams into the pool sleeve, ensuring holes face outwards.
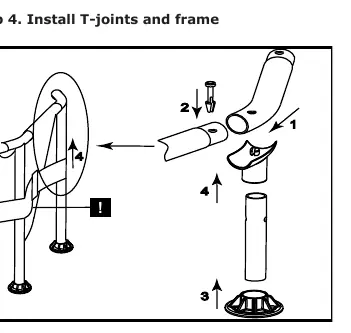
- T-Joints and Frame: Connect horizontal tubes using T-joints, insert pins, install vertical leg caps, and insert legs through the belt.
- Filling: Begin filling the pool. Once 1 inch of water is in, smooth out wrinkles on the bottom. Continue filling until the desired level.
Maintenance and Care
Consistent chemical treatment is vital for water hygiene:
- Chemicals: Use chlorine (tabular, granular, or liquid) to disinfect, pH adjusters to balance acidity, algaecides to remove algae, and shock treatment to clear organic compounds.
- Testing: Frequently test water pH and chlorine levels.
- Filter Pump: Clean or replace the filter cartridge every two weeks or more frequently during heavy use.
- Cleaning: Keep the pool covered when not in use to prevent debris. Rinse off dirt or tanning oil before entering.
Disassembly and Storage
Proper off-season storage extends the life of your pool:
- Draining: Disconnect the filter pump. Attach a garden hose to the drainage valve and direct water to a safe area (storm drain or gutter).
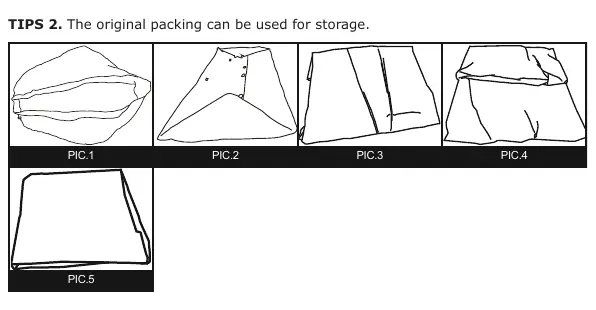
- Drying: Ensure the pool liner is completely dry before folding. Leaving it in the sun for a few hours speeds up drying.
- Folding: Apply talcum powder to prevent vinyl from sticking. Fold the pool into a rectangle shape, removing air as you fold.
- Storage: Store all components indoors in a warm, dry, and weatherproof location.
Troubleshooting
If you encounter issues, refer to these common solutions:
- Colored Water: Adjust pH, run the filter until clear, and clean the cartridge.
- Cloudy Water: Adjust pH, ensure proper chlorination, and clean/replace the filter.
- Low Water Level: Check for leaks in the liner or hoses, tighten clamps, and keep the pool covered.
- Algae: Apply shock treatment, scrub the liner, and test water frequently.
- Cold Water: Relocate the pool to a sunnier area and keep it covered when not in use.
Practical help
Common problems
Water turns blue, brown, or black when first treated with chlorine
Adjust pH to recommended level, run filter until clear, and clean cartridge regularly.
Water looks milky or cloudy
Adjust pH, ensure proper chlorination, clean or replace filter, and ensure bathers rinse off before entry.
Pool losing water daily
Locate and repair holes in liner or hoses, tighten hose clamps, and keep pool covered.
Algae growth (green tint, slippery bottom)
Apply shock treatment, scrub liner, and test water frequently to maintain chlorine levels.
Water is not warming up
Relocate pool to a sunnier area and keep covered when not in use.
Before use
- Verify all parts are present
- Ensure ground is firm, flat, and level (max 3° slope)
- Clear site of sharp objects and debris
- Ensure access to a GFCI-protected outlet
- Have at least 2 adults available for assembly
Images and diagrams
- Part reference diagram shows pool components and assembly order
- Folding instructions show step-by-step folding process
Model compatibility
- Requires GFCI protected outlet
- Do not use extension cords

Manual page author
Michael Turner
Technical manual editor
Reviews PDF manuals for structure, safety notes, and practical product details so readers can find the right information quickly.