Electronics / Security Systems
User Manual for Digital Watchdog DWC-MF Series IP Camera
Quick start guide for Digital Watchdog DWC-MF Series IP cameras. Includes installation, cabling, SD card setup, and network configuration instructions.
Table of contents
Quick Guide from the Manual
This document serves as a quick reference for the initial setup of the Digital Watchdog DWC-MF Series IP cameras. It is recommended to read the full product manual for complete installation and usage details. The guide covers physical installation, power requirements, SD card management, and network configuration.
Safety and Warning Information
WARNING: Failure to follow these instructions may result in serious injury or equipment damage.
- Ensure the mounting surface can withstand five times the camera weight.
- Use only the standard adapter specified in the specification sheet.
- Do not connect multiple cameras to a single adapter.
- Do not install in locations subject to extreme temperatures, high humidity, or near heat sources.
- If unusual smells or smoke occur, disconnect power immediately and contact the service center.
- Do not spray water directly onto the camera parts during cleaning.
Installation
Before mounting, ensure the moisture absorber is installed in the base of the camera's lens module to prevent moisture buildup. Remove the protective film between the dome and the camera module before final assembly.
Mounting Steps
- Use the provided mounting template to mark and drill holes on the wall or ceiling.
- Secure the mounting bracket or mount plate to the surface using the included screws and anchors.
- Attach the main body to the mounting bracket by tightening the lock screw.
- For soft surfaces, use the included metal mount plate.
- Adjust the camera's tilt, pan, and rotation as needed (Pan: 0°~360°, Tilt: 0°~70°, Rotation: 0°~360°).
- Assemble the dome cover over the camera body.
Powering and Cabling
The camera supports power via PoE (Power over Ethernet) or 12V DC. Ensure the power supply meets the requirements listed in the specifications (PoE IEEE 802.3af Class 2 or 3 depending on the model).
- PoE Connection: Use a PoE Injector or PoE Switch to connect data and power using a single Ethernet cable.
- Non-PoE Connection: Use a non-PoE switch for data and a separate power adapter for power.
- Waterproof Cap: Use the provided waterproof cap set. Select the rubber ring that matches your network cable diameter (4.5mm-5.5mm use black ring; over 5.5mm use white ring).
SD Card Management
The camera supports Micro SD cards up to 1TB (FAT32 format).
- Locate the SD card slot in the back of the camera module.
- Insert the Class 10 SD card with contacts facing upward.
- To remove, press the card inward to release it from the slot.
Network Setup and Web Viewer
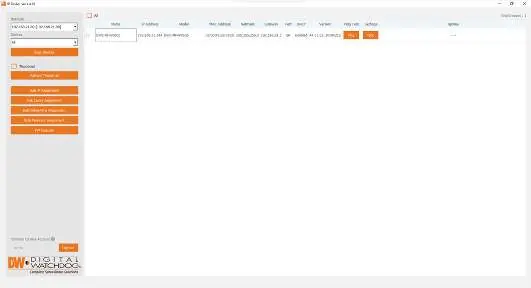
Use the DW IP Finder software to detect the camera on the network and configure settings.
- Download and install DW IP Finder from the Digital Watchdog website.
- Click 'Scan Devices' to list supported cameras on the network.
- Select the camera and click 'Bulk Password Assign' to set the initial admin password.
- Passwords must be at least 8 characters long and include at least four combinations of uppercase, lowercase, numbers, and special characters.
- Use the 'Website' button in the IP Finder to access the camera's web interface for advanced settings.
- For external network access, configure port forwarding on your router.
Practical help
Common problems
Moisture inside camera housing
Ensure the included moisture absorber is installed in the base of the lens module. The camera generates heat to dry moisture during operation.
Camera not detected in network
Ensure the camera is powered and connected to the same network. Use the DW IP Finder software to scan for devices.
Password setup failure
Passwords must be at least 8 characters long and contain at least four combinations of uppercase letters, lowercase letters, numbers, and special characters.
Before use
- Verify mounting surface can support 5x the camera weight.
- Install the moisture absorber in the lens base.
- Select the correct rubber ring for the waterproof cap based on cable thickness.
- Ensure power supply (PoE or 12V DC) meets model specifications.
- Download DW IP Finder software.
Specs in practice
- PoE (Power over Ethernet)
- Allows data and power transmission over a single Ethernet cable.
Images and diagrams
- Wiring diagram illustrates connections for Power, Network, Audio In/Out, and Alarm In/Out.
- Waterproof cap installation requires placing the o-ring correctly between the cap components.
Model compatibility
- Supports Micro SD cards up to 1TB (FAT32).
- Requires PoE IEEE 802.3af Class 2 or 3 depending on the specific model.
- Compatible with DW IP Finder for network configuration.

Manual page author
Michael Turner
Technical manual editor
Reviews PDF manuals for structure, safety notes, and practical product details so readers can find the right information quickly.