Electronics / Thermal Cameras
User Manual for Digital Watchdog VMAX A1 Plus DVR
Quick start guide for the Digital Watchdog VMAX A1 Plus DVR. Learn how to connect cameras, set up the system, configure network settings, and access remote monitoring via the mobile app.
Table of contents
Manual images
Click an image to enlargeQuick Start Guide
This document provides essential instructions for the initial setup and operation of the Digital Watchdog VMAX A1 Plus DVR. It is recommended to read the full instruction manual for complete installation and usage details.
Connecting the DVR
Before powering on the device, ensure all necessary cameras and external devices are connected. The DVR supports HD-Analog, HD-TVI, and analog signals up to 960H, with camera resolutions up to 5MP. The system features automatic signal detection, so no manual configuration is required for BNC inputs.
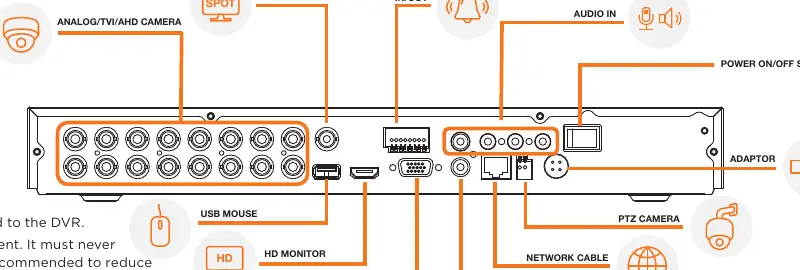
- Connect all cameras and external devices to the appropriate ports on the rear panel.
- Ensure the DVR is placed in its final position before connecting the power supply.
- Connect the power adapter only after all other devices are properly connected.
Powering Up and Initial Setup
Upon initial power-up, the DVR will boot into a protective mode. You must log in to access the setup menu.
- Default Login: Username: admin, Password: no password.
- Unlocking: Right-click anywhere on the screen to bring up the login prompt.
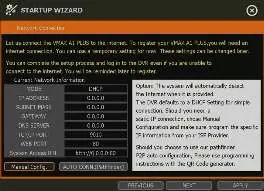
- Startup Wizard: The wizard will guide you through basic settings, including language, date, time, and network configuration.
- Network Settings: It is recommended to set the network type to AUTO CONN. to allow the DVR to auto-detect settings.
Camera Configuration
The DVR supports complete camera control via the coaxial connection (UTC), eliminating the need for additional RS485 wiring for PTZ cameras.
- To add a UTC or PTZ camera, right-click and navigate to MENU, then DECIVE, then PTZ.
- The system will auto-detect the camera type. Ensure the protocol matches the detected camera type.
- Use the PROGRAM button under the CONTROL section to access specific camera menus.
System Monitoring
Use the included USB mouse to navigate the interface.
- Menu Bar: Move the cursor to the bottom of the display area to reveal the menu bar.
- Quick Menu: Right-click anywhere on the screen to access options such as DISPLAY MODE, DIGITAL ZOOM, PTZ control, FREEZE, ADD BOOKMARK, and playback/search functions.
- Help: Use the help button at the bottom left of setup screens for feature explanations.
Remote Monitoring
You can monitor your system using the DW Mobile Plus app without complex port forwarding.
- Navigate to MENU, then NETWORK, then PATHFINDER.
- Check the box for USE PATHFINDER and click Save.
- Once the service is activated, a QR code will appear on the screen.
- Download the DW Mobile Plus app on your smartphone or tablet.
- Use the app to scan the QR code on the DVR screen to register the device.
Safety and Maintenance
- Environment: Place the DVR in a dust and moisture-free environment. Avoid direct sunlight.
- Temperature: Maintain a room temperature between 68-78°F (20-25°C). Do not operate in areas exceeding 104°F (40°C).
- Clearance: Allow at least 3 inches (7.6 cm) of clearance around ventilation openings to prevent overheating.
- Power: A UPS (uninterrupted power supply) is highly recommended to prevent damage during power outages.
- Dual Monitoring: Note that the HD Monitor output and VGA output cannot be used simultaneously.
Practical help
Common problems
DVR is in protective mode and cannot access menus
Right-click anywhere on the screen to open the login window. Use the default credentials: Username 'admin' and no password.
DVR is overheating or unstable
Ensure at least 3 inches of clearance around ventilation openings. Keep the ambient temperature below 104°F (40°C) and ideally between 68-78°F.
Cannot use both HD Monitor and VGA output
The DVR does not support simultaneous use of HD Monitor and VGA outputs for dual monitoring.
Before use
- Connect all cameras and external devices before powering on.
- Ensure the installation environment is dust and moisture-free.
- Verify that the power supply is appropriate for your specific model (12V DC).
- Have a USB mouse and monitor ready for initial setup.
- Ensure the network cable is connected if remote access is required.
Specs in practice
- Supported Signals
- Compatible with HD-Analog, HD-TVI, and legacy Analog signals up to 960H.
- Max Resolution
- Supports camera resolutions up to 5MP.
- Power Consumption
- Requires 12V DC power; amperage varies by model (1.5A for 4-channel, 3.3A for 8-channel, 5A for 16-channel).
Images and diagrams
- The rear panel diagram identifies ports for VGA, HD Monitor, USB Mouse, PTZ Camera, Network Cable, Audio In/Out, and Power.
- The PathFinder setup screen shows where to enable the P2P service and locate the QR code for mobile app registration.
Model compatibility
- UTC control is supported for PTZ cameras, removing the need for RS485 wiring.
- Compatible with DW Mobile Plus app for remote viewing.

Manual page author
Emily Carter
User documentation editor
Prepares concise manual descriptions and highlights the most useful setup, operation, and maintenance information for readers.