Health / Orthopedic Supports
User Manual for Aircast AirSelect Standard Walking Brace
Quick guide for the Aircast AirSelect Standard walking brace. Learn how to apply the brace, adjust aircell compression, deflate aircells, and perform maintenance for models 01EF-XS through 01EF-XL.
Table of contents
Manual images
Click an image to enlargeQuick guide from the manual
The Aircast AirSelect Standard is designed for moderate support, stable fractures of the lower leg, foot, and ankle, severe ankle sprains, and post-operative use. The brace features two customizable distal aircells that can be inflated or deflated to adjust compression levels. For optimal comfort, it is recommended to wear a cotton or cast sock (not included).
Application instructions
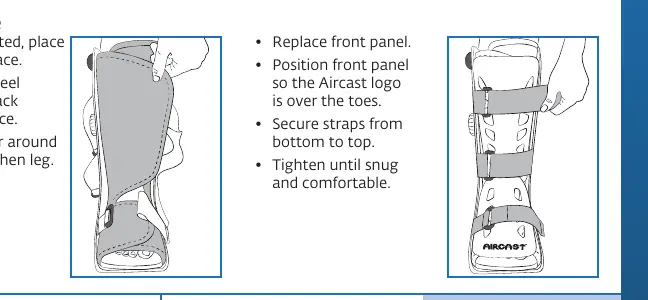
- Prepare the brace: Unfasten all straps, remove the front panel, and open the liner.
- Positioning: While seated, place your foot into the brace, ensuring your heel is positioned against the back of the brace.
- Secure the liner: Wrap the liner around your foot and then your leg.
- Finalize fit: Replace the front panel, ensuring the Aircast logo is positioned over the toes. Secure the straps starting from the bottom and moving to the top. Tighten until the brace feels snug and comfortable.
Adjusting aircell compression
The aircells are initially deflated. Follow these steps to adjust compression:
- Select the aircell: Turn the selector dial found on the right side of the brace to the appropriate number. Number 1 inflates the aircell on the right side, and Number 2 inflates the aircell on the left side.
- Inflate: Press and release the large inflation pump located on the top right side of the brace. Pump until the aircell feels snug.
- Repeat: Repeat the process for the other aircell if necessary.
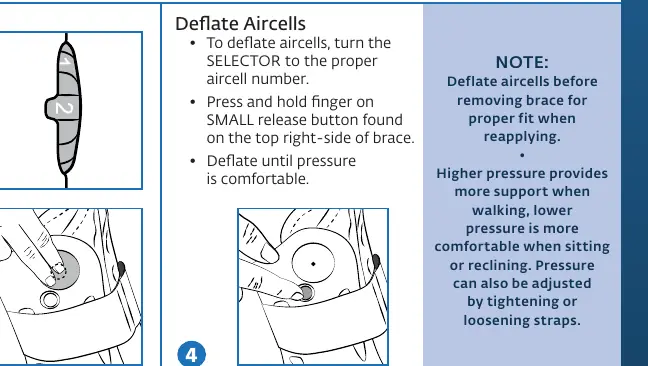
Deflating aircells
To deflate the aircells:
- Select the aircell: Turn the selector dial to the number corresponding to the aircell you wish to deflate.
- Release air: Press and hold the small release button found on the top right side of the brace.
- Adjust: Continue until the pressure is comfortable.
Note: Always deflate aircells before removing the brace to ensure a proper fit when reapplying. Higher pressure provides more support when walking, while lower pressure is more comfortable when sitting or reclining.
Cleaning and maintenance
The foam liner may be hand-washed in 86°F/30°C water with mild detergent. Always air-dry the liner. Do not put the liner in a dryer or use any other heat source to dry it.
Manufacturer information
DJO
Practical help
Common problems
Brace feels uncomfortable while sitting or reclining
Deflate the aircells slightly using the release button to reduce pressure.
Difficulty removing the brace
Ensure you deflate the aircells before removing the brace to make reapplying easier.
Brace does not provide enough support while walking
Ensure both aircells are inflated to a snug level using the large inflation pump.
Before use
- Ensure you have a cotton or cast sock (not included) for added comfort.
- Verify the brace is the correct size (01EF-XS to 01EF-XL).
- Ensure the brace is initially deflated before application.
- Check that the selector dial is set to the correct number before inflating or deflating.
Specs in practice
- Selector Dial
- Used to switch between the right (1) and left (2) aircells for inflation and deflation.
- Large Inflation Pump
- Located on the top right; used to inflate the selected aircell.
- Small Release Button
- Located on the top right; used to deflate the selected aircell.
Images and diagrams
- The selector dial allows independent control of the two distal aircells.
- The inflation pump and release button are conveniently located on the top right side of the brace for easy access.
Model compatibility
- Designed for stable fractures of the lower leg, foot, and ankle.
- Suitable for severe ankle sprains and post-operative use.

Manual page author
Emily Carter
User documentation editor
Prepares concise manual descriptions and highlights the most useful setup, operation, and maintenance information for readers.