Automotive / Car Audio
Owner's Manual for DS18 Hydro Tower Speakers
A comprehensive installation and setup guide for DS18 Hydro series tower speakers (NXL-PS6, NXL-PS8, CF-PS6, CF-PS8). Includes detailed wiring diagrams, mounting instructions for flat and mast configurations, and technical specifications.
Quick answers from the manual
Quick answer
- The DS18 Hydro tower speakers are marine-grade coaxial speakers that require an external amplifier for audio and a 12V controller for RGB lighting. Installation involves either a flat mount or a mast clamp mount (1.75" or 2"). p. 2, 3, 4
Key actions
- Mounting the speakers p. 4, 5
- Wiring the LED lights p. 3
First start
- Disconnect the vehicle battery before beginning any installation work. p. 3
Technical specifications
| Parameter | Value | Meaning | Pages |
|---|---|---|---|
| Power Handling (NXL-PS6/CF-PS6) | 100W RMS / 300W Peak | Continuous and peak power capacity. | p. 2 |
| Power Handling (NXL-PS8/CF-PS8) | 125W RMS / 375W Peak | Continuous and peak power capacity. | p. 2 |
Where to find it in the PDF
- Features and Specifications p. 2
- Installation and Wiring p. 3, 4, 5
- Dimensions p. 6, 7, 8, 9
Table of contents
Quick Guide
The DS18 Hydro series tower speakers are designed for marine, powersports, and off-road applications. Before installation, ensure you have all necessary tools, including a drill, hex keys, wire strippers, and soldering equipment. Always disconnect the vehicle's battery before starting the installation to prevent electrical shorts.
Installation Considerations
- Safety First: Do not cut into gas tanks, brake lines, or electrical wiring.
- Wiring: Avoid running wires near fuel lines or high-voltage power sources. Use rubber or plastic grommets to protect wires routed through metal surfaces.
- Hardware: Use only marine-grade stainless steel hardware to prevent rust and corrosion.
Wiring and Connection
The speakers require connection to an amplifier for audio and a 12V/RGB controller for the integrated LED lighting. If using the LED-BTC control module, follow the specific wiring diagram provided in the manual to connect the Red, Green, Blue, and Black wires to the controller and battery. Ensure all solder joints are protected with heat-shrink tubing or insulating adhesive tape.
Mounting Instructions
The speakers support two primary mounting methods:
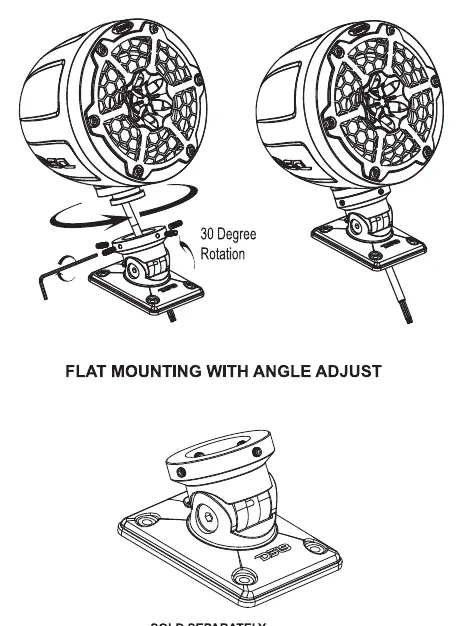
- Flat Clamp Install: Use the flat mounting base and provided M5 screws. Use the NBR pad as a template to mark the location before drilling.
- Mast Clamp Install: Choose the appropriate clamp ring (1.75" or 2") based on your mounting pipe size. Secure the clamp ring and tower pod using the provided M5-35 screws and a 4mm hex wrench.
The logo on the front and back of the speaker can be rotated to your preferred orientation using the vacuum suction tool provided.
Technical Specifications
The Hydro series includes 6.5" and 8" models with varying power handling:
- NXL-PS6 / CF-PS6: 100W RMS / 300W Peak Power.
- NXL-PS8 / CF-PS8: 125W RMS / 375W Peak Power.
- Frequency Response: 65-23kHz (6.5" models) or 55-23kHz (8" models).
- Impedance: 4 Ohms.
Manufacturer information
DS18
Practical help
Common problems
LED lights not functioning
Verify the wiring connections to the LED-BTC controller and ensure the 12V power source is active. Check that all color wires (Red, Green, Blue) are correctly connected.
Mounting instability
Ensure the correct clamp ring size (1.75" or 2") is used for your specific pipe diameter and that all M5 screws are tightened securely.
Corrosion on hardware
Ensure only marine-grade stainless steel hardware is used. If the provided hardware is insufficient for your specific mounting surface, replace it with appropriate marine-grade alternatives.
Before use
- Disconnect the negative battery terminal.
- Gather tools: Drill, hex key set, wire strippers, soldering iron, and heat shrink tubing.
- Verify mounting location for clearance and wiring access.
- Check that the chosen mounting surface is structurally sound.
- Confirm the clamp size matches your mounting pipe (1.75" or 2").
Specs in practice
- Nominal Impedance
- The electrical resistance of the speaker, rated at 4 Ohms.
- Frequency Response
- The range of audio frequencies the speaker can reproduce.
Images and diagrams
- Wiring diagrams show how to connect the speaker wires to an amplifier and the LED wires to the LED-BTC controller.
- Installation diagrams illustrate the assembly of the flat base and the mast clamp system.
- Rotation diagrams show how to adjust the speaker angle and logo orientation.
Model compatibility
- Compatible with 1.75" and 2" mounting pipes.
- Requires an external amplifier for audio playback.
- Requires an external LED-BTC controller for RGB lighting functionality.

Manual page author
Emily Carter
User documentation editor
Prepares concise manual descriptions and highlights the most useful setup, operation, and maintenance information for readers.