Electronics / Security Cameras
User Manual for EKO Alpha Sports Camera
Quick guide for the EKO Alpha 1080P sports camera. Learn how to operate, charge, record video, take photos, and manage files with this essential user manual.
Table of contents
Manual images
Click an image to enlargeQuick guide from the manual
This document provides essential operating instructions for the EKO Alpha sports camera. Before first use, it is mandatory to charge the device for at least two hours. The camera supports microSD cards up to 32GB (not included) and features various shooting modes including video, photo, and playback.
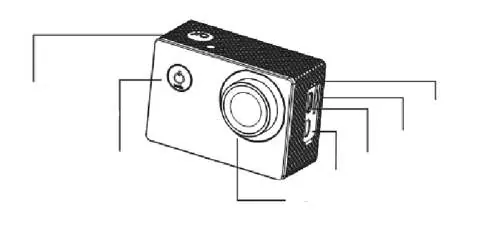
Product Overview
The camera features a Power/Mode button, an OK button, and navigation buttons (Up/Down). Ports located on the side include a MicroSD card slot, USB port, and HDMI output. The front houses the lens, while the back features the LCD screen.

Getting Started
To power the device on or off, press and hold the Power/Mode button for approximately 2 to 3 seconds. You can charge the camera by connecting it to a computer, USB power adapter, or wall outlet. Note that the camera may start and record automatically when connected to a power source.
Video Recording
To record video, switch to video mode using the Power/Mode button. A camera icon will appear in the top-left corner of the screen. Press the OK button to start recording; the icon will blink while recording is in progress. Press OK again to stop. The camera supports various resolutions including 4K, 2.7K, 1080FHD, 1080P, 720P, WVGA, VGA, and QVGA. By default, the camera uses loop recording, which overwrites older files when storage is full.
Photo Mode
Switch to photo mode using the Power/Mode button. An icon will appear on the screen. Press the OK button to capture a photo. Available shooting modes include:
- Single shot
- Automatic timer (3s / 5s / 10s / 20s)
- Continuous shooting
File Management
To access your files, you can connect the camera to a computer using a USB cable to export videos and photos. Alternatively, remove the microSD card and use a card reader to access the files directly.
Safety Instructions
Please adhere to the following safety guidelines:
- Do not use the camera to record people without consent.
- Do not install the camera in private or intimate areas.
- Do not expose the camera to water (unless in the waterproof housing), excessive humidity, or extreme temperatures.
- Do not attempt to open, modify, or repair the camera yourself.
- Do not leave the camera recording continuously without supervision to prevent overheating.
- Do not connect to unsecured public Wi-Fi networks.
Practical help
Common problems
Camera does not turn on
Charge the device for at least two hours before first use.
Storage space is full
The camera uses loop recording by default, which overwrites old files. Adjust settings in the menu if you wish to change this behavior.
Camera overheating
Do not leave the camera recording continuously for extended periods without supervision.
Before use
- Charge the camera for two hours
- Insert a microSD card (up to 32GB)
- Ensure the waterproof housing is properly sealed if using underwater
Specs in practice
- 170° Wide Angle
- Wide field of view to capture more action.
- 30m Waterproof
- Suitable for diving, surfing, and water activities when in the provided housing.
Images and diagrams
- The camera features a Power/Mode button, OK button, and navigation buttons (Up/Down).
- Ports include MicroSD slot, USB, and HDMI.
Model compatibility
- Supports microSD cards up to 32GB (not included).

Manual page author
David Miller
Documentation analyst
Organizes user manual content into clear summaries, with attention to model details, product context, and everyday usability.