Electronics / Security Cameras
User Manual for Eko Cubix Mini Spy Camera
Quick guide for the Eko Cubix Mini Spy Camera. Learn how to charge the device, record video in 720p or 1080p, use motion detection, take photos, enable night vision, and configure the date/time stamp.
Table of contents
Manual images
Click an image to enlargeQuick guide from the manual
Before using the Eko Cubix Mini Spy Camera for the first time, it is required to charge the device for two hours. The camera supports microSD cards up to 32GB (not included). Please ensure you comply with local privacy regulations regarding video surveillance.
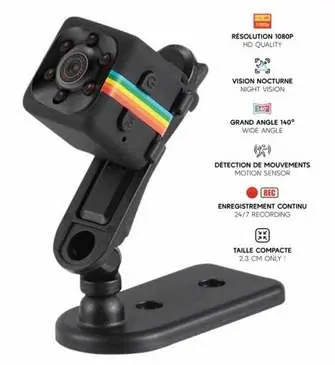
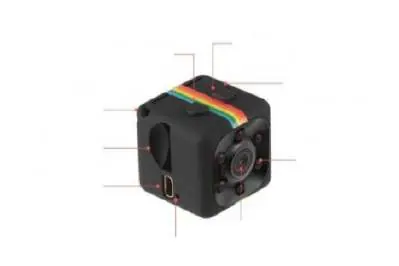
Device Overview
The camera features a Power button, Mode button, indicator lights, night vision sensor, HD camera lens, reset pinhole, Micro USB port, Micro SD card slot, and a lanyard hole.
Charging
Connect the mini camera to a PC USB port (stop recording first) or a 5V portable charger/220V wall charger. You can continue to use the camera while it is charging via an external power source. When fully charged, the blue light remains on and the red light turns off.
Video Recording
720p Recording: Press the On/Off button to turn on the camera (blue light on, standby mode). Press the On/Off button once to start recording; the blue light flashes 3 times and turns off. Press again to stop.
1080p Recording: Turn on the camera. Press the Mode button once to switch to 1080p mode (red and blue lights on). Press the On/Off button to start recording; the blue light turns off, and the red light flashes 3 times before turning off. Press again to stop.
Videos are automatically saved every 5 minutes.
Motion Detection
From standby mode (720p or 1080p), hold the Mode button for 3 seconds. The camera enters motion detection mode. Recording starts automatically when movement is detected, with red and blue lights flashing together.
Photos
Turn on the camera. Press the Mode button twice to enter photo mode (red light remains on). Press the On/Off button once to take a photo; the red light flashes once. The photo resolution is 4032x3024.
Night Vision
Turn on the camera. Hold the On/Off button for 2 seconds; the red light flashes twice to activate night vision. To deactivate, hold the On/Off button for 2 seconds; the red light flashes 3 times.
Date and Time Settings
Connect the camera to a computer. Create a text file named TIMERSET.txt at the root of the memory card. Enter the date and time in the format: YYYYMMDDHHMMSS Y (or N instead of Y if you do not want the timestamp on videos). Example: 20251020112752 Y.
Safety and Usage Warnings
Do not use the camera for illegal activities, espionage, or blackmail. Do not install in private or intimate areas (bathrooms, bedrooms, etc.). Do not expose to water, excessive humidity, or extreme temperatures. Do not leave the camera recording continuously without supervision to avoid overheating.
Official resources from the manual
Practical help
Common problems
Camera turns off automatically
The battery may be empty, the memory card is full, or the camera has timed out in standby mode (1 minute) to save battery.
Blue and red lights flash simultaneously for 5 seconds
This indicates the battery is empty or the memory card is full. The camera will save the video and turn off.
Blue and red lights flash, then camera turns off
The memory card is not installed.
Before use
- Charge the device for 2 hours before first use.
- Insert a microSD card (up to 32GB, not included).
- Ensure the camera is not used in private or intimate areas.
- Check local regulations regarding privacy and video surveillance.
Specs in practice
- Video Resolution
- Supports 1080p (Full HD) and 720p (adjustable).
- Battery Life
- Approximately 60 minutes of continuous recording.
Images and diagrams
- Power button: Turns the device on/off and starts/stops recording.
- Mode button: Switches between video modes, photo mode, and activates motion detection.
- Reset: Used to reset the device.
- Micro USB: Used for charging and data transfer.
Model compatibility
- Compatible with 5V portable chargers or 220V wall chargers.
- Requires a microSD card for operation.

Manual page author
David Miller
Documentation analyst
Organizes user manual content into clear summaries, with attention to model details, product context, and everyday usability.