Electronics / Monitors
User Manual for Element 1125C16-4 Flush Mount
Quick guide for installing the Element 1125C16-4 Flush Mount. Includes wiring instructions, assembly steps, and safety warnings for proper setup.
Table of contents
Quick guide from the manual
This document provides assembly and installation instructions for the Element 1125C16-4 Flush Mount lighting fixture. Before beginning, ensure all parts are present and the power is turned off at the circuit breaker. The installation requires basic tools and should be performed by a licensed electrician if you are in doubt.
Safety and Preparation
Warnings:
- Turn off electricity at the circuit breaker or main fuse box before starting installation.
- Disconnect the fixture from the power source before replacing bulbs.
- Allow bulbs sufficient time to cool before removal.
- If any parts are missing or damaged, do not attempt to install the fixture; contact customer service.
Tools Required: Flathead screwdriver, Phillips screwdriver, pliers, wire cutter, wire stripper, electrical tape, and safety glasses.
Installation Steps
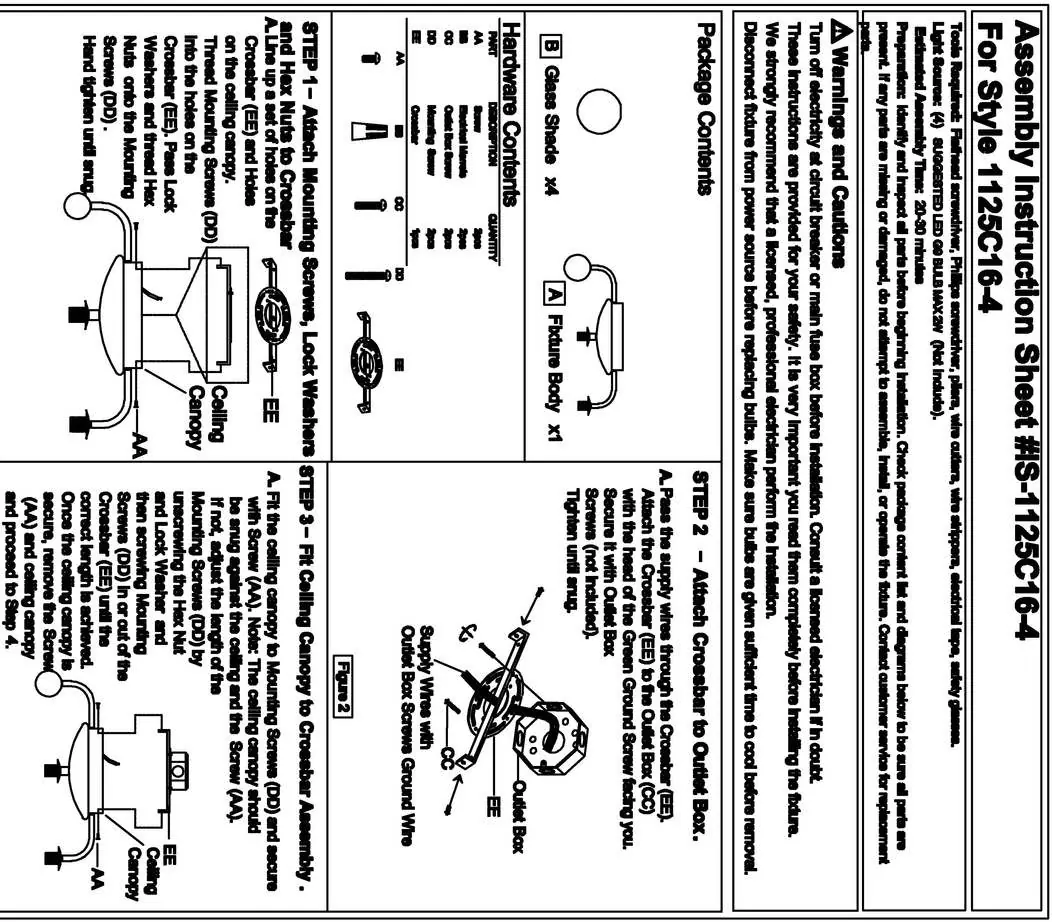
- Attach Crossbar: Pass supply wires through the mounting bracket (EE). Attach the bracket to the outlet box with the green ground screw facing you. Secure with outlet box screws (CC) and tighten until snug.
- Fit Ceiling Canopy: Align the canopy with the mounting screws (DD) and secure with screw (AA). If the canopy is not snug, adjust the length of the mounting screws by unscrewing the hex nut and lock washer, then screwing the mounting screws in or out of the crossbar until the correct length is achieved.
- Wire Connections: Use standard wire connectors to join wires. Twist connections until wires are lightly joined, wrap with electrical tape, and tuck into the outlet box. Connect white to white, black to black (or red), and ground to ground.
- Final Assembly: Install G9 LED bulbs (not included) into the sockets. Attach the glass shade to the fixture body.
Maintenance
To replace bulbs, ensure the fixture is disconnected from the power source and the bulbs have cooled down completely before removal. Use G9 LED bulbs as specified in the light source requirements.
Practical help
Common problems
Canopy is not snug against the ceiling
Adjust the length of the mounting screws (DD) by unscrewing the hex nut and lock washer, then screwing the mounting screws in or out of the crossbar until the correct length is achieved.
Missing or damaged parts
Do not attempt to assemble or install the fixture. Contact customer service for replacement parts.
Before use
- Turn off electricity at the circuit breaker or main fuse box.
- Verify all parts listed in the package contents are present.
- Ensure you have the required tools: screwdriver, pliers, wire cutter, wire stripper, and electrical tape.
- Purchase G9 LED bulbs (not included).
Specs in practice
- Light Source
- Requires (4) G9 LED bulbs (max 2W) for the 1125C16-4 model.
Images and diagrams
- The wiring diagram illustrates connecting the white, black, and ground wires from the outlet box to the corresponding wires on the fixture using wire connectors.
- The canopy adjustment diagram shows how to modify the mounting screw depth to ensure a flush fit against the ceiling.
Model compatibility
- Compatible with G9 LED bulbs.
- Requires a standard electrical outlet box for mounting.

Manual page author
Michael Turner
Technical manual editor
Reviews PDF manuals for structure, safety notes, and practical product details so readers can find the right information quickly.