Home Appliances / Small Kitchen Appliances
User Guide for George Home 2-Slice Toaster GPT101W-16 / GPT101B-16
Quick guide for the George Home 2-Slice Toaster (GPT101W-16/GPT101B-16). Includes setup, operation, cleaning, and safety instructions.
Quick answers from the manual
Quick answer
- This guide covers the operation of the George Home 2-Slice Toaster (GPT101W-16/GPT101B-16), including safety, first-time setup, toasting modes, and maintenance. p. 1, 5, 7
Key actions
- Perform burn-off procedure before first use p. 5, 6
- Clean crumb tray weekly p. 9
First start
- Plug in, set dial to 7, push lever down, and wait for it to pop up. Repeat until odour is gone. p. 5, 6
Problems and fixes
Bread jammed
Unplug the toaster before trying to remove the bread.
p. 3Maintenance and reset
- Change the fuse in the plug using a 10 amp fuse. p. 9
Technical specifications
| Parameter | Value | Meaning | Pages |
|---|---|---|---|
| Power | 850-1000W | Power consumption | p. 1 |
| Voltage | 220-240V~50-60Hz | Operating voltage | p. 1 |
Where to find it in the PDF
- Parts identification p. 4
- First use instructions p. 5, 6
- Operating instructions p. 7, 8
- Cleaning and fuse replacement p. 9
Table of contents
Manual images
Click an image to enlargeQuick guide from the manual
This document provides essential instructions for the George Home 2-Slice Toaster. Before using the appliance for the first time, it is necessary to perform a burn-off procedure to remove manufacturing residue. Always ensure the toaster is placed on a firm, level surface and kept away from flammable materials like curtains.
Parts of your toaster

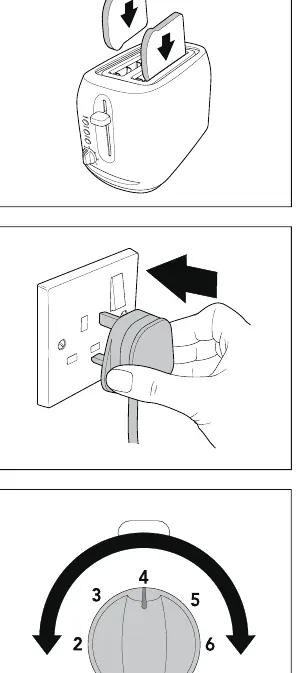
- Bread slots: Where you insert the bread.
- Control panel: Includes Defrost, Reheat, and Cancel buttons.
- Control dial: Adjusts the toasting level from 1 (lowest) to 7 (highest).
- Lever: Used to lower the bread and start the toasting cycle.
- Crumb tray: Located at the back; should be cleaned regularly.
Preparing for first use
Oil or manufacturing residue may remain on the heat elements, which can cause an odour during the first few uses. To resolve this:
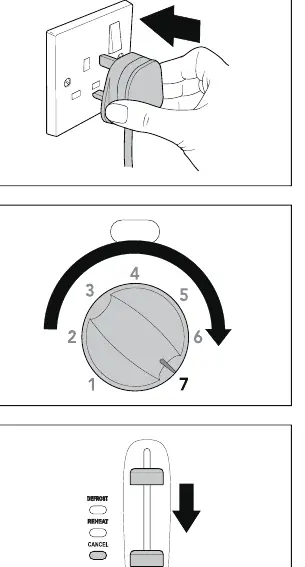
- Plug the toaster into the mains socket and turn the power on.
- Set the control dial to number 7.
- Push the lever down until it locks.
- Wait for the lever to pop up.
- Allow the toaster to cool and repeat the process until there is no more odour.
Using your toaster
- Ensure the crumb tray is fully inserted.
- Insert up to two slices of bread into the slots.
- Plug in and switch on the power.
- Set the control dial to your desired setting (start at 4 for standard toasting).
- Push the lever down until it locks.
- Defrost: To toast frozen bread, push the lever down and press the Defrost button.
- Reheat: To reheat cold toast, push the lever down and press the Reheat button.
- Cancel: Press the Cancel button at any time to stop the toasting cycle.
Cleaning and maintenance
Always ensure the toaster is disconnected from the power and completely cool before cleaning.
- Exterior: Use a damp cloth to clean the outside. Do not use abrasive cleaners or metal polish.
- Crumb tray: Pull out the tray at the back and dispose of the contents at least once a week if used regularly.
- Storage: When not in use, the power cord can be wound under the bottom of the toaster.
Changing the fuse
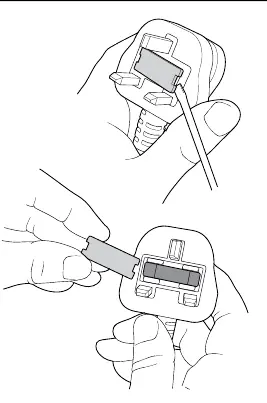
- Only use a 10 amp fuse.
- Use a screwdriver to pull the fuse holder in the plug cover upward until it is free.
- Slide the old fuse out and insert the replacement.
- Push the fuse holder back into the recess until it locks.
Safety warnings
- Do not use the toaster near combustible materials like curtains.
- Never insert metal foil, tools, or bread that is too thick into the toaster.
- Do not attempt to dislodge food while the toaster is in use.
- If the bread is jammed, unplug the toaster before trying to remove it.
- Do not operate the toaster by means of an external timer or remote-control system.
- The appliance must be connected to a protective ground.
Practical help
Common problems
Smoke or odour during first use
This is normal due to manufacturing residue. Perform the burn-off procedure described in the manual.
Bread is jammed
Unplug the toaster before trying to remove the bread. Use sliced bread to avoid jamming.
Toaster not working
Check the fuse in the plug (must be a 10 amp fuse) and ensure the power is switched on.
Before use
- Remove all protective wrapping
- Place on a firm, level surface
- Check that the voltage matches your home supply
- Perform the burn-off procedure
Images and diagrams
- Control panel: Features Defrost, Reheat, and Cancel buttons.
- Control dial: Settings 1-7 for adjusting toasting level.
- Crumb tray: Located at the back of the unit.
Model compatibility
- For household use only.
- Not intended for use by children under 8 years without supervision.
- Do not use with external timers or remote control systems.

Manual page author
Michael Turner
Technical manual editor
Reviews PDF manuals for structure, safety notes, and practical product details so readers can find the right information quickly.