Home Appliances / Personal Care
Grundig GSB 910 SW Soundbar User Manual
Quick guide for the Grundig GSB 910 SW soundbar. Includes setup, wall mounting, Bluetooth pairing, connection instructions, and technical specifications.
Quick answers from the manual
Quick answer
- The Grundig GSB 910 SW is a 2.1 channel soundbar system. It connects to TVs via HDMI (ARC), Optical, or AUX cables and supports wireless Bluetooth streaming for audio and subwoofer connection. p. 1, 12, 14
Key actions
- Pairing the subwoofer p. 10, 17
- Wall mounting p. 11, 18
First start
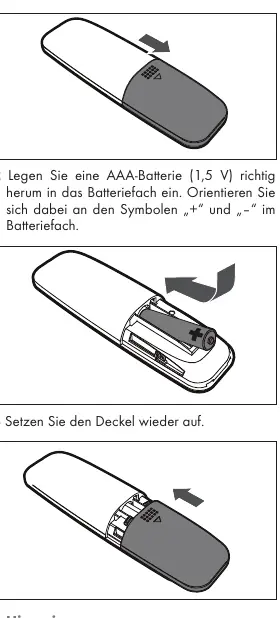
- Activate remote battery p. 9, 13
Problems and fixes
Subwoofer connection
Press the pair button on the rear panel of the subwoofer.
p. 10, 17Maintenance and reset
- Clean the device with a clean, dry cloth. Do not use cleaning agents. p. 6, 15
Technical specifications
| Parameter | Value | Meaning | Pages |
|---|---|---|---|
| Power Output | 2 x 20W (Soundbar) + 40W (Subwoofer) | Total system power output | p. 14, 21 |
Where to find it in the PDF
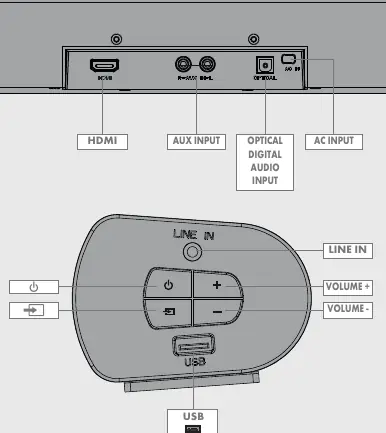
- Controls and Ports p. 3
- Wall Mounting p. 11
- Technical Data p. 14
Table of contents
Manual images
Click an image to enlargeQuick guide from the manual
The Grundig GSB 910 SW is a 2.1 channel soundbar system designed for audio playback. This guide covers essential setup, connection, and operation procedures. Ensure the soundbar has at least 10 cm of free space on all sides for proper ventilation.
Device Overview
The soundbar features a display screen and remote sensor on the front. The rear panel contains HDMI, AUX, and Optical inputs. The side panel includes power, source selection, volume controls, and a USB port for playback and software updates.
Installation and Wall Mounting
To mount the soundbar on a wall:
- Drill two holes with a 6 mm diameter, spaced 500 mm apart.
- Insert the provided plugs and screws.
- Leave 4 mm of space between the screw heads and the wall.
- Hang the soundbar on the screws.
Note: Professional installation (e.g., in a bistro) must be performed by a qualified electrician according to VDE 0100 regulations.
Connections
TV Connection: Connect via HDMI (ARC) for optimal synchronization, or use the Optical or AUX inputs. If using Optical, ensure the TV audio output is set to PCM.
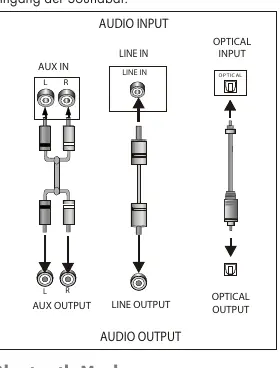
External Devices: Connect MP3 players or other analog sources to the AUX IN jack.
Subwoofer Connection: The subwoofer connects wirelessly via Bluetooth. If it does not connect automatically, press the pair button on the rear panel of the subwoofer.
Operation
Bluetooth Mode: Switch to Bluetooth mode using the source button. The soundbar will search for signals. Select "Grundig Soundbar 2.1" on your smartphone to pair. The Bluetooth symbol will remain lit when connected.
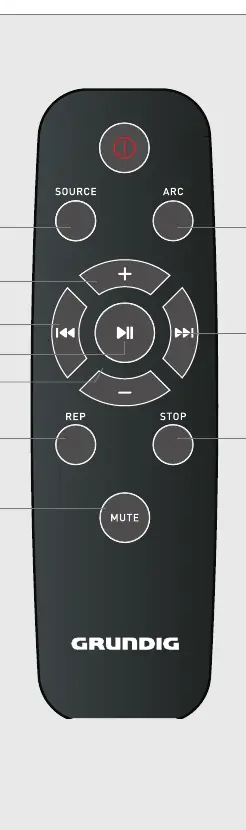
Remote Control: Use the remote to adjust volume, switch sources, control playback (play/pause/skip), and mute audio. The remote operates within an 8-meter range at a 30-degree angle.
Technical Specifications
- Power Supply: 100-240V~ 50/60Hz
- Soundbar Output: 2 x 20W
- Subwoofer Output: 1 x 40W
- Bluetooth Frequency: 2402 - 2480 MHz
Practical help
Common problems
Subwoofer not connecting
Press the pair button on the rear panel of the subwoofer to re-establish the wireless connection.
Remote control not responding
Check battery polarity or replace with a new AAA battery.
No sound from Optical connection
Ensure the TV audio output setting is configured to 'PCM'.
Before use
- Remove the battery protection film from the remote.
- Ensure at least 10 cm of clearance around the soundbar.
- Verify local mains voltage matches the device specifications.
- Ensure all external devices are connected before plugging in the power cable.
Specs in practice
- Power Supply
- 100-240V~ 50/60Hz
- Bluetooth Range
- Approximately 10 meters
- Remote Range
- Approximately 8 meters
Images and diagrams
- Page 3: Port layout and control buttons.
- Page 11: Wall mounting steps showing 500mm spacing.
- Page 12: Connection diagram for AUX, Line In, and Optical inputs.
Model compatibility
- Compatible with Bluetooth-enabled devices (smartphones, tablets, laptops).
- TV audio output must be set to PCM for digital optical connection.

Manual page author
David Miller
Documentation analyst
Organizes user manual content into clear summaries, with attention to model details, product context, and everyday usability.