Plumbing / Showers & Tubs
User Manual for Home Depot 18G Ice Maker
Quick guide for the Home Depot 18G Ice Maker. Learn how to operate, clean, maintain, and troubleshoot your portable ice maker with this essential user manual.
Table of contents
Manual images
Click an image to enlargeQuick Guide
This ice maker is designed for household use. Before first use, ensure the unit is placed on a level surface with at least 6 inches of clearance on all sides. Allow the refrigerant to settle for at least 1 hour before plugging the unit into a grounded 110-120V outlet. Always use potable drinking water; do not use milk, juice, or other liquids.
Safety Precautions
- Grounding: The appliance must be grounded. Do not use damaged cords or extension cords unless they meet the 14AWG/1875W minimum requirement.
- Placement: Keep away from direct sunlight and heat sources. Ensure proper ventilation.
- Handling: Do not tip the unit over. If moved, allow it to sit upright for a few hours before use.
- Maintenance: Unplug the unit before cleaning or servicing.
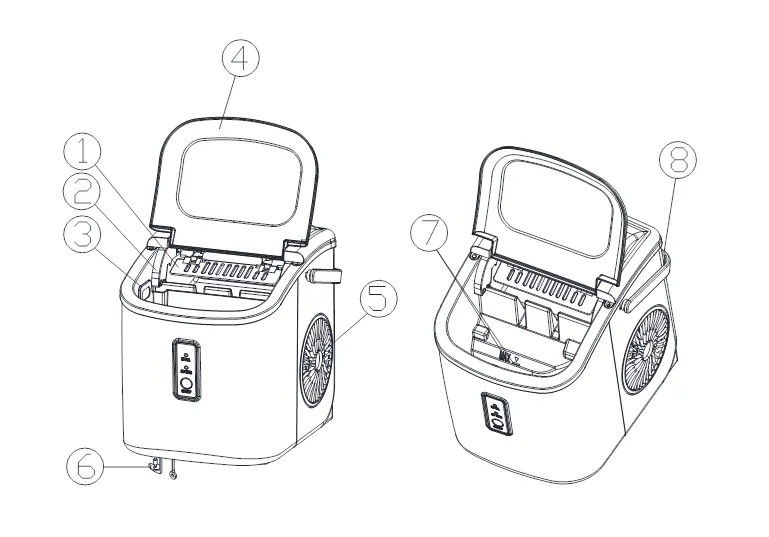
Unit Construction & Operation
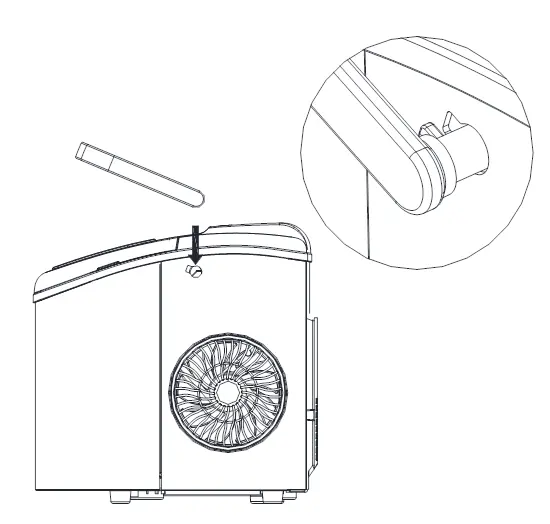
The unit features an ice scoop, ice full sensor, ice basket, and a transparent window. The control panel includes:
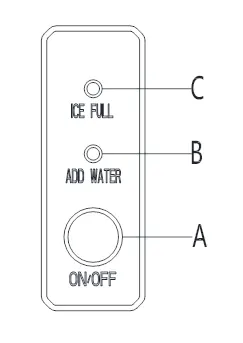
- A: ON/OFF button.
- B: ADD WATER indicator.
- C: ICE FULL indicator.
Automatic Self-Cleaning Program: Plug in the unit and press the ON/OFF button for more than 5 seconds to initiate the 30-minute cleaning cycle. Drain the water through the bottom outlet after completion.
Using Your Ice Maker
- Open the cover, remove the ice basket, and pour water into the tank, ensuring it stays below the maximum water level mark.
- Press the ON/OFF button to start the cycle.
- The cycle lasts approximately 6 to 13 minutes depending on ambient temperature (recommended 50°F to 105°F).
- If the water pump cannot inject water, the ADD WATER indicator will turn on. Refill the tank and press ON/OFF again.
- The unit stops automatically when the ice basket is full.
Maintenance & Cleaning
Regular maintenance ensures longevity and ice quality:
- Routine Cleaning: Clean the interior with diluted detergent, warm water, and a soft cloth. Rinse with clean water and drain via the bottom cap.
- Storage: If not in use for a long time, drain all water completely and dry the interior thoroughly.
- Water Quality: Change the water in the reservoir every 24 hours to maintain hygiene.
Troubleshooting
If you encounter issues, check the following:
- ADD WATER light on: Refill the water tank.
- ICE FULL light on: Remove ice cubes or clear any obstructions.
- Slow ice production: Ensure the hot air vent is not blocked and the water temperature is within the recommended range (44.6°F–89.6°F).
- Water leakage: Check if the drain plug is secure. If the leak persists, contact support.
Technical Parameters
- Model: IM-18A
- Power: 115V/60Hz
- Ice Making Current: 1.5A
- Refrigerant: R600a (0.60Oz/17g)
- Net Weight: 6.4Kg
- Dimensions: 222x294x290mm
Manufacturer information
The Home Depot
Practical help
Common problems
ADD WATER indicator turns on
The unit lacks water. Fill the tank to the max level and press the ON/OFF button to restart.
ICE FULL indicator turns on
The ice basket is full. Remove the ice cubes or clear any obstructions from the sensor area.
Ice-making is too slow
Ensure the hot air vent is not blocked and the water temperature is between 44.6°F and 89.6°F.
Water leakage
Ensure the drain plug at the bottom is securely in place. If the leak continues, contact support.
Before use
- Remove all exterior and interior packaging and tape.
- Place the unit on a level, stable surface.
- Ensure at least 6 inches of space around the back and sides of the unit.
- Allow the unit to sit for 1 hour to let refrigerant settle before plugging in.
- Clean the interior with diluted detergent and warm water.
- Ensure the power outlet is grounded and matches the 110-120V requirement.
Images and diagrams
- Parts identification: 1-8 labels identify the ice scoop, sensor, basket, window, air vent, drain cap, water level mark, and handle.
- Control panel: A (ON/OFF), B (ADD WATER indicator), C (ICE FULL indicator).
Model compatibility
- Use only potable/drinking water.
- Do not use milk, juice, or other liquids.
- Recommended room temperature: 50°F to 105°F.

Manual page author
David Miller
Documentation analyst
Organizes user manual content into clear summaries, with attention to model details, product context, and everyday usability.