Lighting / Fixtures
Installation Guide for Home Depot 1-Spray Dual Showerhead
Quick installation and usage guide for the Home Depot 1-Spray Dual Wall Mount Showerhead. Includes step-by-step assembly instructions, parts list, and operation modes.
Table of contents
Quick guide from the manual
This guide covers the installation and operation of the Home Depot 1-Spray Dual Wall Mount Showerhead. For optimal performance, it is recommended to keep the rain shower head positioned horizontally; do not tilt it. Ensure all connections are sealed with teflon tape, wrapping at least 12 rounds around the joints to prevent leaks.
Parts list
- Adjustable Extension Arm
- Showerhead
- Showerhead Holder
- Showerhead Bracket
- Stainless Steel Shower Hose
- Washers
- O-ring
- Teflon Tape
Installation
- Preparation: Unthread the old showerhead from the existing shower arm. Use a wrench if necessary. Note that the original shower arm is not included in this package.
- Attach Extension Arm: Attach the extension arm to the existing shower arm. Wrap teflon tape around the connection (12+ rounds). Tighten securely with a wrench.
- Install Showerhead: Attach the showerhead to the extension arm, ensuring the washer is in place. Adjust the angle as needed.
- Install Bracket: Attach the showerhead bracket to the extension arm. Use teflon tape on the joint (12+ rounds).
- Connect Hose: Install the flexible shower hose to the unit, ensuring washers are used at both ends.
Operation
The handheld unit features 4-Setting Modes. Push the switch by hand to cycle through the following functions:
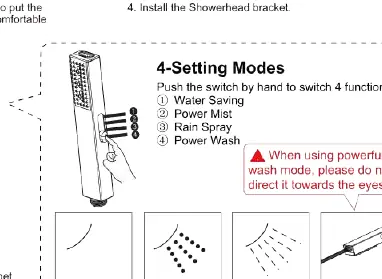
- Water Saving
- Power Mist
- Rain Spray
- Power Wash
Warning: When using the powerful wash mode, do not direct the spray towards the eyes.
Troubleshooting and maintenance
If you discover a missing part in the box, contact support for a replacement. Do not return the entire showerhead combo set to the warehouse without contacting support first. If you find a leak, ensure that you have used sufficient teflon tape (at least 12 rounds) on the threaded connections.
Manufacturer information
The Home Depot
Practical help
Common problems
Leaking at connections
Ensure you have wrapped the joint with teflon tape for at least 12 rounds to create a proper seal.
Missing parts
Contact the support team to have the specific part reshipped rather than returning the entire unit.
Showerhead tilting
The showerhead is designed to be positioned horizontally. Do not tilt it, as this can lead to water collecting.
Before use
- Ensure you have a wrench for installation.
- Verify you have all parts: Extension arm, showerhead, hose, washers, O-ring, and teflon tape.
- Check that your existing shower arm is compatible.
- Apply teflon tape to all threaded connections (12+ rounds).
Specs in practice
- 4-Setting Modes
- Includes Water Saving, Power Mist, Rain Spray, and Power Wash settings.
Images and diagrams
- Installation steps show the sequence of attaching the extension arm, showerhead, and hose.
- The 4-Setting Modes diagram illustrates the switch mechanism on the handheld showerhead.
Model compatibility
- Suitable for 8-inch, 10-inch, and 12-inch showerheads.
- Requires an existing wall-mounted shower arm (not included).

Manual page author
David Miller
Documentation analyst
Organizes user manual content into clear summaries, with attention to model details, product context, and everyday usability.