Tools / Drills
User Manual for HOTO XCQ01A Compressed Air Dust Collector
Quick guide for the HOTO XCQ01A Compressed Air Dust Collector. Learn how to use, clean, and maintain your handheld vacuum with our step-by-step instructions.
Table of contents
Manual images
Click an image to enlargeQuick guide from the manual
This manual covers the operation and maintenance of the HOTO XCQ01A handheld vacuum. Key procedures include charging the device, using the suction nozzle for cleaning, and maintaining the dust bin and filter.
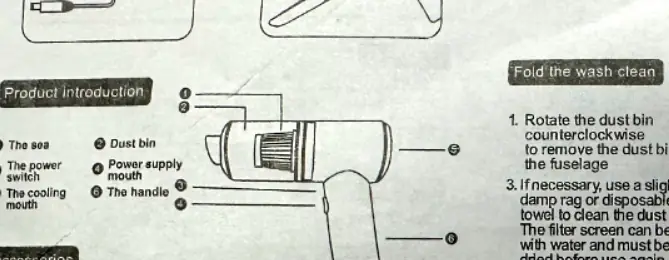
Product overview
The device consists of the main body, dust bin, power switch, cooling mouth, and power supply port. Accessories included are a charging cable and a multi-function suction nozzle.
Usage instructions
To use the device:
- Connect the charger to fully charge the battery.
- Attach the appropriate accessory based on the cleaning situation. The flat mouth nozzle is suitable for doors, seats, ashtrays, and crevices.
- Turn on the power switch to start cleaning.
Cleaning and maintenance
To clean the device:

- Rotate the dust bin counterclockwise to remove it from the fuselage.
- Empty the dust from the bin.
- Take out the filter, wash it with water, and ensure it is thoroughly dry before reuse.
- Reinstall the filter and dust bin by rotating in the opposite direction.
Safety warnings
- Do not repair or modify the product unless authorized.
- Do not cover the air inlet or exhaust outlet during operation to prevent overheating.
- Do not inhale combustibles such as burning cigarette butts.
- Keep the product away from children.
- Charge the device when the work indicator is off.
Technical specifications
- Model: XCQ01A
- Noise: Less than 50db
- Motor power: 20W
- Dimensions: 165 x 148 x 55mm
- Weight: About 250g
- Capacity: 0.1L
- Charging: USB charging
Manufacturer information
Shanghai HOTO Technology Co., Ltd.
Practical help
Common problems
Device overheating
Ensure the air inlet and exhaust outlet are not covered during operation.
Reduced suction
Check if the dust bin is full or if the filter needs cleaning.
Before use
- Charge the device fully before first use.
- Ensure the dust bin is securely attached.
- Select the appropriate nozzle for the surface (e.g., flat mouth for crevices).
Images and diagrams
- The diagram shows the dust bin removal process by rotating counterclockwise.
- The cleaning sequence illustrates removing the filter, washing it, and drying it.
Model compatibility
- The device uses USB charging.

Manual page author
Emily Carter
User documentation editor
Prepares concise manual descriptions and highlights the most useful setup, operation, and maintenance information for readers.