Home Appliances / Cooktops Hobs
User Manual for Hotpoint 097AOY54CIX Oven
Comprehensive user guide for the Hotpoint 097AOY54CIX oven. Includes installation instructions, safety warnings, operating procedures, cooking tables, cleaning tips, and maintenance steps.
Table of contents
Manual images
Click an image to enlargeQuick Guide
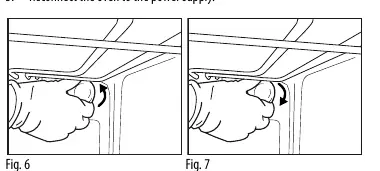
This oven is designed for domestic food preparation. Before using the appliance for the first time, remove all protective film, adhesive labels, and cardboard pieces. Heat the empty oven at 200°C for approximately one hour to eliminate odors from insulating materials and protective grease. Always ensure the oven is disconnected from the power supply before performing any installation or maintenance work.
Safety Instructions
- Installation and maintenance must be performed by a qualified technician.
- The appliance must be earthed.
- Do not use multiple plug adapters or extension leads.
- Keep children away from the oven during and after use as accessible parts become very hot.
- Do not obstruct the vent apertures above the control panel.
- Use oven gloves when handling hot accessories.
- Do not heat sealed jars or containers as they may explode.
- Avoid using flammable materials near the oven.
- If cooking with alcohol, be aware that vapors may catch fire.
Installation
Ensure the kitchen unit housing the oven is heat-resistant (minimum 90°C). Perform all cabinet cutting before fitting the oven and remove wood chips. The power cable must be long enough to reach the socket. An all-pole disconnect switch with a minimum contact gap of 3 mm must be utilized for compliance.
Operating the Oven
The control panel features a function selector knob, an electronic programmer, and a thermostat knob. To operate, turn the selector knob to the desired function and the thermostat knob to the required temperature. The thermostat LED will light up until the set temperature is reached.
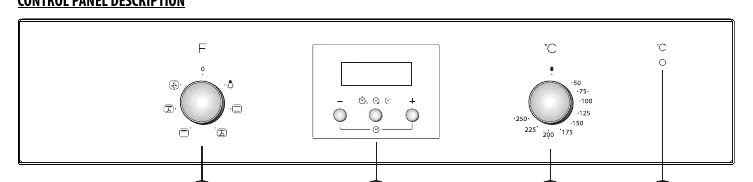
Electronic Programmer
Upon connection, the display will flash 'AUTO' and '0.00'. Use the '+' and '-' buttons to set the time of day. The middle button allows you to select settings such as the timer, cooking time, and cooking end time. To set a cooking duration, select the function and temperature, press the middle button, and use the '+' and '-' buttons to set the time.
Cooking Functions
- Conventional: Suitable for cooking any dish on one shelf.
- Convection Bake: Ideal for cakes with liquid filling or cooking on two levels.
- Grill: For steaks, kebabs, sausages, and toasting bread. Keep the door closed.
- Turbogrill: For large joints of meat. Keep the door closed.
- Defrosting: Speeds up thawing at room temperature.
Cleaning and Maintenance
Always clean the oven when it is cool. Do not use steam cleaning equipment, abrasive sponges, or metallic scrapers. Use a damp cloth for the exterior. For the interior, use proprietary oven detergents. The oven door can be removed for easier cleaning. If your model has catalytic side panels, do not use abrasive cleaners on them.
Replacing the Oven Lamp
Disconnect the oven from the power supply. Unscrew the lamp cover, replace the bulb (use 25-40W/230V E-14 or 20-40W/230V G9, depending on the model), and screw the cover back on.
Troubleshooting
- Oven does not work: Check the power supply and ensure the oven is connected. Try turning it off and on again.
- Door will not open: If the oven is in a self-cleaning cycle, wait for it to unlock automatically.
- Electronic programmer error: If the display shows 'F' followed by a number, contact your nearest After-sales Service and provide the error code.
Practical help
Common problems
Oven does not work
Check for mains power and ensure the oven is connected. Try restarting the appliance.
Door will not open
If the oven is in a self-cleaning cycle, wait until it unlocks automatically.
Electronic programmer error
If the display shows 'F' followed by a number, contact After-sales Service with the specific code.
Before use
- Remove all cardboard protection, protective film, and labels.
- Heat the empty oven at 200°C for one hour to remove manufacturing smells.
- Ensure the oven is earthed.
- Verify that the power voltage matches the appliance dataplate.
- Ensure kitchen units are heat-resistant to at least 90°C.
Specs in practice
- Conventional
- Standard cooking mode for single-shelf dishes.
- Convection Bake
- Uses fan for even heat distribution, ideal for cakes or multi-level cooking.
Images and diagrams
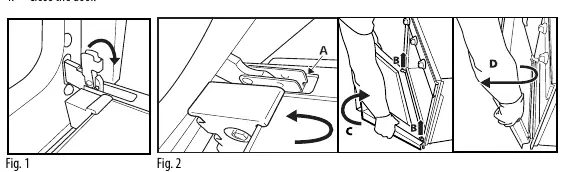
- Door removal: Open fully, lift catches, close partially, lift and turn to release.
- Heating element: Pull out and lower to access the roof of the oven for cleaning.
- Lamp replacement: Unscrew cover, replace bulb, and screw cover back on.
Model compatibility
- Use dark-colored metal cake tins for best heat absorption.
- Use pyrex or stoneware for cooking, but note that cooking times may be longer.
- Only use 25-40W/230V E-14 or 20-40W/230V G9 lamps (model dependent).

Manual page author
David Miller
Documentation analyst
Organizes user manual content into clear summaries, with attention to model details, product context, and everyday usability.