Home Appliances / Cooktops Hobs
Hotpoint NSWM 1045C Washing Machine
A comprehensive guide for the Hotpoint NSWM 1045C washing machine, covering wash cycle settings, detergent usage, maintenance procedures, and troubleshooting common operational issues.
Table of contents
Manual images
Click an image to enlargeQuick guide from the manual
Before using your Hotpoint NSWM 1045C, ensure that the transport bolts have been removed as per the installation guide. For the first use, run an empty wash cycle using the Auto-Clean program to prepare the machine. Always sort laundry by fabric type and color, and check pockets for loose objects before loading.
Control Panel
The control panel allows you to manage all washing functions:
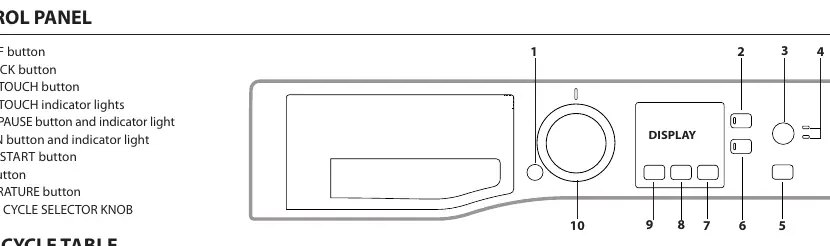
- ON/OFF button: Powers the machine on or off.
- Start/Pause button: Starts or pauses the selected wash cycle.
- Wash Cycle Selector Knob: Used to select the desired program.
- Temperature and Spin buttons: Allow for manual adjustment of cycle parameters.
- Delay Start: Sets a delayed start time for the cycle.
- Extra Touch: Provides options for Rapid cycle or Steam Hygiene.
Wash Cycles
The machine offers various cycles tailored to different fabric types and soil levels. The Eco 40-60 cycle is the most efficient for normally soiled cotton. Other cycles include Cotton, Synthetics, Delicates, Wool (Woolmark approved), Anti Allergy, and specialized cycles like Baby, Duvet, and 30 min. Always refer to the garment care label for the maximum recommended temperature.
Detergent Dispenser Drawer
The drawer has specific compartments for additives:
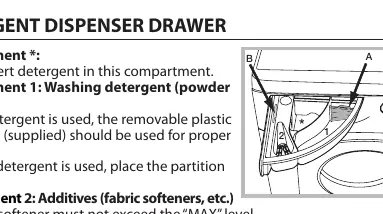
- Compartment 1: Washing detergent (powder or liquid). Use the supplied partition for liquid detergent.
- Compartment 2: Additives (fabric softeners). Do not exceed the MAX level.
Use powder detergent for white cotton garments, pre-washing, and temperatures over 60°C.
Care and Maintenance
Regular maintenance ensures the longevity of your appliance:
- Cleaning the machine: Use a soft cloth with lukewarm soapy water. Do not use solvents.
- Auto-Clean: Run this cycle every 40 washes without laundry to clean internal parts.
- Cleaning the pump: The pump is self-cleaning, but small items may get stuck in the pre-chamber. Access it by removing the front plinth panel.
- Door and Drum: Leave the door ajar after use to prevent odors.
Troubleshooting
If the machine fails to start, check the power supply, door closure, and the Start/Pause button. If an H2O error appears, check the water inlet hose and tap. If the machine vibrates excessively, ensure the transport bolts were removed and the machine is level.
Practical help
Common problems
Washing machine does not start
Check if the appliance is plugged in, there is power in the house, the door is closed properly, and the Start/Pause button has been pressed.
H2O error on display
Check if the water inlet hose is connected, the tap is open, and there is sufficient water pressure.
Excessive vibration during spin
Ensure transport bolts were removed during installation, the machine is level, and it is not wedged between furniture.
Too much foam
Ensure the detergent is suitable for machine washing and reduce the amount of detergent used.
Before use
- Remove transport bolts
- Check water inlet hose connection
- Run Auto-Clean cycle for first use
- Sort laundry by fabric and color
- Check pockets for loose objects
- Ensure detergent is suitable for machine washing
Images and diagrams
- Control Panel: Located at the top, features the display and buttons for cycle selection, temperature, spin speed, and options.
- Detergent Dispenser: Located on the top left, includes compartments for detergent (1) and fabric softener (2).
Model compatibility
- Stacking kit: Contact Technical Assistance to check availability for this model to secure a tumble dryer on top.

Manual page author
Michael Turner
Technical manual editor
Reviews PDF manuals for structure, safety notes, and practical product details so readers can find the right information quickly.