Home Appliances / Cooktops Hobs
User Manual for Hotpoint 1234X Induction Hob
Comprehensive user guide for the Hotpoint 1234X induction hob. Includes detailed installation instructions, electrical connection diagrams, power management settings, daily operation, cleaning tips, and troubleshooting codes.
Table of contents
Manual images
Click an image to enlargeQuick Guide
This manual provides essential instructions for the safe installation and operation of your Hotpoint 1234X induction hob. Always read the safety instructions before use. Ensure the hob is installed by a qualified technician and that the electrical connection matches your home's power supply. Use only ferromagnetic cookware with a flat base for optimal performance.
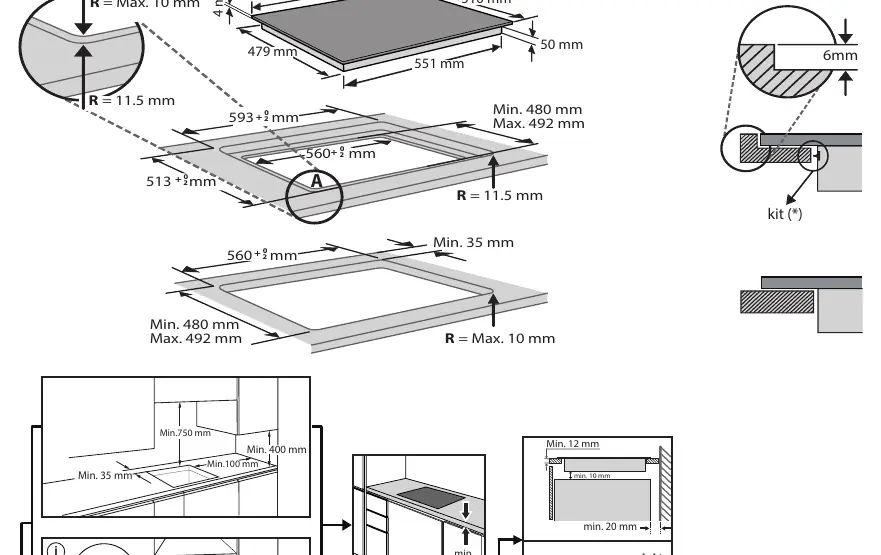
Installation and Electrical Connection
The appliance must be installed by a qualified technician in compliance with local regulations. Before installation, ensure the cabinet is cut to the correct dimensions as specified in the installation diagrams. The appliance must be earthed. Electrical connection must be made before connecting to the power supply. Ensure the voltage on the data plate matches your home's voltage. Do not use extension leads or multiple sockets.

Product Description
The control panel features touch-sensitive buttons for power levels, timer settings, and special functions. Key elements include the scroll keypad for power adjustment, the Flexi Space button for combining cooking zones, and the My Menu button for accessing special functions like melting, keeping warm, and slow cooking.
First Time Use
Upon first connection, you must set the power management level within 60 seconds. Press the far right timer '+' button for at least 5 seconds until 'PL' appears, then use '+' and '-' to select the desired power level (2.5 kW, 4.0 kW, 6.0 kW, or 7.2 kW). Confirm by pressing the OK button. The hob also features a Demo Mode; if 'DE' appears on the display, follow the instructions in the manual to deactivate it.
Daily Use
To activate a cooking zone, move your finger horizontally across the scroll keypad. Use the 'P' button for the Booster function. The Flexi Space feature allows you to combine two cooking zones for larger or oval cookware. The My Menu button provides access to automatic functions: Melting, Keep Warm, and Slow Cooking. Always place pots in the center of the cooking zone.
Cleaning and Maintenance
Clean the hob after each use when it is cool. Do not use abrasive sponges, scouring pads, or steam cleaning equipment. Use a scraper for stuck residues. If the CleanProtect logo is present, follow the specific soaking instructions provided in the manual to maintain the coating.
Troubleshooting
If an error code appears (e.g., F0E1, F0E7, F0EA), consult the troubleshooting table. F0E1 typically indicates incompatible or poorly positioned cookware. F0E7 indicates a wiring issue. F0EA or F0E9 indicates overheating; allow the hob to cool down before restarting. If problems persist, contact the After-Sales Service.
Practical help
Common problems
F0E1 Error Code
Cookware is not detected or incompatible. Reposition the pot or use different, induction-compatible cookware.
F0E7 Error Code
Wrong power cord connection. Verify the electrical wiring against the installation diagram.
F0EA / F0E9 Error Code
Internal overheating. Wait for the hob to cool down before using it again.
d E displayed when hob is off
Demo mode is active. Follow the 'Demo Mode' section in the manual to deactivate it.
Before use
- Ensure installation is performed by a qualified technician.
- Verify that the home voltage matches the appliance data plate.
- Check that all packaging materials are removed.
- Use only ferromagnetic pots and pans with a flat base.
- Set the power management level within 60 seconds of initial power-up.
Specs in practice
- Power Levels
- Adjustable to 2.5 kW, 4.0 kW, 6.0 kW, or 7.2 kW to match home electrical limits.
Images and diagrams
- Installation diagrams show required clearances and cutout dimensions.
- Electrical connection diagrams illustrate wiring for 230V and 400V configurations.
- Control panel diagram identifies all touch zones and indicators.
Model compatibility
- Only use ferromagnetic cookware (stainless steel with sandwich base, enamelled steel, cast iron).
- Avoid adapter plates as they reduce efficiency and may cause overheating.
- Ensure the pot base diameter matches the cooking zone size.

Manual page author
David Miller
Documentation analyst
Organizes user manual content into clear summaries, with attention to model details, product context, and everyday usability.