Furniture / Chairs & Seating
Ivy Bronx LED Pendant Light Installation Manual
Quick installation and wiring guide for Ivy Bronx LED pendant lights. Includes step-by-step assembly instructions, dimmer compatibility details, and safety precautions for 120VAC systems.
Table of contents
Quick guide from the manual
This document provides installation and wiring instructions for the Ivy Bronx LED pendant light. Before starting, ensure the power is disconnected at the circuit breaker. This fixture is designed for 120VAC/60Hz circuits and is compatible with TRIAC (forward-phase) and ELV (reverse-phase) dimmers. It is suitable for dry or damp indoor locations and can be installed on ceilings with a slope of up to 65 degrees.
Assembly Instructions
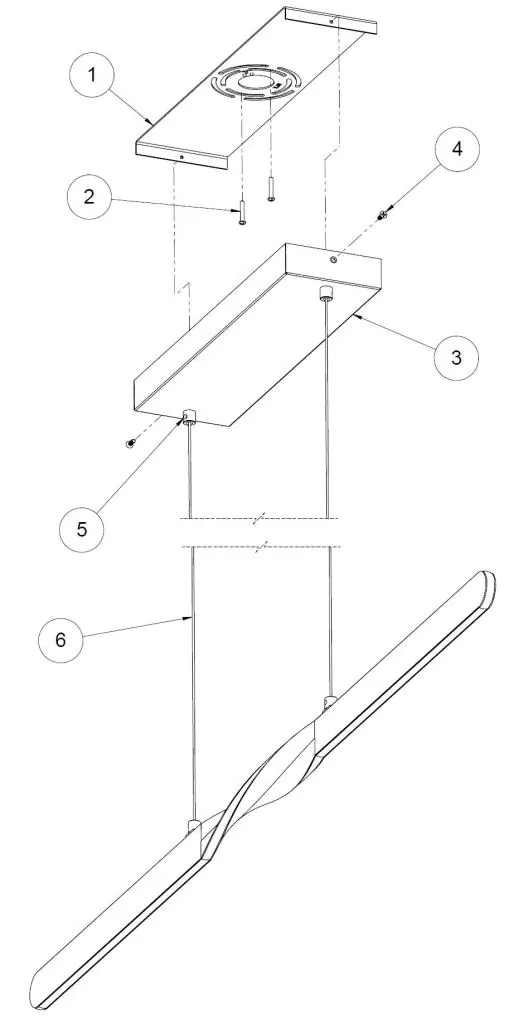
- Preparation: Disconnect power. Remove the fixture and parts from the carton. Remove the mounting bracket (1) from the fixture (3) by unscrewing the two screws (4).
- Mounting Bracket: Install the mounting bracket (1) to your junction box using the provided screws (2).
- Cord Adjustment: To adjust the height, loosen the strain relief set screws (5) counterclockwise. Slide the cord to the desired length, then re-tighten the screws. Excess cord can be coiled inside the canopy.
Wiring
All wiring must be performed inside the junction box. If supply wires are within three inches of the LED driver, ensure they are rated for at least 90°C (194°F).
- Grounding: Connect the green wire from the fixture to the supply ground wire.
- Non-dimming: Connect the white fixture wire to the white (N) supply wire and the black fixture wire to the black (L) supply wire.
- TRIAC Dimming: Connect the white fixture wire to the neutral (N) wire and the black fixture wire to the control line (L) wire, following the dimmer manufacturer's instructions.
Final Mounting
Install the fixture (3) over the mounting bracket (1) by aligning the side holes and securing it with the two screws (4). Restore power at the circuit breaker once installation is complete.
Practical help
Common problems
Fixture not dimming correctly
Ensure you are using a compatible TRIAC (forward-phase) or ELV (reverse-phase) dimmer and that wiring follows the dimmer manufacturer's instructions.
Cord length needs adjustment
Loosen the strain relief set screws (5) counterclockwise to allow the cord to slide. Adjust to the desired height and re-tighten the screws.
Wiring safety concern
If supply wires are within three inches of the LED driver, they must be rated for at least 90°C (194°F).
Before use
- Turn off power at the fuse or circuit breaker box.
- Verify the junction box is compatible and securely installed.
- Check supply wires for damage or scrapes.
- Ensure the ceiling slope does not exceed 65 degrees.
- Confirm the power source is 120VAC/60Hz.
Specs in practice
- 65° max slope
- The maximum angle of the ceiling on which this fixture can be safely installed.
Images and diagrams
- 1: Mounting bracket
- 2: Mounting screws
- 3: Fixture canopy
- 4: Side screws for fixture
- 5: Strain relief set screws
Model compatibility
- Suitable for dry or damp indoor locations.
- Requires a junction box (not included).
- Compatible with TRIAC and ELV dimmers.

Manual page author
Emily Carter
User documentation editor
Prepares concise manual descriptions and highlights the most useful setup, operation, and maintenance information for readers.