Home Appliances / Brewing Systems
BrewZilla 100L Brewing System Three-Phase Conversion Guide
A technical guide for converting the BrewZilla 100L brewing system from single-phase to three-phase power. Includes wiring instructions, terminal identification, and safety checks.
Table of contents
Manual images
Click an image to enlargeImportant Safety Information
This conversion process involves high-voltage electrical components and must only be performed by a qualified electrician. Ensure the brewery is completely unplugged from the power source before beginning any work.
Power Consumption Overview
The BrewZilla 100L features three concealed heating elements integrated into the base. Each element is approximately 2200 watts, resulting in a total heating capacity of 6600 watts. While the unit comes standard with a 32A single-phase plug, converting to a three-phase power source allows for a more even load distribution across the property's electrical phases.
Three-Phase Installation Procedure
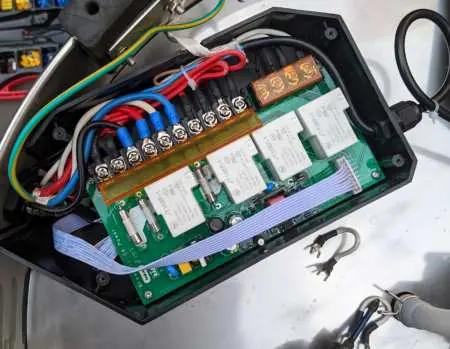
- Access the Enclosure: Unplug the brewery, turn it upside down, and remove the cover from the electrical enclosure on the underside.
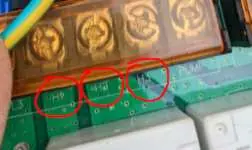
- Identify Terminals: Locate the three terminals on the control board labeled H1, H2, and H3. These are connected to the active sides of the heating elements. Remove the jumper cables that bridge H1, H2, and H3 together.
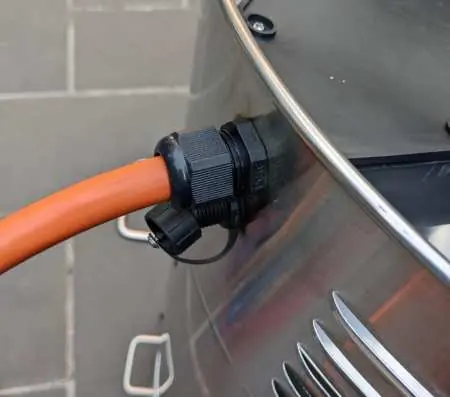
- Install Cable: Remove the existing single-phase cable and install the new three-phase cable. Ensure the cable is securely fastened through the cable gland. In most instances, a 2.5mm² three-phase cable is required, but verify specific requirements with your electrician.
Wiring and Testing
Follow these steps to complete the electrical connections:
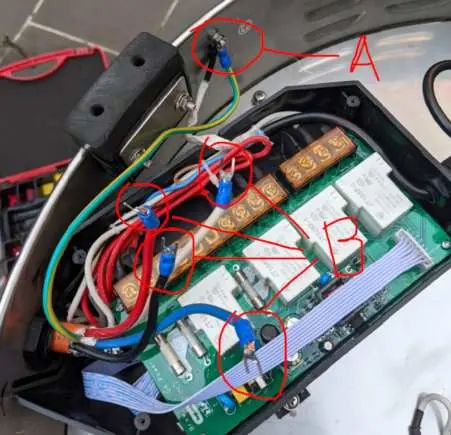
- Earth Connection: Connect a ring terminal to the earth wire and secure it to the body of the BrewZilla.
- Active and Neutral Connections: Attach fork terminals to the three active phases and the neutral wire.
- Wiring Configuration: Connect the wires as follows:
- Live 1 to H1
- Live 2 to H2
- Live 3 to H3
- Neutral to N3
- Color Coding: Note that cable colors vary by country. In Australia, the standard is Red (Live 1), White (Live 2), Blue (Live 3), and Black (Neutral). Always verify local regulations regarding active and neutral wire colors.
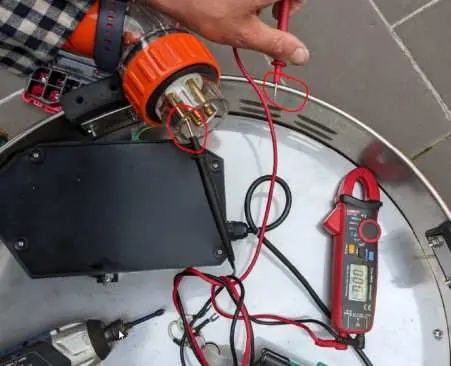
- Final Check: Replace the electrical enclosure lid. Use a multimeter to check for continuity between the body of the BrewZilla and the Earth pin on the plug. The resistance should be close to 0 Ohms.
Practical help
Common problems
Incorrect wiring configuration
Ensure Live 1 is connected to H1, Live 2 to H2, Live 3 to H3, and Neutral to N3.
High resistance during continuity test
Verify that the earth connection is securely attached to the metal body of the unit and that all terminals are tightened.
Before use
- Ensure the unit is completely disconnected from the power source.
- Verify that a qualified electrician is performing the installation.
- Confirm you have the correct 2.5mm² three-phase cable.
- Have a multimeter ready for the final continuity check.
- Check local regulations for wire color coding standards.
Specs in practice
- Total Heating Capacity
- 6600 Watts (3 x 2200W elements).
- Standard Power
- 32A Single Phase.
- Recommended Cable
- 2.5mm² three-phase cable.
Images and diagrams
- H1, H2, and H3 terminals are located on the control board and must have jumper cables removed.
- The earth wire requires a ring terminal secured to the brewery body.
- Active and neutral wires require fork terminals for connection to the board.
Model compatibility
- Conversion must be performed by a qualified electrician.
- Cable colors for active/neutral may vary by country; check local regulations.

Manual page author
Emily Carter
User documentation editor
Prepares concise manual descriptions and highlights the most useful setup, operation, and maintenance information for readers.