Home Appliances / Small Kitchen Appliances
User Manual for Korona 21305 2-Slice Toaster
Quick guide for the Korona 21305 2-Slice Toaster. Learn how to operate, clean, and maintain your toaster, including safety warnings and troubleshooting tips.
Quick answers from the manual
Quick answer
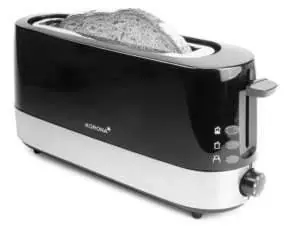
- The Korona 21305 is a 2-slice toaster. Before first use, preheat it on the highest setting without bread to burn off manufacturing residues. Always unplug after use and clean the crumb tray regularly. p. 7, 16
Key actions
- Preheating p. 7, 16
- Cleaning p. 9, 18
First start
- Remove packaging, place on heat-resistant surface, preheat on max setting without bread for 3-4 minutes. p. 7, 16
Problems and fixes
Bread stuck
Unplug, let cool, remove without sharp metal objects.
p. 7, 16Technical specifications
| Parameter | Value | Meaning | Pages |
|---|---|---|---|
| Power | 720-850W | Rated power consumption | p. 9, 18 |
Where to find it in the PDF
- Product Description p. 6, 15, 24, 33
- Operation p. 7, 8, 16, 17
Table of contents
Manual images
Click an image to enlargeQuick guide from the manual
This guide provides essential information for operating the Korona 21305 2-Slice Toaster. Before using the appliance for the first time, it is necessary to perform a preheating cycle without bread to remove any manufacturing residues. Always ensure the toaster is placed on a stable, heat-resistant surface and kept away from flammable materials like curtains.
Product description
The toaster features the following components:
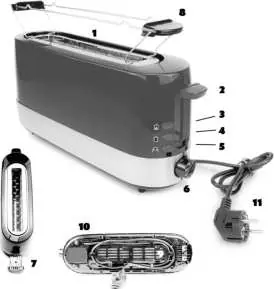
- 1. Bread slot
- 2. Toasting lever
- 3. Defrost button with indicator light
- 4. Reheat button with indicator light
- 5. Cancel button with indicator light
- 6. Browning control (Min. – Max.)
- 7. Crumb tray
- 8. Removable bun warmer
- 9. Cable guide (rear side)
- 10. Cable storage
- 11. Power cord and plug
Before first use
Follow these steps to prepare your toaster:
- Remove all packaging materials.
- Place the toaster on a flat, stable, and heat-resistant surface.
- Unwind the power cord completely and secure it in the cable guide.
- Connect to a properly installed wall socket.
- Set the browning control to the maximum level and push the toasting lever down. Let the toaster heat up for 3-4 minutes without any bread inside.
- Allow the unit to cool down completely and clean it before regular use.
Operation
Toasting: Insert bread into the slot, select the desired browning level, and push the toasting lever down until it locks. The cancel button light will illuminate. The toaster will switch off automatically when the cycle is complete.
Bun Warmer: Always use the removable bun warmer for buns or croissants. Never place them directly into the bread slots. Do not cover the bun warmer completely to avoid heat accumulation.
Reheat and Defrost: Use the respective buttons (Reheat or Defrost) after inserting the bread and pushing down the toasting lever. The corresponding indicator lights will turn on.
Cleaning and maintenance
Always unplug the toaster and let it cool down before cleaning. Never immerse the appliance in water. Regularly pull out the crumb tray to remove accumulated bread crumbs. Clean the exterior with a soft, slightly moistened cloth.
Safety warnings
- Do not operate the toaster near flammable materials.
- Never leave the toaster unattended during operation.
- Do not insert metal objects into the bread slots.
- If a slice of bread gets stuck, unplug the device and let it cool before removing it.
- Do not use the toaster with an external timer or remote control system.
Manufacturer information
Korona electric GmbH
Practical help
Common problems
Toaster does not switch off automatically
Press the cancel button or unplug the device immediately.
Smoke or smell during first use
This is normal due to manufacturing residues; ensure good ventilation.
Bread stuck in slot
Unplug the device, let it cool down, then remove the bread without using sharp metal objects.
Before use
- Remove all packaging
- Place on a stable, heat-resistant surface
- Unwind power cord
- Preheat on max setting without bread for 3-4 minutes
Images and diagrams
- 1. Bread slot
- 2. Toasting lever
- 3. Defrost button
- 4. Reheat button
- 5. Cancel button
Model compatibility
- Not intended for commercial use.
- Do not use with external timers or remote control systems.

Manual page author
Emily Carter
User documentation editor
Prepares concise manual descriptions and highlights the most useful setup, operation, and maintenance information for readers.