Documents / Warranty Safety
Installation Guide for Kuryakyn 4025 ISO Brake Pedal Pad
Step-by-step installation guide for the Kuryakyn 4025 ISO Brake Pedal Pad. Includes safety warnings, tool requirements, and adhesive application instructions for proper mounting.
Table of contents
Manual images
Jump to the sectionQuick guide from the manual
This document provides instructions for installing the Kuryakyn 4025 ISO Brake Pedal Pad. Ensure the motorcycle is parked on a hard, level surface and the engine and exhaust system have fully cooled before beginning installation to prevent injury.
Tools required
- Set of Hex Wrenches
Installation procedure

- Preparation: Park the motorcycle on a hard, level surface, turn off the ignition, and allow the engine and exhaust system to cool completely.
- Positioning: Start the set screws in the locations marked "1" and "4" on the diagram. Place the bottom cover half under the brake pedal.
- Securing: Tighten the set screw marked "1".
- Assembly: Place the top half of the cover into position. Secure the top and bottom halves together using the two #8-32 socket head cap screws marked "2" and "3".
- Finalizing: Snug the remaining set screw marked "4".
- Rubber Pads: Thoroughly clean the recessed surfaces of the brake pedal pad. Peel the backing off the two rubber pads and press them firmly into position for one full minute. Full bonding occurs in 24 hours.
Important safety and installation notes
- Temperature restriction: Do not attempt installation if the ambient temperature is below 50°F, as the adhesive will not bond correctly.
- Fastener security: It is the installer's responsibility to ensure all fasteners (including pre-assembled ones) are tightened before operating the motorcycle.
- Surface preparation: Ensure the installation area is free of grease, oil, dirt, or debris to guarantee proper adhesion.
Practical help
Common problems
Adhesive not sticking
Ensure the installation surface is thoroughly cleaned of grease, oil, and dirt. Do not attempt installation in temperatures below 50°F.
Loose components
Verify that all fasteners, including pre-assembled ones, are tightened before operating the motorcycle.
Before use
- Park on a hard, level surface
- Turn off the ignition
- Allow engine and exhaust to cool completely
- Verify all parts are present (Top/Bottom halves, inserts, screws)
- Ensure ambient temperature is at least 50°F
Specs in practice
- #8-32 x .313” socket head cap screw
- Used to secure the top and bottom cover halves together.
- #10-32 x .250” setscrew
- Used to secure the pedal assembly to the brake pedal.
Images and diagrams
- PIC 1 illustrates the specific locations for set screws and cap screws on the pedal assembly.
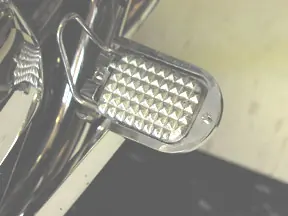
- PIC 2 shows the final appearance of the installed ISO Brake Pedal Pad.
Model compatibility
- Intended for specific applications; check the Kuryakyn catalog for Harley-Davidson or GL & Metric Cruisers compatibility.

Manual page author
Emily Carter
User documentation editor
Prepares concise manual descriptions and highlights the most useful setup, operation, and maintenance information for readers.