Garden / Hot Tubs
User Manual for Lifesmart Acrylic Spas
Quick guide for Lifesmart Acrylic Spas. Includes installation, electrical requirements, control panel operation, water chemistry, maintenance, and troubleshooting.
Table of contents
Manual images
Click an image to enlargeQuick guide from the manual
This manual provides essential instructions for the safe operation and maintenance of Lifesmart Acrylic Spas. Before operating, ensure the spa is filled with water to avoid damage. Always test the GFCI breaker before use. If you encounter issues, review the troubleshooting section or contact Customer Service at 888-961-7727 Ext. 8440.
Installation
Proper placement is critical for safety and service access. Ensure the foundation is solid, level, and capable of supporting the weight of the spa, water, and occupants. The area must provide adequate drainage away from the spa. For indoor installations, ensure proper ventilation to manage humidity.
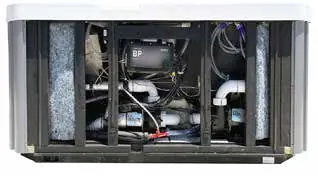

Electrical Requirements
Electrical installation must be performed by a licensed electrician in accordance with the National Electric Code (NEC). Do not power the spa without first filling it with water.
- 115V Models: Use the factory-installed GFCI cord. Plug directly into a dedicated grounded 115V, 15A outlet (6-10 feet from the spa).
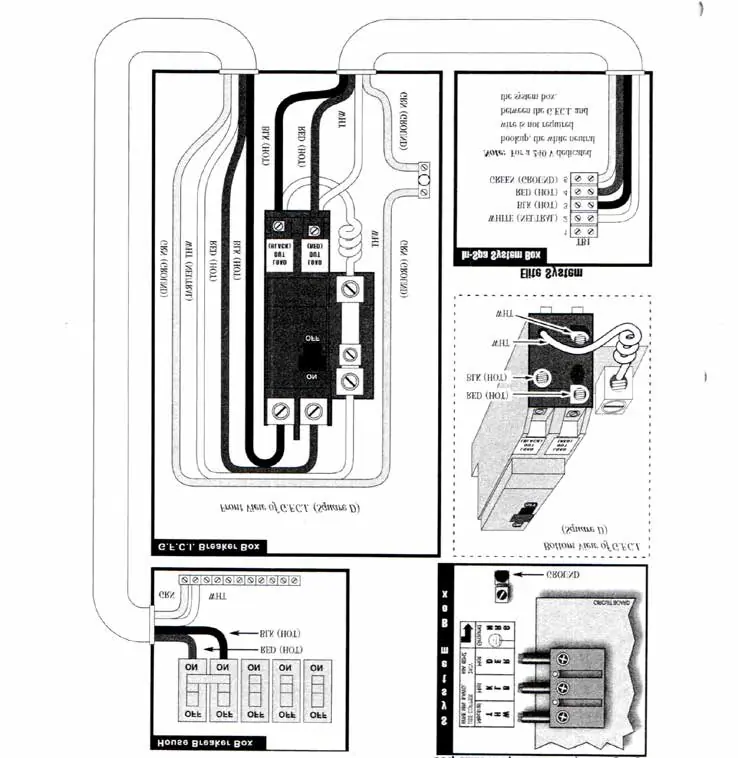
- 230V Models: Must be hard-wired to a dedicated circuit breaker.
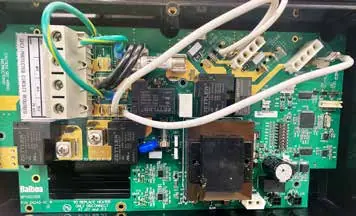
- Conversion: 115V to 230V conversion requires specific wiring changes on the control board (J24 jumpers, F3 fuse, etc.) and must be performed by a professional.
Control Panel Operation
The control panel manages temperature, jets, and lighting.
- Priming Mode: Occurs automatically on startup (4-5 minutes). The heater is disabled during this time.
- Temperature: Adjustable between 80°F-104°F (High Range) or 50°F-99°F (Low Range).
- Heat Modes: Ready Mode (heats 24/7) and Rest Mode (heats only during filter cycles).
- Filter Cycles: Programmable start time and duration.
- Locking: Panel and temperature settings can be locked to prevent unauthorized changes.
Water Chemistry
Maintaining water quality is the owner's responsibility. Recommended levels:
- Free Available Chlorine: 3.0-5.0 ppm
- Total Alkalinity: 40-120 ppm
- Water pH: 7.2-7.8
- Calcium Hardness: 75-150 ppm
Always run the jet pump for at least 10 minutes after adding chemicals.
Maintenance
- Filter Cartridge: Check and clean weekly. Replace or deep clean every four weeks using a filter degreaser. Never scrub with a brush.
- Cover Care: Clean monthly with mild soap and water. Do not use abrasive cleaners.
- Draining/Winterizing: Turn off the breaker before draining. Use a wet-vac to remove water from lines during winterization to prevent freezing damage.
Practical help
Common problems
Pump operates but no water flows to jets
The pump may not be primed. Press the Jets button several times (do not run motor for more than 5-10 seconds without water).
Water is too hot
Check desired temperature on control panel. Remove cover to promote heat reduction. Ensure spa is not in direct sunlight.
GFCI breaker trips immediately
Check the White Neutral Wire connection to the spa.
Control panel displays OH (Overheat)
Spa is deactivated. Remove cover, allow water to cool below 104°F, then reset power.
Before use
- Ensure spa is filled with water before powering on.
- Test the GFCI breaker before each use.
- Check water chemistry (pH 7.2-7.8, Chlorine 3-5 ppm).
- Ensure all jets are in the open position.
- Lock the cover when not in use.
Images and diagrams
- Wiring diagram shows connections for 230V GFCI breaker.
- Control panel layout for 1-pump and 2-pump models.
- Filter cartridge assembly and removal steps.
Model compatibility
- Willow (LSA-510L) supports 115V or 230V.
- Acacia and Palmetto models require 230V.

Manual page author
Emily Carter
User documentation editor
Prepares concise manual descriptions and highlights the most useful setup, operation, and maintenance information for readers.