Garden / Hot Tubs
LifeSmart Hot Tub Owner's Manual
Comprehensive owner's manual for LifeSmart hot tubs. Includes installation, electrical requirements, control panel operation, water chemistry, maintenance, and troubleshooting for 110V and 230V models.
Table of contents
Manual images
Click an image to enlargeQuick Guide
This manual provides essential instructions for the safe operation and maintenance of your LifeSmart hot tub. Always fill the spa with water before plugging it in. Test the GFCI before each use. If you encounter issues, refer to the troubleshooting section or contact customer service at (888) 961-7727 Ext. 8440.
Safety Information
DANGER: Risk of child drowning. Ensure children are supervised at all times and use the locking cover when the spa is not in use. ELECTROCUTION RISK: Connect only to a grounded source. Do not bury the power cord. Maintain a safe distance of at least 5 feet (1.5 m) from all metal surfaces and electrical appliances.
Installation
Choose a location that allows access to the equipment compartment. Ensure the foundation is solid and level, capable of supporting the weight of the spa, water, and users. For indoor installations, ensure adequate ventilation and drainage.

Electrical Requirements
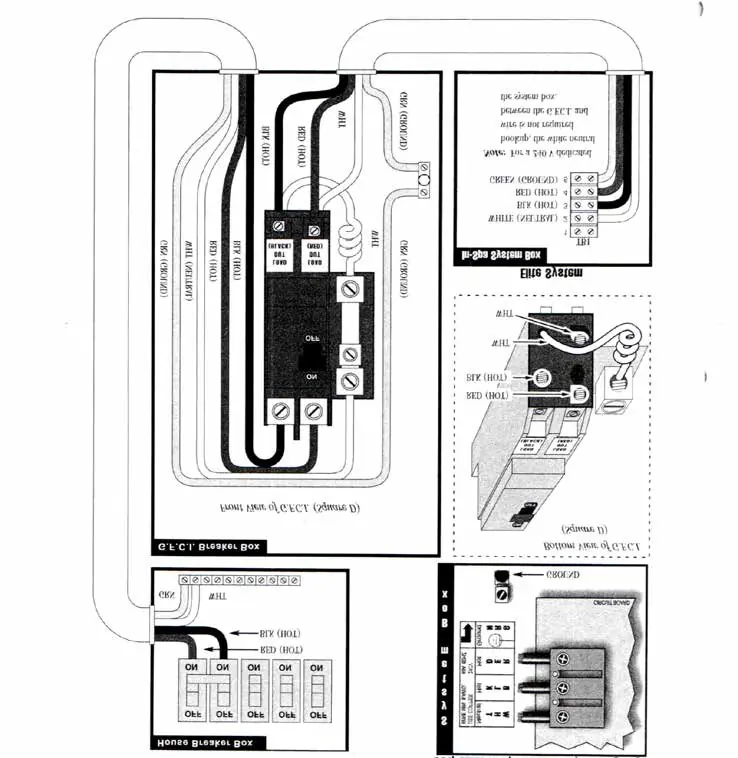
110V Models: Must be plugged into a dedicated, grounded 15-amp outlet. Do not use extension cords. 230V Models: Must be hard-wired by a licensed electrician. Ensure proper grounding and use a suitably rated GFCI circuit breaker.
Control Panel Operation
The control panel allows you to adjust temperature (80°F - 104°F), operate jets, and control lighting. Filter cycles (F1 and F2) are programmable. Operational modes include Standard, Economy, Sleep, and Quiet (on select models). Use the OFF mode for quick maintenance.
Maintenance
Clean the filter cartridge monthly to prevent debris buildup and pump damage. Maintain water chemistry: pH (7.2-7.8), Free Available Chlorine (3.0-5.0 ppm), Total Alkalinity (40-120 ppm), and Calcium Hardness (75-150 ppm). Use a weekly shock treatment.

Draining and Winterizing
Drain the spa every 3-6 months. For winterizing, remove all water from plumbing lines using a wet-vac and add non-toxic Propylene glycol anti-freeze to jet outlets and suction fittings.
Troubleshooting
If the spa is not operating, check the power supply, household breaker, and GFCI. If the pump runs but water does not flow, the pump may need priming. If the water is too hot, remove the cover to promote cooling and check for diagnostic messages like 'OH' (Overheat).
Practical help
Common problems
No component operation
Check if the spa has power, ensure the household circuit breaker is not tripped, and verify the GFCI at the end of the power cable is not tripped.
Pump runs but no water flow
The pump may not be primed. Press the JETS button several times (5-10 second bursts). If it still does not prime, loosen the unions to allow trapped air to escape, then tighten.
Water is too hot
Remove the cover to promote heat reduction. If the system displays 'OH', the spa is deactivated. It should reset automatically once the temperature drops below 107°F.
Before use
- Fill the spa with water before plugging it in.
- Ensure all jets are in the open position.
- Test the GFCI before each use.
- Check water chemistry levels (pH 7.2-7.8, Chlorine 3.0-5.0 ppm).
- Ensure the filter is installed and not loose.
Specs in practice
- Free Available Chlorine (FAC)
- Recommended level is 3.0-5.0 ppm for proper sanitation.
- Total Alkalinity
- Recommended range is 40-120 ppm to assist in pH control.
- Calcium Hardness
- Recommended range is 75-150 ppm to prevent scale or corrosion.
Images and diagrams
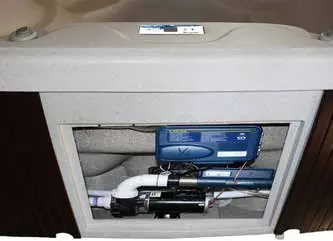
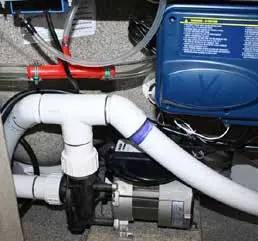
- Equipment Access: Shows how to remove panels to reach the pump and control box.
- Wiring Diagram: Details 230V electrical connections.
Model compatibility
- 110V models (except Sereno) are Plug-In only and cannot be converted.
- Only use Propylene glycol anti-freeze for winterizing; never use automotive anti-freeze.

Manual page author
David Miller
Documentation analyst
Organizes user manual content into clear summaries, with attention to model details, product context, and everyday usability.