Smart Home / Energy Meters
User Manual for Netvox R900PB06AO1 Ultrasonic Material Level Detection Sensor
Quick guide for the Netvox R900PB06AO1 ultrasonic sensor. Learn about installation, NFC configuration, LoRaWAN settings, and maintenance.
Table of contents
Manual images
Click an image to enlargeQuick Guide
The Netvox R900PB06AO1 is a LoRaWAN Class A wireless sensor designed for liquid level, material level, or parking space detection. It features an ultrasonic sensor with a 20-degree detection angle, a built-in vibration sensor for anti-tamper detection, and a digital output (DO) for local linkage. The device is configured via NFC and supports data storage for up to 10,000 records.
Product Overview
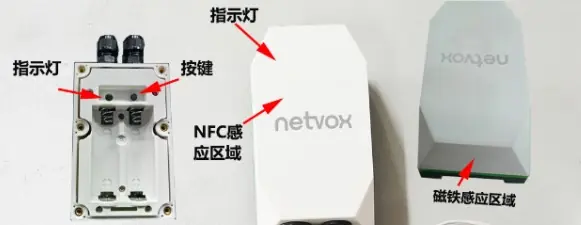
The device consists of the main unit and an ultrasonic probe. It is powered by two ER14505/ER18505 lithium batteries. The main unit has an IP65 protection rating. It includes an LED indicator, a button for manual operation, and an NFC detection area for configuration.
Operation and Power
Powering On/Off:
- Power On: Insert batteries. Press and hold the button for 3 seconds until the green light flashes once. Alternatively, use a magnet near the sensor for 3 seconds.
- Power Off: Press and hold the button for 5 seconds until the green light flashes, then perform a short press within 5 seconds. Alternatively, use a magnet for 5 seconds, then repeat the magnet action within 5 seconds.
- Factory Reset: Press and hold the button for 10 seconds (or use a magnet for 10 seconds). The green light will flash 20 times to confirm.
Network Joining
Upon power-on, the device automatically searches for a network. A solid green light for 5 seconds indicates a successful network join. If the device fails to join, check the gateway registration information or contact your platform provider.
Data Transmission and Configuration
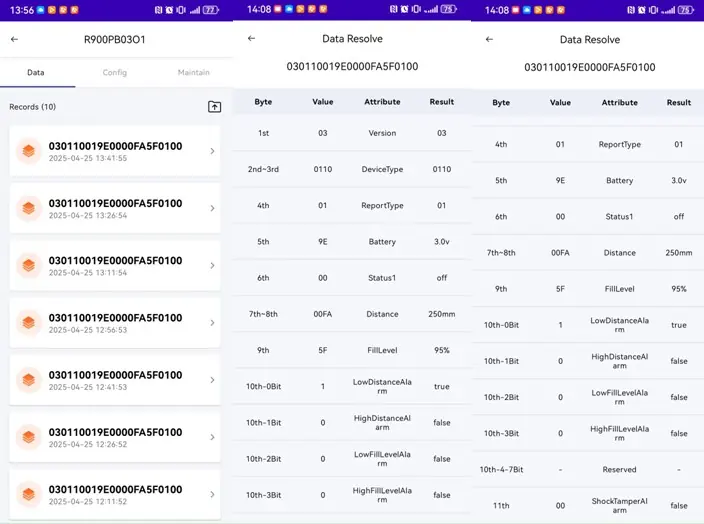
The device sends data packets containing distance, fill level percentage, and battery voltage. Configuration parameters such as Min Interval, Max Interval, and Reportable Change can be adjusted via downlink commands or the NFC App. The device supports offline data storage; when reconnected to the network, it will transmit stored data with Unix timestamps.
NFC App Configuration
The Netvox NFC App allows for easy configuration and firmware upgrades. Ensure your phone has NFC enabled and the NetvoxNFCApp installed. To configure, bring the phone close to the device's NFC area. You may need to enter the default password (12345678) to modify parameters. Changes to network parameters (frequency, join info, Band) require a device reboot to take effect.
Installation Methods
The device supports multiple mounting options depending on the environment:
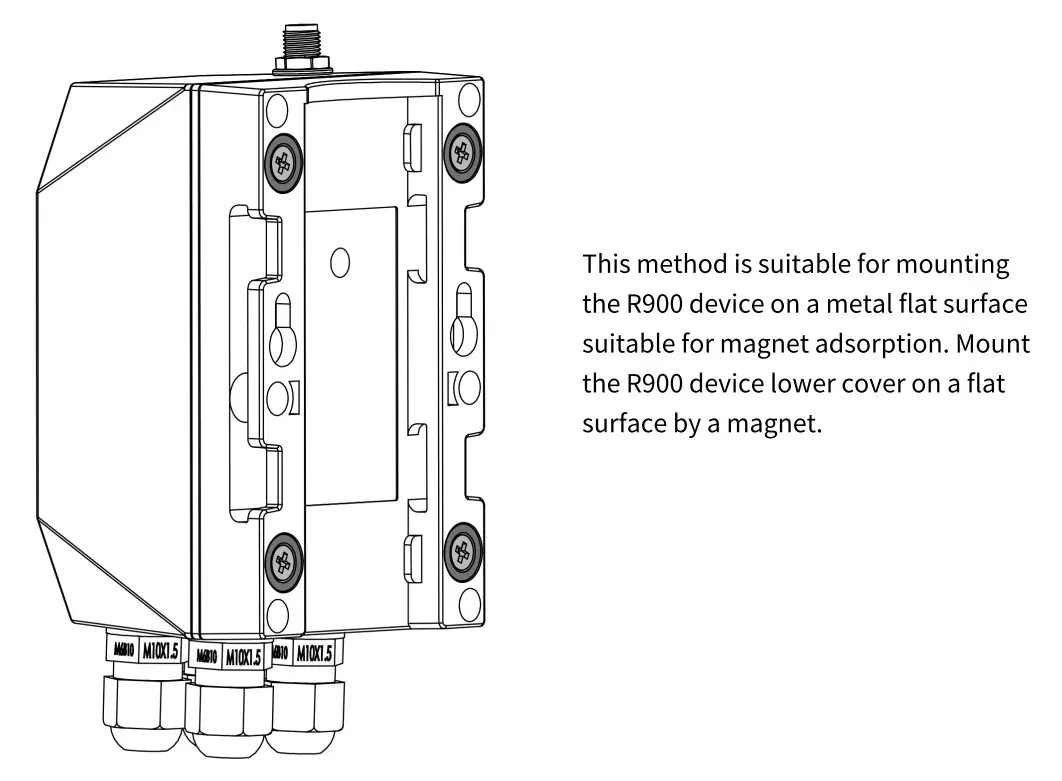
- Magnet Mounting: Suitable for metal flat surfaces.
- Screw Mounting: Use two self-tapping screws (3mm diameter) on a flat surface. Ensure a gap of >3mm between the screw head and the surface.
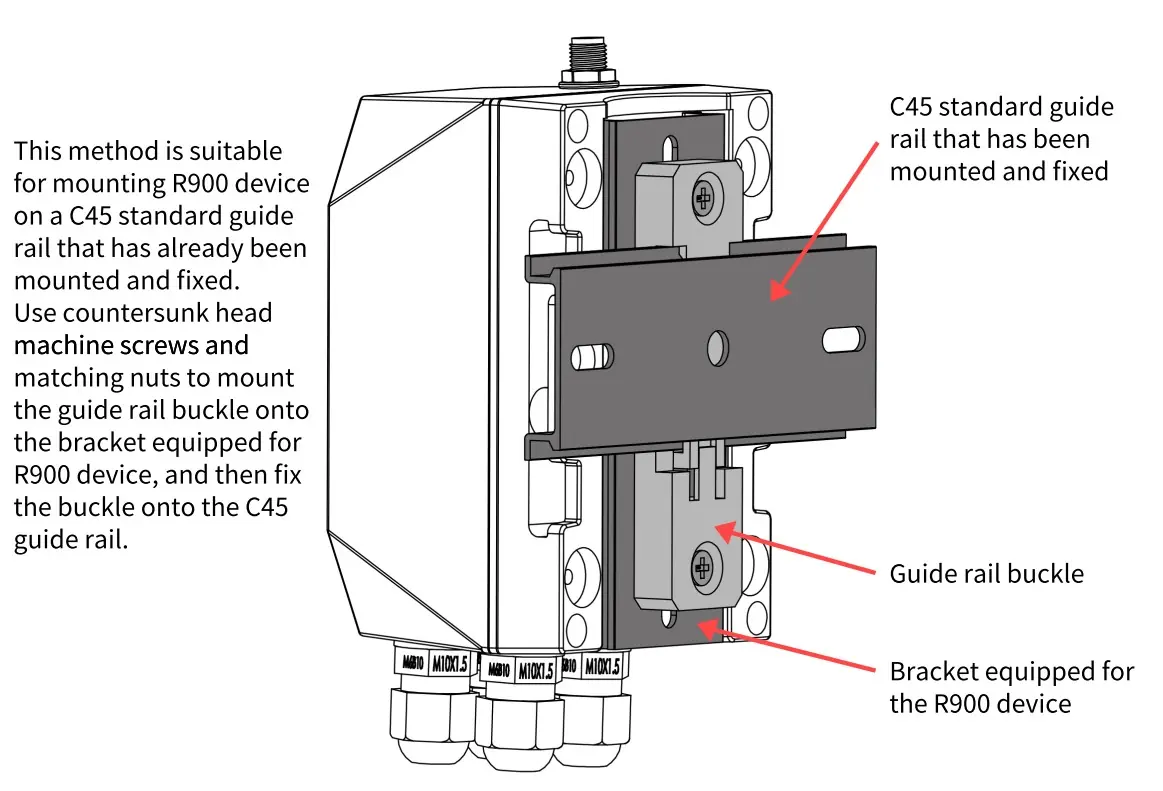
- C45 Rail Mounting: Use the bracket to mount onto a standard C45 guide rail.
- Threaded Fixture: Use a 1/4-inch screw thread fixture for wall mounting.
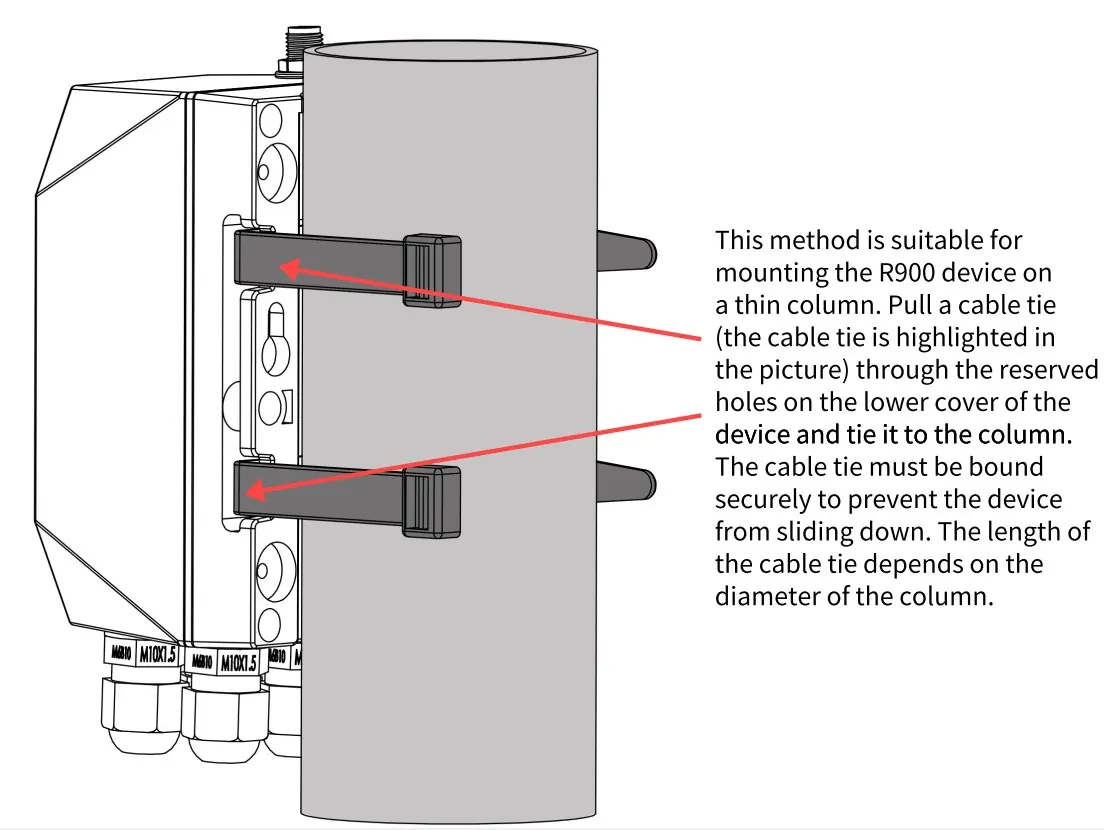
- Cable Tie: Use cable ties through the reserved holes on the lower cover to secure the device to a column.
Sensor Installation Notes: Ensure the probe is vertical to the measured surface. Avoid placing the probe directly above water inlets/outlets or areas with heavy foam/turbulence. Maintain a distance of 25-30cm from the side wall and ensure the sensor is at least 30cm from the ground/bottom.
Maintenance
Keep the device dry and clean. Avoid using harsh chemicals or detergents for cleaning. Do not expose the device to extreme temperatures, as this may damage the battery or internal components. If the device gets wet, allow it to dry completely before use.
Manufacturer information
Netvox Technology Co., Ltd.
Practical help
Common problems
Device fails to join the network
Check the gateway registration information or consult your platform server provider.
Low battery warning
Replace batteries promptly when voltage drops to 3.2V to prevent unstable sensor data.
Unstable or incorrect sensor readings
Ensure the probe is installed vertically, free from obstacles, and away from strong electromagnetic interference.
Before use
- Ensure your smartphone has NFC functionality.
- Install the NetvoxNFCApp on your smartphone.
- Ensure the device is powered on.
- Check that the ultrasonic beam path is free of obstacles.
- Verify the installation surface is clean and dry.
Specs in practice
- Min Interval
- The minimum time interval between data reports.
- Max Interval
- The maximum time interval between data reports.
- Reportable Change
- The threshold value change that triggers an immediate data report.
- DeadZoneDistance
- The distance range near the sensor where objects cannot be detected.
Images and diagrams
- The device supports mounting via magnets, screws, C45 rails, threaded fixtures, or cable ties.
- Water level calculation is based on the total depth (H) and the measured distance (D).
Model compatibility
- Compatible with LoRaWAN Class A protocol.
- Supports third-party platforms like Actility/ThingPark, TTN, and MyDevices/Cayenne.

Manual page author
Michael Turner
Technical manual editor
Reviews PDF manuals for structure, safety notes, and practical product details so readers can find the right information quickly.