Health / Laboratory Equipment
User Manual for Neuation iTHERM CH25 Incubator
Quick guide for the Neuation iTHERM CH25 incubator. Learn about installation, temperature control, calibration, and maintenance for this 22L laboratory device.
Table of contents
Manual images
Click an image to enlargeQuick guide from the manual
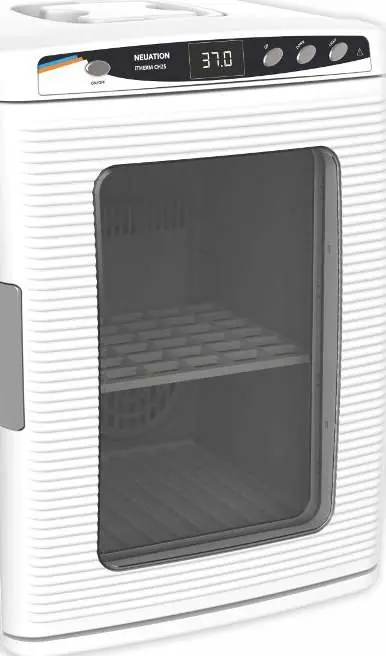
The Neuation iTHERM CH25 is a mini incubator designed for laboratory use. Before first use, place the unit on a clean, level, and stable surface. Allow the device to stand for 2 to 3 hours (10 hours in summer) to let the system settle before turning it on. Ensure a clearance of at least 5 inches on all sides for proper air circulation. The unit is not designed for recessed or built-in installation.
Installation
Position the incubator away from heat sources such as boilers or direct sunlight. Connect the power supply to the 2-pin DC inlet on the back of the unit. The internal power outlet can be used to power small instruments like shakers or mixers by plugging the included cable into the bottom power inlet on the back of the instrument.
Operation
To operate the incubator:
- Open the front door and place samples inside.
- Connect the power adaptor to the unit and plug it into a wall outlet.
- Turn the power switch to the ON or COOL position.
- Use the UP and DOWN buttons on the control panel to set the desired temperature. The unit will save the settings automatically.
Calibration
If the displayed temperature requires adjustment:

- Press and hold the UP and DOWN buttons simultaneously until the display shows 00A.
- Set the required offset value within the range of ±5°C.
- Wait for the value to be stored automatically.
Note: Only one offset value can be entered, which applies to the entire temperature range.
Cleaning and Maintenance
Always disconnect the machine from the power source before cleaning. Use a damp cloth to wipe the unit. Do not use abrasive cleaners, as they may damage the surface.
Technical Specifications
- Capacity: 22L
- Temperature Range: Ambient -15°C to 60°C
- Temperature Accuracy: 0.5°C (at 37°C)
- Temperature Uniformity: +/- 1.5°C (at 37°C)
- Electrical: 100-240 VAC, 50Hz/60Hz
- Weight: 7.4 Kgs
Safety Precautions
- For indoor laboratory use only.
- Do not use near water or where the unit may get wet.
- Ensure the power cord is positioned to avoid damage or tripping.
- Do not overload power outlets.
- Unplug the unit if it will not be used for a long period.
- Do not add unauthorized attachments.
Practical help
Common problems
Temperature not maintaining
Ensure the unit is used indoors in a cool room. It is not designed for outdoor use in heat.
Calibration required
Hold UP and DOWN buttons simultaneously until '00A' appears on the display, then adjust the offset value.
Before use
- Place on a clean, level, and stable surface.
- Allow the unit to stand for 2-3 hours (10 hours in summer) before first power-on.
- Ensure 5-inch clearance on all sides for air circulation.
- Verify the power source matches the label requirements.
- Remove the power supply from the white box inside the chamber.
Specs in practice
- Temperature Range
- Ambient -15°C to 60°C.
- Pollution Degree
- 2 (Standard indoor laboratory environment).
Images and diagrams
- The control panel features an ON/OFF switch, a digital display, and buttons for UP, DOWN, and LIGHT adjustments.
Model compatibility
- The internal power outlet voltage depends on the wall voltage (e.g., 230V wall input provides 230V output).
- Not designed for recessed installation or built-in wall mounting.

Manual page author
Emily Carter
User documentation editor
Prepares concise manual descriptions and highlights the most useful setup, operation, and maintenance information for readers.