Power / Batteries Chargers
User Guide for Nitecore 12K Carbon Battery™ Extended Headlamp Runtime Kit
Quick guide for the Nitecore 12K Carbon Battery, covering charging procedures, power bank functionality, headlamp integration, red signal light operation, and battery status indicators.
Table of contents
Manual images
Jump to the sectionQuick guide from the manual
This document provides essential instructions for the Nitecore 12K Carbon Battery. It serves as a power bank for external devices and an extended power source for compatible headlamps. Key operations include charging the unit via USB-C, monitoring battery levels through 10 integrated indicators, and managing the red signal light feature.
Device Overview
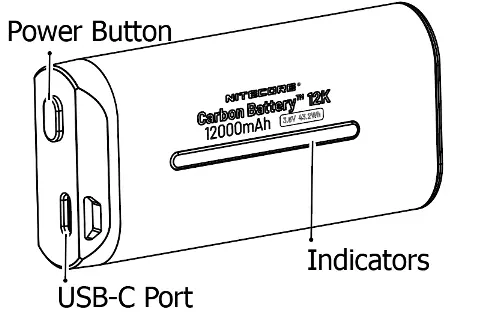
The device features a USB-C port for both input and output, a power button, and 10 LED indicators that display charging status, power levels, and function as a rear signal light.
Charging the Battery
Connect a USB-C cable to the device's USB-C port and an adapter. Charging takes approximately 2 hours and 40 minutes. During charging, indicators pulse from flashing blue to solid blue. When fully charged, all indicators remain solid blue.
Using as a Power Bank
Connect an external device to the USB-C port using a USB-C cable. The unit will automatically begin charging the connected device. If the battery level is too low, the USB output will automatically shut off to protect the battery.
Headlamp Integration
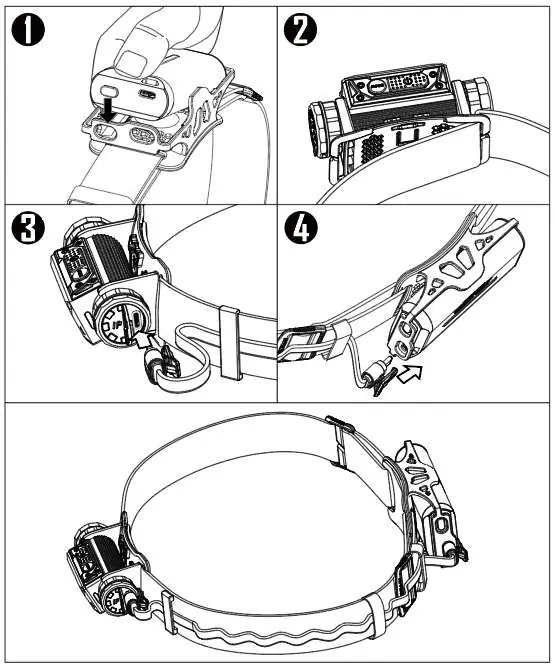
To use the 12K battery with a headlamp: 1. Install the battery into the bracket. 2. Attach the headlamp to the headband. 3. Connect the charging cable from the headband to the headlamp's port. 4. Connect the other end to the 12K battery's USB-C port. The headlamp will prioritize power from the 12K battery.
Red Signal Light
The device includes two red rear light modes. Press and hold the power button for 1 second to turn the red light on or off. When the red light is on, short-press the power button to switch between bidirectional and unidirectional light flow modes.
Battery Level Indication
Short-press the power button to view the current power level. The indicators will light up for 6 seconds: 10 lights indicate 90-100%, 9 lights 80-90%, down to 1 light for 5-10%. If 1 light is flashing, the battery is below 5% and requires immediate charging.
Safety and Maintenance
Operate within -10 to 35 degrees Celsius and store between -20 to 60 degrees Celsius. Charge the device every 6 months if not in use. Do not disassemble, puncture, or expose the device to fire or high temperatures. Keep away from flammable materials and do not submerge in water for extended periods.
Practical help
Common problems
USB output turns off during use
The battery level is too low; the device automatically shuts off output to protect the battery.
Red signal light does not turn on
The battery level is too low; charge the device.
Headlamp stops charging from the 12K battery
If the 12K battery power is too low, it will stop charging the headlamp, and the headlamp will switch to its own internal battery.
Before use
- Verify the product code on the packaging and register at charger.nitecore.com/validation for a 6-month warranty extension.
- Ensure the power adapter used is qualified and certified (CCC, CE, or FCC).
- Check that the charging cable is not damaged.
- Confirm the ambient temperature is within the operating range of -10 to 35 degrees Celsius.
Images and diagrams
- The power button is located on the side panel above the USB-C port.
- The 10 indicators are located on the front face of the battery.
- Installation steps show the battery sliding into the bracket and connecting to the headlamp via the provided cable.
Model compatibility
- Designed for use as an extended power source for compatible headlamps.
- Compatible with external devices requiring USB-C charging.

Manual page author
Michael Turner
Technical manual editor
Reviews PDF manuals for structure, safety notes, and practical product details so readers can find the right information quickly.