Home Appliances / Small Kitchen Appliances
OXO Brew 12-Cup Coffee Maker with Podless Single-Serve Function
Quick guide for the OXO Brew 12-Cup Coffee Maker. Learn how to set the clock, use the brew baskets for carafe or mug brewing, clean, descale, and troubleshoot your machine.
Table of contents
Manual images
Click an image to enlargeQuick guide from the manual
The OXO Brew 12-Cup Coffee Maker features a versatile brewing system. Key points for operation include using the correct brew basket for your desired output: the Small Brew Basket for 2-4 cups (mug brewing) and the Large Brew Basket for 5-12 cups (carafe brewing). Always use filtered water for the best results and to prevent mineral buildup. The machine will alert you when it is time to descale by displaying an exclamation point next to the CLEAN indicator.
Meet your coffee maker
The coffee maker consists of several key components:
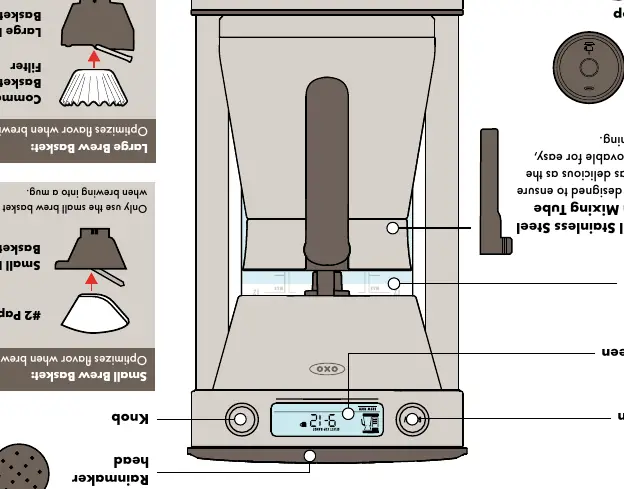
- Rainmaker head: Evenly distributes water over coffee grounds.
- Small Brew Basket: Use with #2 paper filters for 2-4 cups.
- Large Brew Basket: Use with commercial basket filters for 5-12 cups.
- Double Wall Stainless Steel Carafe: Includes a removable mixing tube for consistent flavor.
- Drip Tray: Acts as a platform for mugs to reduce splashing.
Before you begin
Before your first use, follow these steps:
- Remove all packaging.
- Wash all removable parts (carafe, baskets, drip tray, mixing tube).
- Plug in the coffee maker.
- Set the clock by turning the knob to SET CLOCK and following the on-screen prompts.
- Run a water-only 9-12 cup brew cycle to rinse the machine.
Using the brew baskets
The machine uses two different baskets depending on the brew size:
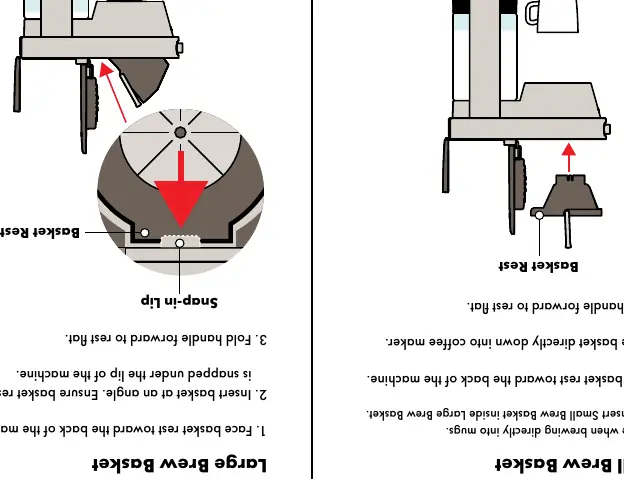
- Small Brew Basket: Only use when brewing directly into mugs. Do not insert this inside the Large Brew Basket.
- Large Brew Basket: Only use when brewing into the carafe.
To insert, face the basket rest toward the back of the machine, place the basket down, and fold the handle forward to rest flat.
Brewing into carafe
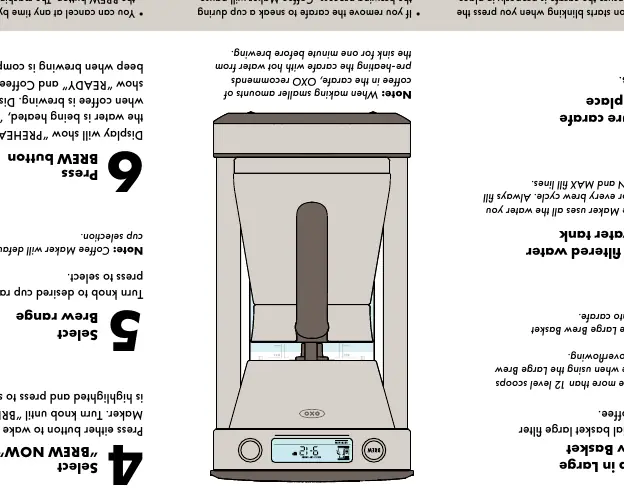
- Snap in the Large Brew Basket and add a commercial basket filter and ground coffee.
- Add filtered water to the tank (between MIN and MAX lines).
- Ensure the carafe is in place and lids are closed.
- Select BREW NOW using the knob.
- Select the desired cup range.
- Press the BREW button.
Podless brewing into mug
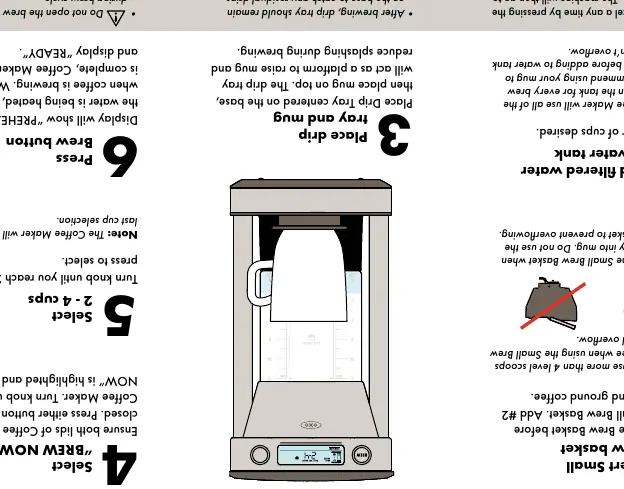
- Remove the Large Brew Basket and insert the Small Brew Basket with a #2 paper filter and ground coffee.
- Add filtered water to the tank.
- Place the drip tray on the base and place your mug on top.
- Select BREW NOW, choose the 2-4 cups range, and press the BREW button.
Cleaning and care
Always unplug the machine before cleaning. The Rainmaker, drip tray, brew baskets, and mixing tube are top-rack dishwasher safe. Hand wash the carafe and lid with mild detergent; do not put the carafe in the dishwasher as it will compromise the vacuum insulation. Keep the water tank and brew basket lids open after brewing to allow for drying.
Descaling
The machine will show an exclamation point next to CLEAN every 90 cycles. To descale:
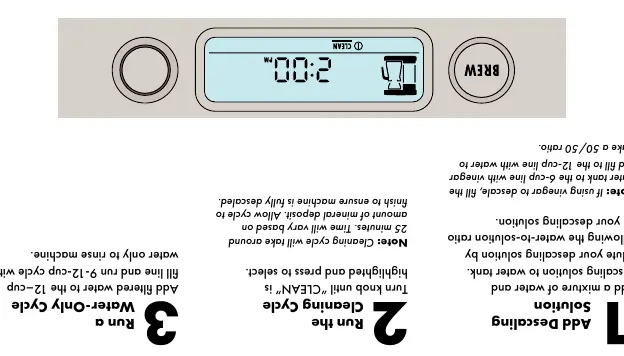
- Add a mixture of water and descaling solution (or a 50/50 vinegar/water mix) to the tank.
- Turn the knob to select CLEAN and press to start the cycle (approx. 25 minutes).
- Run a water-only cycle with filtered water to rinse the machine.
Troubleshooting
If the machine beeps or displays errors, check the following:
- Screen says CLN: Time to descale.
- Screen says HHHH: Machine overheated; wait 15 minutes to cool down and then descale.
- Bar icons blinking: Add water to the tank.
- Carafe icon blinking: Ensure the carafe is properly positioned.
Practical help
Common problems
Coffee Maker is beeping and screen shows HHHH
The machine has overheated due to excess scale buildup. Wait 15 minutes for it to cool down, then perform a descaling cycle.
Water is bubbling or not bubbling while brewing
This is normal. The water is heated to specific SCA standards, so it may not always look like it is boiling.
Condensation in the water tank after brewing
This is normal. Leave the water tank lid open between uses to allow the tank to dry out.
Coffee Maker is popping or cracking during the brew cycle
This is normal. At the end of the cycle, the machine pumps a mixture of water and air, which causes popping noises.
Before use
- Remove all packaging materials.
- Wash all removable parts (carafe, baskets, drip tray, mixing tube).
- Set the clock using the knob.
- Run a water-only 9-12 cup brew cycle to rinse the system.
Specs in practice
- Small Brew Basket
- Optimized for 2-4 cups; use with #2 paper filters.
- Large Brew Basket
- Optimized for 5-12 cups; use with commercial basket filters.
Images and diagrams
- The drip tray acts as a platform to raise your mug closer to the brew head, reducing splashing.
- The brew baskets must be inserted with the basket rest facing the back of the machine.
Model compatibility
- Use only the carafe provided with the Coffee Maker.
- Do not use distilled water.
- Do not use the Large Brew Basket when brewing into a mug.

Manual page author
David Miller
Documentation analyst
Organizes user manual content into clear summaries, with attention to model details, product context, and everyday usability.