Electronics / Cameras
User Manual for Ozspy 2K 1296P Spy Camera Watch
Quick guide for the Ozspy 2K 1296P Spy Camera Watch. Learn how to record video, take photos, use motion detection, charge the battery, and configure settings via PC.
Table of contents
Manual images
Click an image to enlargeQuick Start Guide
Before using your Ozspy 2K 1296P Spy Camera Watch for the first time, it is essential to charge the device uninterrupted for 4 hours. To configure the date, time, and video settings, connect the watch to a computer using the provided USB cable and run the setup file found on the removable disk.
Device Overview
The watch features several physical controls:
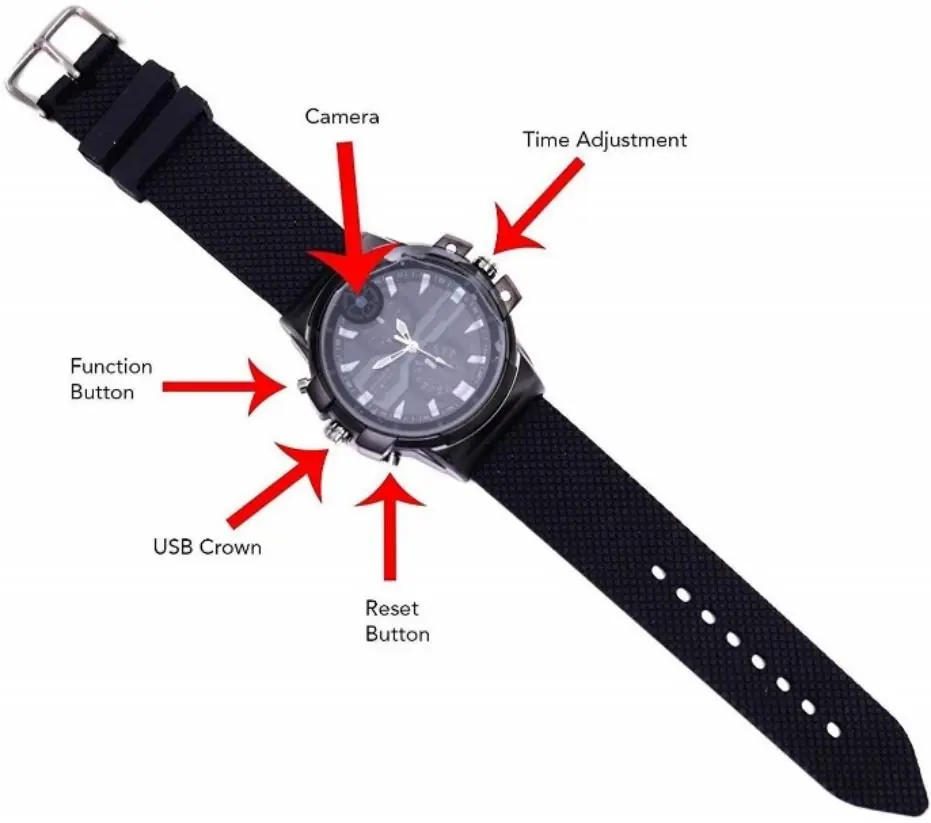
- Function Button: Used for powering on/off, starting/stopping recordings, and switching modes.
- USB Crown: Unscrew this to access the USB port for charging and data transfer.
- Time Adjustment Crown: Pull out to manually set the analog watch time.
- Reset Button: Used in combination with the Function button to restore factory defaults.
Charging the Battery
To charge the device, unscrew the USB Crown and insert the supplied USB cable. Connect the other end to a DC 5V USB power adapter. A blue LED will flash while charging and turn solid blue once the battery is fully charged.
Initial Setup and Configuration
Connect the watch to a computer or laptop via the USB cable. A new removable disk will appear on your computer. Open this disk and run the configuration utility file. This software allows you to:
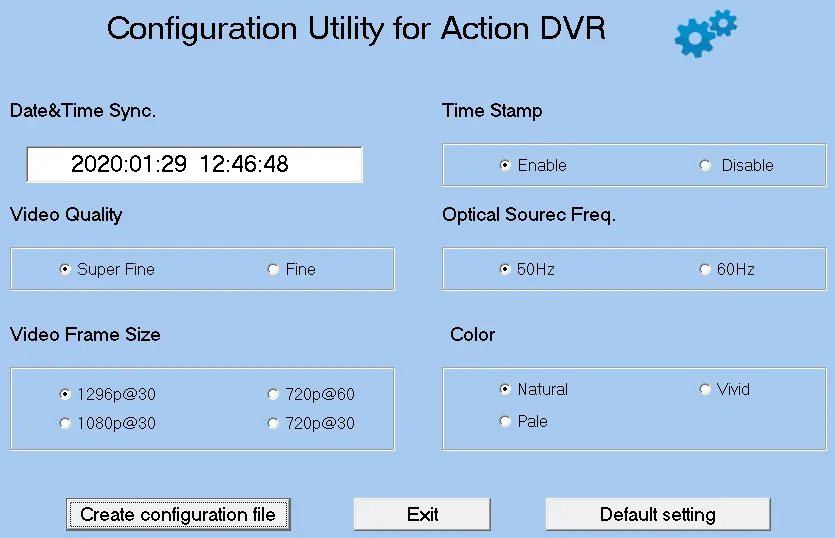
- Sync the date and time.
- Enable or disable the time stamp.
- Adjust video quality (Super Fine/Fine).
- Set optical source frequency (50Hz/60Hz).
- Select video frame size and color settings.
After applying changes, select "Create configuration file" and then "Exit".
Operating Instructions
Powering On/Off: Press and hold the Function Button.
Video Recording: Once powered on, the device automatically starts video recording (green LED flashes). Push the Function Button to pause (solid blue LED). Push again to resume recording.
Taking Photographs: From Standby Mode (solid blue LED), press the Function Button twice. The LED will flash blue and green. Press the Function Button once to take a photo. Press the Function Button twice to exit photo mode.
Audio Only Recording: From Standby Mode, press the Function Button three times quickly. The blue LED will flash and go out. Press the Function Button once to stop and exit.
Motion Detection Mode: From Standby Mode, press the Function Button four times quickly. The green LED will flash. Recording starts automatically when motion is detected. Press the Function Button once to pause, and four times quickly to exit.
Reset and Troubleshooting
If the device becomes unstable, you can reset it to factory defaults by pressing both the "Reset" and "Function" buttons simultaneously. If the battery is low, the blue LED will flash and the device will power off. If the memory is full, the device will overwrite the oldest recordings; if it cannot overwrite, both blue and green LEDs will flash before powering off.
Manufacturer information
OzSpy Security Solutions
Practical help
Common problems
Device is unstable or unresponsive
Press both the 'Reset' and 'Function' buttons at the same time to restore factory defaults.
Device powers off unexpectedly
Check if the battery is low (blue LED flashes) or if the memory is full (blue and green LEDs flash).
Cannot record video
Ensure the device is in the correct mode. If memory is full, the device may stop recording.
Before use
- Charge the device for 4 hours uninterrupted before first use.
- Unscrew the USB Crown to access the charging port.
- Connect to a PC to configure date, time, and video settings.
- Be aware of local laws and regulations regarding the use of hidden cameras.
Specs in practice
- 2K Resolution
- High-definition video recording capability for clearer images.
- Motion Detection
- The camera automatically starts recording when it detects movement.
- Optical Source Freq.
- Adjustable to 50Hz or 60Hz to match local lighting conditions and prevent flickering.
Images and diagrams
- The watch includes a Function Button, Time Adjustment Crown, USB Crown, and a Reset Button.
- The USB Crown must be unscrewed to reveal the USB port.
Model compatibility
- Requires a PC or laptop for initial configuration and file playback.
- Compatible with standard USB 5V power adapters.

Manual page author
Michael Turner
Technical manual editor
Reviews PDF manuals for structure, safety notes, and practical product details so readers can find the right information quickly.