Automotive / Dash Cams
Digital Watch Recorder User Guide
Comprehensive user guide for the Digital Watch Recorder. Learn how to record video, capture audio, take photos, set the time, and maintain your device.
Table of contents
Manual images
Click an image to enlargeQuick Start Guide
This guide provides essential instructions for operating your Digital Watch Recorder. Before first use, ensure the device is fully charged and a memory card is installed if required. The device features multiple modes including video recording, audio recording, photo capture, and motion detection. All operations are controlled via the side buttons, with status indicated by LED lights.
Device Overview
The watch features several key components for operation:
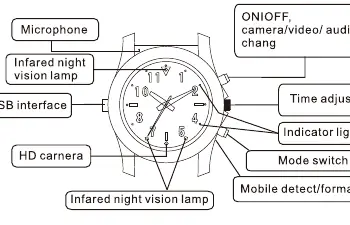
- Microphone: Located on the watch face.
- Infrared Night Vision Lamp: Used for low-light recording.
- USB Interface: Used for charging and data transfer.
- Buttons: Includes On/Off/Mode/Video/Audio/Camera controls, Time adjust, and Mode switch.
Indicator Light Status
The LED indicator lights provide feedback on the device status:
- Solid Blue: Standby for video recording.
- Solid Green: Standby for sound recording.
- Solid Green & Blue: Standby for filming.
- Solid Red & Blue: Charging.
- Red light off: Fully charged.
- Blue light flickering: Out of memory (device will power off).
- Red light flickering: Low battery (device will power off).
Operation Instructions
Memory Card Installation: If the device requires an external card, open the rear cover by rotating it anticlockwise. Remove the battery to access the memory card slot, insert the TF card, and replace the battery and cover.
Formatting: For the first use or to delete files, press and hold the format button while connecting the USB cable to a charger or computer. A solid red light indicates formatting is in progress; a solid green light indicates completion.
Recording Functions
Video: Press the On/Off button for 1 second to enter standby (blue light solid). Click the Start button to record. The blue light will flicker three times to indicate recording has started. Click On/Off again to finish.
Audio: Press the mode button to switch to audio mode (green light solid). Press the start button to record. The green light will flicker three times to indicate recording has started.
Camera: Switch to camera mode (green and blue lights solid). Press the On/Off button to take a photo. The lights will flicker once per photo.
Motion Detection: In standby, press the switch button for over 2 seconds. The red and blue lights will flicker three times to indicate motion detection standby.
Settings and Time Configuration
To set the time, watermark, or resolution:
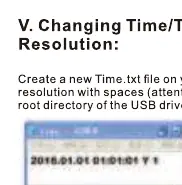
- Create a Time.txt file on your computer.
- Input the settings in the format: YYYY.MM.DD HH:MM:SS Y/N 1/2/3.
- Save the file to the root directory of the watch's USB drive.
- The device will update the settings upon the next power-on.
Resolution Codes: 1=1080P, 2=720P, 3=VGA.
Resetting the Device
If the watch experiences a failure or crash, press the mode key and the On/Off button simultaneously to force a power off.
Charging and Connection
Connect the USB cable to a power adapter or computer. The device can be used as a USB drive when connected to a PC. The battery charges simultaneously during connection.
Maintenance
- Battery: Fully recharge if the watch has not been used for a long time. Keep away from heat sources.
- Temperature: Operate between 0-40°C.
- Humidity: Keep in a dry environment (20%-80% humidity).
- Lens: Avoid exposure to strong sunlight.
- Cleaning: Use a dry cloth to wipe the glass. Remove the protective transparent cover before using the camera.
Official resources from the manual
Practical help
Common problems
Device crash or failure
Press the mode key and the On/Off button simultaneously to force a power off.
Device powers off automatically
Check if the memory card is full (blue light flickers) or if the battery is low (red light flickers).
Cannot record or take photos
Ensure the memory card is correctly installed and formatted. Check that the protective cover has been removed from the lens.
Before use
- Charge the device fully before first use.
- Install a TF memory card if the device does not have internal memory.
- Format the memory card using the format button procedure.
- Remove the protective transparent cover from the camera lens.
- Set the correct time using the Time.txt file method.
Specs in practice
- Video Resolution
- Configurable: 1080P (1920x1080), 720P (1280x720), or VGA (640x480).
- Operating Temperature
- 0°C to 40°C; use at room temperature for optimal battery life.
- Mini Illumination
- 10Lux; infrared light activates automatically for night vision.
Images and diagrams
- The side buttons control power, mode switching, and recording start/stop.
- LED indicator lights (Red, Blue, Green) communicate the current operating mode and battery/memory status.
- The USB port is used for both charging and file transfer to a computer.
Model compatibility
- Compatible with Windows ME/2000/XP/Win7/2003/Vista, Mac OS 10.4, and Linux.
- The device is not waterproof; do not use in humid environments or underwater.

Manual page author
Emily Carter
User documentation editor
Prepares concise manual descriptions and highlights the most useful setup, operation, and maintenance information for readers.