Electronics / Cameras
EKO Flip Body Camera User Manual
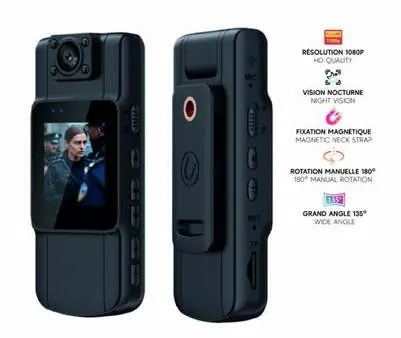
Quick start guide and user manual for the EKO Flip body camera. Learn how to operate, record, charge, and manage settings for your 1080P wearable camera.
Table of contents
Manual images
Click an image to enlargeImportant Information
Before using your EKO Flip body camera for the first time, please charge the device for at least two hours. This device requires a MicroSD card (up to 128GB, not included) for storage. Ensure you are aware of local privacy regulations regarding video surveillance and do not use the camera for illegal activities or in private/intimate spaces.
Product Overview
The EKO Flip body camera features a compact design with the following controls and components:
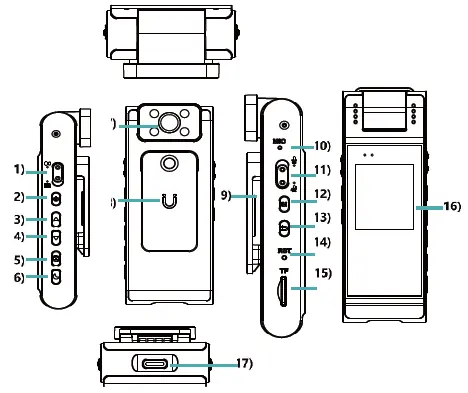
- 1. Video: Start/stop recording.
- 2. Power/OK: Power on/off, confirm menu selections, lock recording.
- 3. Up: Navigate menus, zoom.
- 4. Down: Navigate menus, zoom.
- 5. Rotation: Rotate screen 180°, change resolution.
- 6. Photo/Night Vision: Switch to photo mode, take photo, toggle night vision.
- 7. Lens: 180° manual rotation.
- 8. Magnet: For mounting.
- 9. Clips: For attachment.
- 10. Hole: Microphone/Indicator.
- 11. Record: Dedicated record button.
- 12. Menu: Access settings.
- 13. Return: Access album/return.
- 14. Reset: Factory reset pinhole.
- 15. MicroSD: Memory card slot.
- 16. Screen: 1.54" IPS display.
- 17. Port Type-C: Charging and data transfer.
Operation
Recording Video
Slide the Video button up to start recording. Slide it down to stop and save the recording.
Taking Photos
In other modes, press the Photo button to switch to photo mode, then press again to capture an image. While recording video, you can also press this button to take a photo. Hold the button to activate night vision.
Settings and Navigation
Use the Up and Down buttons to navigate through the menu. Press the Power/OK button to confirm your selection. Press the Menu button to enter or exit the settings screen. Use the Return button to view the album.
Resetting the Device
If the device screen freezes, insert a pin into the Reset hole to restart the camera.
Safety and Usage Guidelines
- Do not record individuals without their consent, unless legally authorized.
- Avoid installing the camera in private areas such as bedrooms or changing rooms.
- Do not leave the camera recording continuously for long periods without supervision to prevent overheating.
- Do not expose the camera to water, excessive humidity, or extreme temperatures.
- Do not attempt to open or repair the device yourself.
- Protect your recorded data with passwords and regular storage management.
Practical help
Common problems
Device screen is frozen
Insert a pin into the Reset hole to restart the device.
Device overheating
Do not leave the camera recording continuously for long periods without supervision.
Before use
- Charge the device for two hours before the first use.
- Insert a MicroSD card (up to 128GB, not included).
- Ensure the camera is not placed in areas accessible to children.
- Check local regulations regarding privacy and video surveillance.
Specs in practice
- Video Resolution
- Up to 1080P (1920 x 1080) at 30 fps.
Images and diagrams
- The device features a side-mounted control panel including buttons for video, power, menu navigation, and reset.
- The lens is capable of 180-degree manual rotation.
- The USB-C port is located at the bottom for charging and data transfer.
Model compatibility
- Requires a MicroSD card for storage (not included).
- Not compatible with public, unsecured Wi-Fi networks.

Manual page author
Michael Turner
Technical manual editor
Reviews PDF manuals for structure, safety notes, and practical product details so readers can find the right information quickly.