Lighting / Fixtures
Philips Touch 12W LED Ceiling Lamp Installation Guide
Installation and operation guide for the Philips Touch 12W LED Ceiling Lamp. Includes wiring instructions, mounting steps, and details on the built-in dimming and memory functions.
Table of contents
Manual images
Click an image to enlargeQuick guide from the manual
This document provides instructions for the safe installation and operation of the Philips Touch 12W LED Ceiling Lamp. Key features include a 3-step dimming function and a memory feature that retains the last brightness setting.
Installation
Before beginning, ensure the main power supply is turned off. Follow these steps to install the fixture:
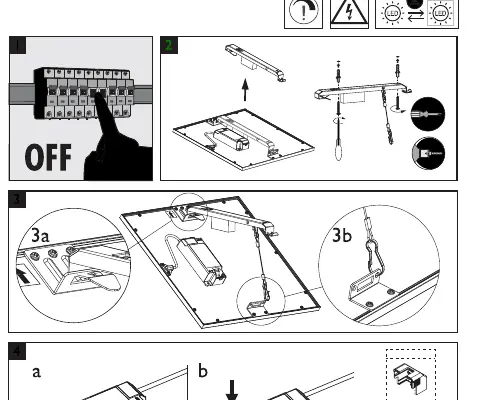
- Power Off: Switch off the main power supply at the circuit breaker.
- Mounting: Install the mounting bracket to the ceiling surface.
- Attachment: Secure the lamp to the mounting bracket.
- Wiring: Connect the power cables. Ensure the cable diameter is between 4mm and 8.5mm. Strip the wire insulation to 8mm. The supported cable cross-section is 0.75-1.5mm².
Operation and dimming
The lamp features a built-in dimming function controlled by your existing wall switch:
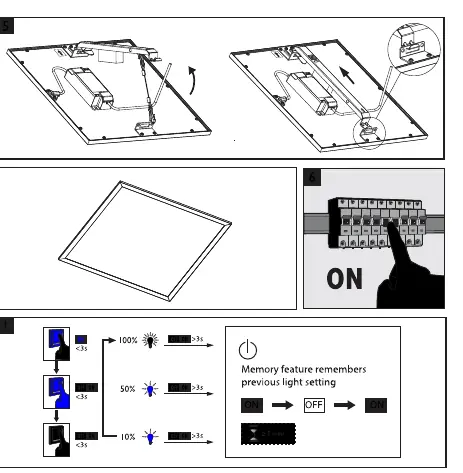
- Dimming: Toggle the power switch (turn off and on) within 3 seconds to cycle through brightness levels: 100%, 50%, and 10%.
- Memory Feature: The lamp remembers the previous light setting if it is turned off for more than 3 seconds.
Technical specifications
The device is designed for standard ceiling installation. Ensure all wiring complies with local electrical codes. The unit supports a cable diameter of 4mm to 8.5mm and wire cross-sections of 0.75mm² to 1.5mm².
Manufacturer information
Philips
Practical help
Common problems
Light does not change brightness
Ensure you are toggling the power switch within 3 seconds. If the switch is toggled too slowly, the memory feature may reset or the lamp may not register the dimming command.
Lamp does not turn on
Verify that the power supply is active at the circuit breaker and check that the wiring connections are secure and correctly stripped to 8mm.
Before use
- Turn off the main power supply at the circuit breaker.
- Ensure the ceiling surface is suitable for mounting.
- Verify cable diameter is between 4mm and 8.5mm.
- Strip wire insulation to exactly 8mm.
- Ensure cable cross-section is between 0.75mm² and 1.5mm².
Show more Show less
Specs in practice
- Dimming Levels
- The lamp cycles through 100%, 50%, and 10% brightness when the switch is toggled within 3 seconds.
- Memory Feature
- The lamp saves the current brightness setting if it remains off for longer than 3 seconds.
- Cable Requirements
- Supports 0.75-1.5mm² cable with a diameter of 4-8.5mm.
Images and diagrams
- Steps 1-4 illustrate the physical mounting process and wiring connection.
- Step 5-6 illustrate the final assembly and power-on procedure.
- The dimming diagram shows the timing required to cycle through brightness levels.
Model compatibility
- Designed for standard indoor ceiling installation.
- Compatible with standard wall switches for dimming control.

Manual page author
David Miller
Documentation analyst