Plumbing / Showers & Tubs
Assembly Guide for Plumbworld 1520mm Vertical Radiator Cover
Step-by-step assembly and wall-mounting instructions for the Plumbworld 1520mm Vertical Radiator Cover. Includes a complete parts list, hardware identification, and detailed installation steps.
Table of contents
Manual images
Click an image to enlargeQuick guide from the manual
This guide provides instructions for assembling the Plumbworld 1520mm Vertical Radiator Cover. Before beginning, ensure you have all parts and the necessary tools. The assembly requires careful handling of cam locks and screws to avoid damaging the wood panels.
Parts and tools
Tools needed:
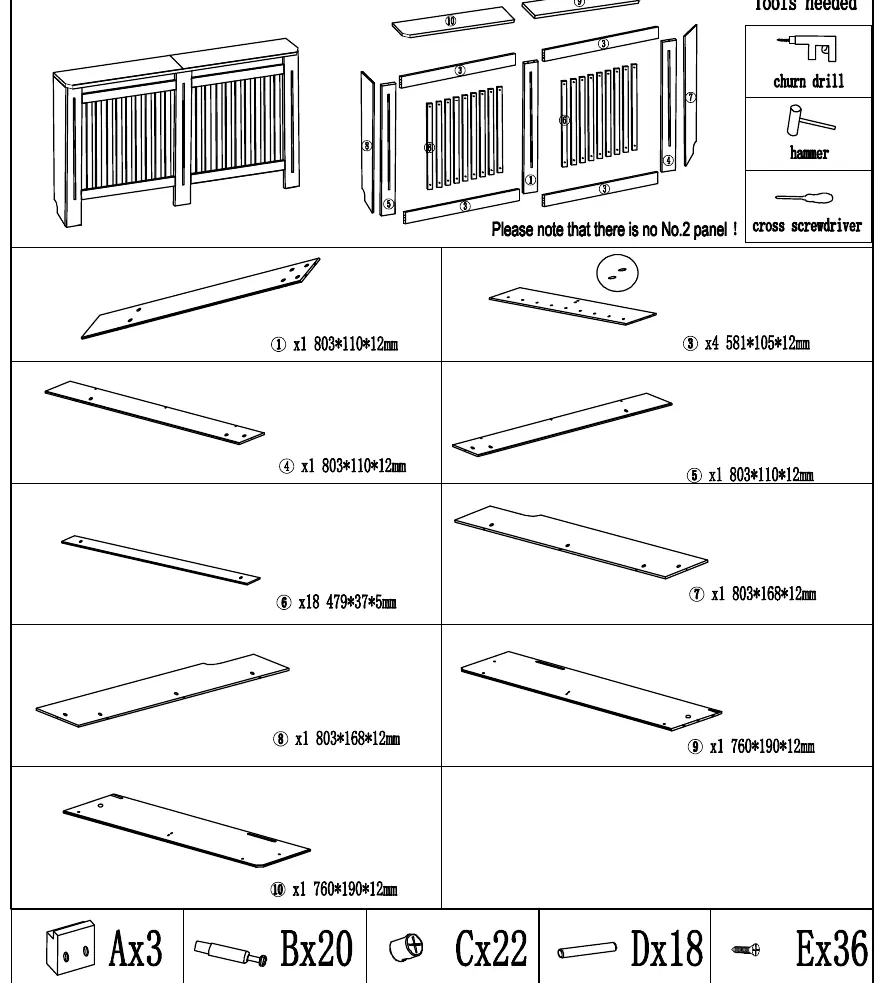
- Churn drill
- Hammer
- Cross screwdriver
Parts list:
- Panels 1 through 10 (verify all panels are present before starting).
- Hardware kit including cam locks (C), screws (B, D, E, F, G, I), brackets (H), and wall mounting hardware (A).
Assembly instructions
Step 1-2: Frame assembly
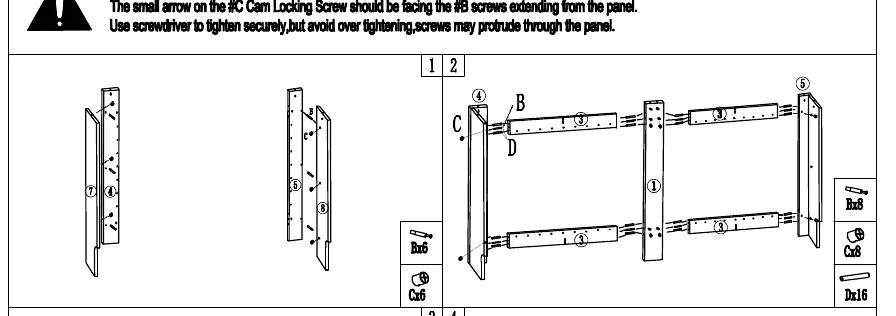

Connect the vertical slats and side panels using the provided screws and cam locks. Ensure the small arrow on the #C Cam Locking Screw is facing the opening extending from the panel. Do not over-tighten screws as it may cause the wood to splinter.
Step 3-4: Top shelf assembly
Assemble the top shelf using panels 9 and 10. Secure them together using the specified hardware (D, J, C).
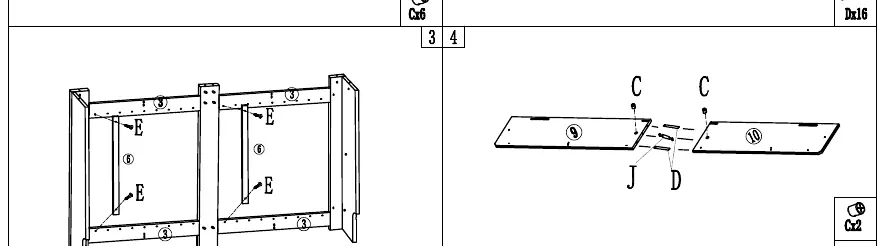
Step 5-6: Attaching the top
Attach the assembled top shelf to the main frame. Keep panels 9 and 10 on the same level during this process to prevent screws from protruding through the panels.
Wall mounting
Step 7-8: Securing to the wall
Use the provided brackets (A) and screws (F, G) to secure the radiator cover to the wall. Ensure the unit is stable and level before final tightening.
Practical help
Common problems
Wood splintering
Do not over-tighten screws; use a screwdriver carefully.
Cam lock not securing
Ensure the small arrow on the #C Cam Locking Screw is facing the opening extending from the panel.
Screws protruding through panels
Keep panels 9 and 10 on the same level during assembly to ensure proper alignment.
Before use
- Verify all panels (1-10) are present.
- Check all hardware (A-J) against the parts list.
- Ensure you have a drill, hammer, and cross-head screwdriver.
- Clear the area around the radiator for installation.
Images and diagrams
- Page 1 provides a comprehensive inventory of all wooden panels and hardware components.
- Steps 1-2 illustrate the construction of the main frame using cam locks.
- Steps 3-4 detail the assembly of the top shelf.
- Steps 5-6 show how to connect the top shelf to the frame.
- Steps 7-8 demonstrate the final wall-mounting procedure using brackets.
Model compatibility
- Designed for vertical style radiators.
- Requires wall mounting for stability.

Manual page author
Emily Carter
User documentation editor
Prepares concise manual descriptions and highlights the most useful setup, operation, and maintenance information for readers.