Furniture / Radiator Covers
Installation Guide for Plumbworld Bath Panel
Step-by-step installation guide for Plumbworld bath panels. Includes instructions for front and end panel fitting, required tools, materials, and maintenance tips.
Quick answers from the manual
Quick answer
- This guide provides instructions for installing Plumbworld bath panels, including preparation, front-only installation, and front-and-end panel installation. p. 1, 2
Key actions
- Attach plinth to panel p. 1
- Install front panel p. 2
- Install end panel p. 2
First start
- Seal all panel faces and edges before fitting. p. 1
Problems and fixes
Obstructions (pipes/skirting)
Trim the panels to fit and finish cut surfaces with two or more coats of varnish.
p. 1Maintenance and reset
- Wipe clean with a soft damp cloth. Never use scourers, abrasives or chemical cleaners. Keep the panel dry. p. 2
Where to find it in the PDF
- Parts and Preparation p. 1
- Installation and Care p. 2
Table of contents
Manual images
Click an image to enlargeQuick guide from the manual
This document provides installation instructions for Plumbworld bath panels. It covers the necessary tools, materials, and step-by-step procedures for fitting front-only panels and combined front and end panels. Always ensure panels are sealed before installation to prevent moisture damage.
Parts and tools
Parts Supplied:
- Bath Panel
- Plinth
Tools Required (not supplied):
- Hand Saw
- Drill
- Screwdriver
Additional Materials Required:
- Wall fixings and screws (for 25mm battens)
- 25mm, 12mm, and 35mm countersunk wood screws
- 38mm x 25mm softwood batten (approx. 3.3m for front and end, 2.3m for front only)
Preparation
Before fitting, measure the distance from the floor to the underside of the bath rim. Attach the plinth to the back of the bottom of the panel using 12mm wood screws to match this height. If the floor is uneven, trim the lower edge of the plinth. If the panel needs to be cut to fit around pipes or skirting boards, ensure all cut surfaces are finished with two or more coats of varnish to seal them from moisture.
Installing the front panel
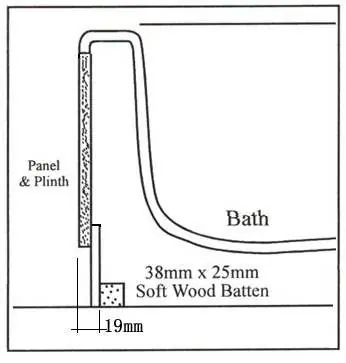
- Fix a 38mm x 25mm softwood batten to the floor, inset 19mm from the bath edge.
- Fix a 300mm long batten vertically to the wall at both ends of the bath, inset 16mm from the bath edge.
- Position the panel under the bath rim.
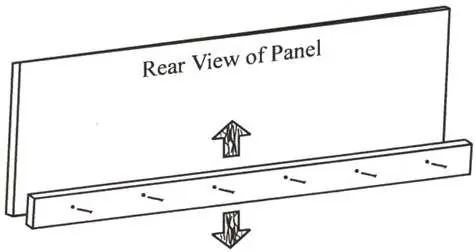
- Drill 3 holes evenly spaced along the bottom edge of the plinth (12mm from the edge) and 2 holes at each end of the panel (12mm from the edge).
- Secure the panel to the battens using 25mm wood screws.
Installing front and end panels
- Install the front panel as described above, but secure it to the wall at one end only.
- Cut back the floor batten and plinth at the open end to allow the end panel plinth to fit.
- Position a batten vertically on the rear edge of the front panel where it meets the end panel, inset 16mm from the panel end, and secure with 35mm wood screws.
- Fit a softwood batten to the floor and wall for the end panel and secure the end panel.
Care and maintenance
- Wipe clean with a soft damp cloth.
- Never use scourers, abrasives, or chemical cleaners.
- Keep the panel dry.
- It is recommended to seal the top of the bath panel with silicone.
Practical help
Common problems
Uneven floor
Trim the lower edge of the plinth to compensate for floor unevenness.
Obstructions like pipes or skirting boards
Trim the panels to fit around the obstruction and seal all cut surfaces with two or more coats of varnish.
Panel height does not match bath
The bath panels feature adjustable plinths to fit most bath heights.
Before use
- Measure the distance from the floor to the underside of the bath rim.
- Ensure you have a hand saw, drill, and screwdriver.
- Purchase required materials: wall fixings, 38mm x 25mm battens, and wood screws (12mm, 25mm, 35mm).
- Seal all panel faces and edges with varnish before fitting.
- Check if you are installing a front panel only or a front and end panel combination.
Images and diagrams
- Fig 1: Shows how to attach the plinth to the panel using 12mm screws.
- Fig 2: Illustrates the 19mm inset for the floor batten.
- Fig 3: Illustrates the 16mm inset for the wall batten.
- Fig 4: Shows the assembly overview and screw placement.
- Fig 5: Details the connection point between the front and end panels.
Model compatibility
- Panels should be sealed on all faces and edges before fitting to prevent moisture damage.

Manual page author
David Miller
Documentation analyst
Organizes user manual content into clear summaries, with attention to model details, product context, and everyday usability.