Tools / Soldering Tools
User Manual for Power Fist 100W Fast Heat Pistol Grip Soldering Gun
Quick guide for the Power Fist 100W Fast Heat Pistol Grip Soldering Gun. Includes safety instructions, operation steps, tip replacement, and maintenance tips.
Quick answers from the manual
Quick answer
- This manual provides instructions for the safe operation, maintenance, and troubleshooting of the Power Fist 100W Fast Heat Pistol Grip Soldering Gun. p. 3, 8
Key actions
- Operate the soldering gun p. 8
- Replace the soldering tip p. 8, 9
First start
- Connect to power and begin soldering p. 8
Show 3 more answers Show less
Problems and fixes
Tool does not function properly or parts are missing
Visit a Princess Auto Ltd. location for a solution or have a qualified technician service the tool.
p. 9Technical specifications
| Parameter | Value | Meaning | Pages |
|---|---|---|---|
| Amperage Rating | 0.8 A | Electrical current requirement | p. 11 |
| Voltage Rating | 120 V AC | Required input voltage | p. 11 |
| Temperature Rating | 300 to 600°C | Operating temperature range | p. 11 |
Where to find it in the PDF
- Cover Page p. 1
- Table of Contents p. 2
- Safety and Introduction p. 3, 4, 5, 6
- Identification Key p. 7
- Operation and Maintenance p. 8, 9
- Parts Breakdown p. 10
- Specifications p. 11
- French Language Section p. 13, 14, 15, 16
Table of contents
Manual images
Click an image to enlargeQuick Guide
The Power Fist 100W Fast Heat Pistol Grip Soldering Gun is designed for quick, efficient soldering on electrical and metalwork projects. It features a 100-watt heating element that reaches working temperatures between 300°C and 600°C in 6-8 seconds.
- Voltage: 120V AC
- Heat-up time: 6-8 seconds
- Safety: Always wear safety goggles and protective gear.
Safety Precautions
Read and understand all instructions before using this tool. Failure to follow safety rules can result in serious personal injury.
- Work Area: Keep the area clean, well-lit, and free of distractions. Do not use in the presence of flammable gases, dust, or liquids.
- Personal Safety: Wear impact safety goggles (CSA Z94.3-07 or ANSI Z87.1) and appropriate gloves. Do not operate the tool when tired or under the influence of drugs, alcohol, or medication.
- Power Cord Safety: Inspect the cord for cracks or fraying before each use. Keep the cord away from heat, oil, and sharp edges. Do not pull on the cord to disconnect the plug.
Product Overview
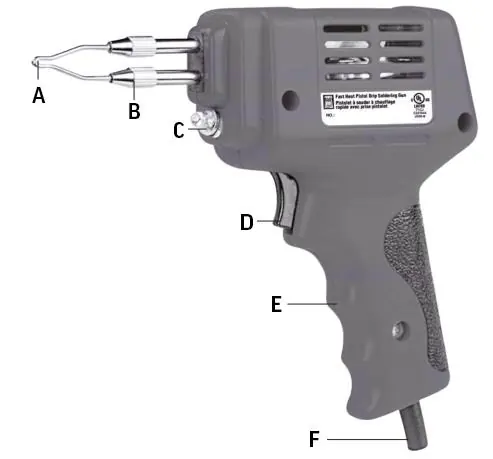
The soldering gun features a pistol grip design for comfort and control. Key components include the soldering tip, tip screws, light, switch, handle, and power cord.
Operation
- Ensure the voltage and frequency match the technical specifications (120V / 60Hz).
- Connect the gun to a power supply.
- Hold the gun by the handle and place the soldering tip on the point you wish to solder.
- Turn on the switch; the light will turn on.
- Wait 6-8 seconds for the gun to reach approximately 230°C.
- When finished, turn off the switch.
Note: Lubricate the soldering tip before use. Do not hold the switch down for long periods of time; press and release as needed to maintain a steady temperature.
Care and Maintenance
Regular maintenance ensures the tool remains in good condition and operates efficiently.
- Cleaning: Keep the tool clean, dry, and free of oil or grease.
- Lubrication: Apply a thin coat of light oil to steel parts if the tool is not used for an extended period to prevent rust. Remove the lubricant before using the tool again. Never use penetrating oil as it may act as a solvent and cause the tool to seize.
- Replacing the Tip: Unscrew the two screws connecting the soldering tip to the gun, pull off the old tip, replace it, and secure it with the two screws.
Troubleshooting
If the tool does not function properly or parts are missing, visit a Princess Auto Ltd. location for a solution. If unable to do so, have a qualified technician service the tool.
Specifications
- Amperage Rating: 0.8 A
- Voltage Rating: 120 V AC
- Temperature Rating: 300 to 600°C
Parts Breakdown
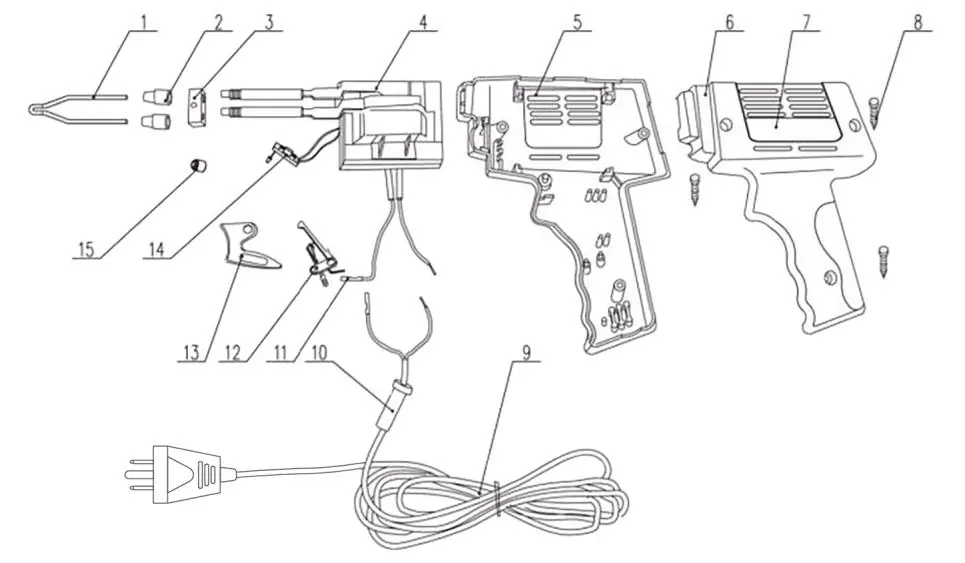
The tool consists of several replaceable parts, including the soldering tip, tip screws, heating insulation baffle, transformer, cabinet, name plate, cord, terminal board, switch, push button, bulb socket, and bulb.
Practical help
Common problems
Tool does not heat up
Check the power connection and ensure the switch is being pressed correctly.
Damaged or worn soldering tip
Unscrew the two screws holding the tip, remove the old tip, insert a new one, and tighten the screws.
Before use
- Inspect the power cord for cracks, fraying, or other insulation faults.
- Ensure the power supply is 120V AC.
- Lubricate the soldering tip.
- Wear safety goggles and appropriate protective clothing.
- Ensure the work area is clean and free of flammable materials.
Show more Show less
Specs in practice
- 300 to 600°C
- The operating temperature range of the soldering tip.
Images and diagrams
- A: Soldering Tip
- B: Tip Screws
Model compatibility
- Use only accessories intended for this tool.
- Do not use extension cords unless rated for outdoor use when working outdoors.

Manual page author
Emily Carter
User documentation editor