Furniture / TV Stands
Owner's Manual for Real Flame 13086LP Fire Table
Quick guide for the Real Flame 13086LP Fire Table. Includes assembly instructions, lighting procedures, safety warnings, leak testing, and troubleshooting tips.
Table of contents
Manual images
Click an image to enlargeQuick Guide
This manual provides essential instructions for the safe assembly, operation, and maintenance of the Real Flame 13086LP Fire Table. Always read the full manual before use. This appliance is for outdoor use only and requires a 20 lb LP gas tank.
Safety Warnings
- Outdoor Use Only: Never use this appliance in an enclosed space such as a camper, tent, car, or home.
- Clearances: Maintain a minimum clearance of 60 inches (152.4 cm) from the top and 48 inches (121.9 cm) on all sides from combustible materials.
- Gas Safety: If you smell gas, shut off the supply immediately, extinguish any open flames, and leave the area.
- Storage: Do not store gasoline or other flammable vapors within 25 feet of the fireplace.
- Wind Conditions: Do not operate in high wind conditions.
Assembly Instructions
1. Battery Installation: Install the AA battery into the igniter housing as shown in the diagram.
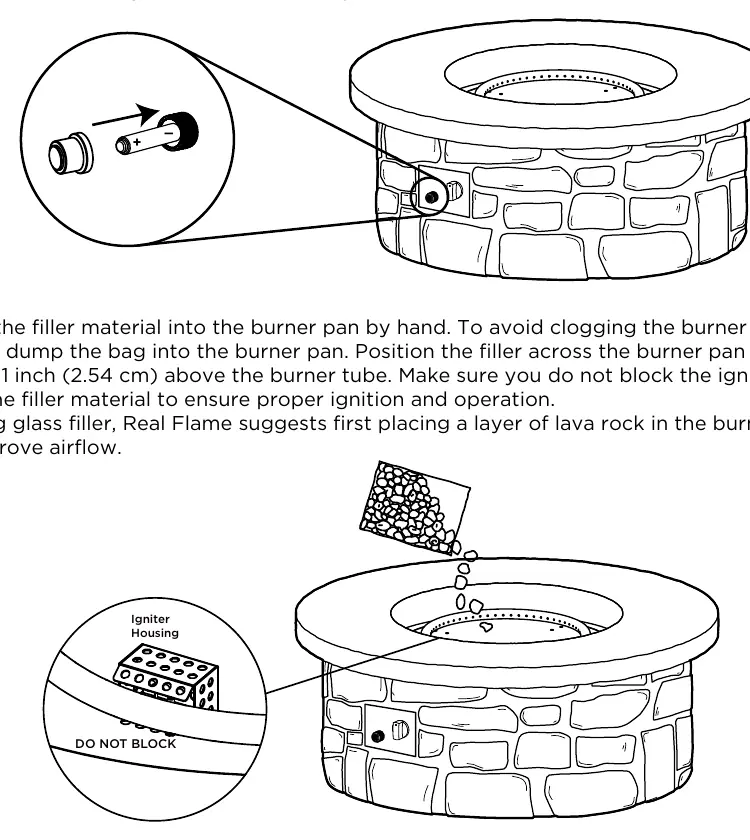
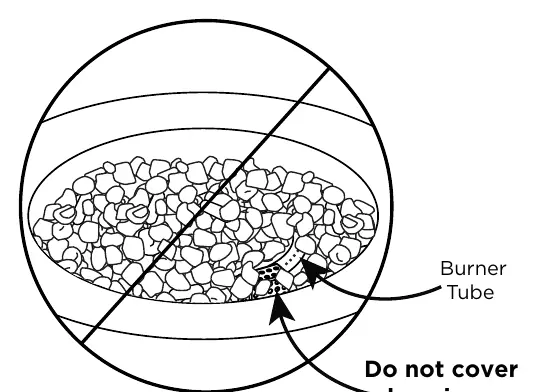
2. Filler Material: Place the filler material (lava rock or glass) into the burner pan by hand. Do not dump the bag. Ensure the filler is level and 1 inch (2.54 cm) above the burner tube. Do not block the igniter housing.
3. Tank Connection: Place the tank seat on the ground and secure the 20 lb LP gas tank. Connect the gas line to the tank by turning the knob clockwise. Hand-tighten only.
Pre-Use Leak Testing
Before first use, perform a leak test:
- Mix 1 part dishwashing soap with 3 parts water in a spray bottle.
- Ensure the control knob is in the OFF position and connect the gas tank.
- Spray the solution on all valve connections.
- If bubbles appear, turn off the gas, disconnect the tank, and inspect connections for debris. Reconnect and retest.
Lighting Instructions

- Ensure the control knob is in the OFF position.
- Slowly open the gas tank valve.
- Push in and turn the control knob counterclockwise to the LIGHT position.
- Keep the knob pushed in for 15-30 seconds after ignition.
- If ignition does not occur within 15 seconds, turn to OFF, wait 5 minutes, and try again.
- Once lit, release the knob and adjust to the desired flame height.
Care and Maintenance
- General Cleaning: Use a mild soap and water solution with a soft cloth. Do not use abrasive cleaners.
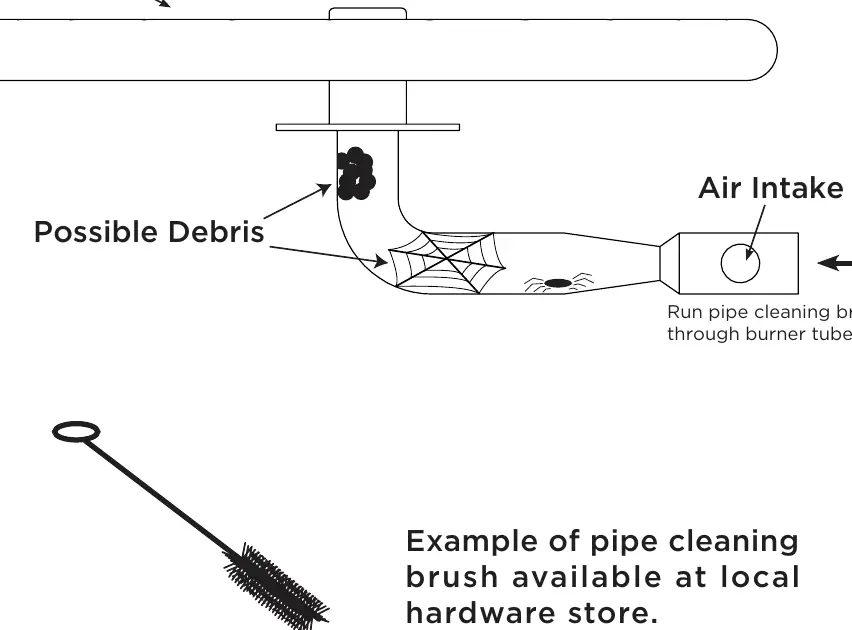
- Burner: Keep the burner ports clean. Use a paper clip or pin to clear clogs. Use compressed air or a pipe cleaning brush to clear debris from the burner tube.
- Storage: Turn off the gas, remove the tank, remove the battery, and cover the fireplace when not in use.
Troubleshooting
If the fireplace fails to ignite or stay lit, check the following:
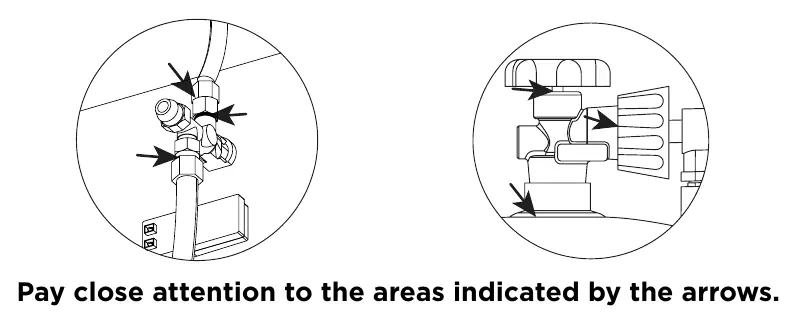
- Ignition: Ensure the battery is fresh and installed correctly (+ side out). Check that the electrode wire is securely connected to the back of the igniter box.
- Thermocouple: Ensure the thermocouple is aligned with the burner port and that the flame makes direct contact with the tip.
- Obstructions: Check for spider webs or debris in the burner tube.
Practical help
Common problems
Fireplace will not ignite
Check battery installation (+ side out), ensure electrode wire is connected, and verify a spark is visible when the button is pushed.
Fireplace will not stay lit
Ensure the igniter housing is clear of debris and the thermocouple is properly aligned with the flame.
Low flame
Check if the LP tank is empty or if cold temperatures are affecting gas pressure. Allow the tank to warm naturally.
Before use
- Check hose assembly for abrasion or damage.
- Ensure burner and components are free of dirt and debris.
- Perform a leak test on all connections.
- Ensure LP tank is 20 lb and properly secured.
- Verify minimum clearances (60 inches top, 48 inches sides).
Specs in practice
- Inlet Pressure
- 11.0” W.C. (normal), 13.0” W.C. (max), 8” W.C. (min)
Images and diagrams
- Leak testing: Spray soap solution on valve connections to check for bubbles.
- Burner tube cleaning: Use a pipe cleaning brush to remove debris from the burner tube.
- Igniter/Thermocouple: Ensure spark is visible and flame contacts the thermocouple tip.
Model compatibility
- For outdoor use only.
- Do not use solid fuels like wood or charcoal.
- Operate in winds up to 10 mph.

Manual page author
Emily Carter
User documentation editor
Prepares concise manual descriptions and highlights the most useful setup, operation, and maintenance information for readers.