Power / Batteries & Chargers
User Manual for Renogy 12V 20A/40A DC-DC Battery Charger
Comprehensive user manual for the Renogy 12V 20A/40A DC-DC Battery Charger. This guide covers installation, wiring diagrams, battery type configuration, LED indicators, charging logic, and troubleshooting steps to ensure optimal...
Table of contents
Manual images
Click an image to enlargeQuick Guide from the Manual
The Renogy 12V 20A/40A DC-DC Battery Charger is designed to charge your 12V auxiliary battery from a starter battery in your RV. It is compatible with GEL, FLD, SLD/AGM, and Lithium (LiFePO4) batteries. The device features smart alternator detection and remote monitoring via the Renogy app or Renogy ONE Core.
Installation
Safety First: Always wear insulating gloves and use insulated tools. Ensure the charger is installed in a clean, dry, and ventilated area, protected from direct sunlight.
- Mounting: The charger can be mounted vertically on a wall or horizontally on the floor. Ensure adequate clearance for ventilation.
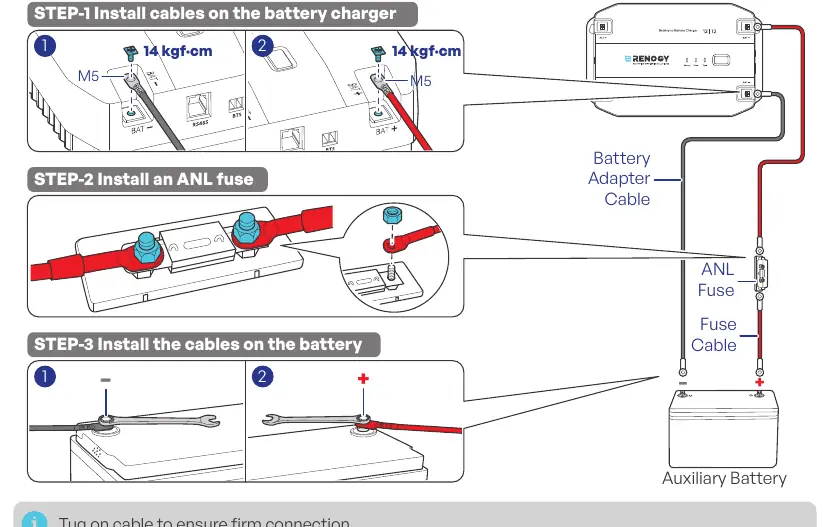
- Wiring: Use UL multi-strand soft copper wire. Install fuses at both the input and output ends, as close to the batteries as possible (ideally within 20 cm).
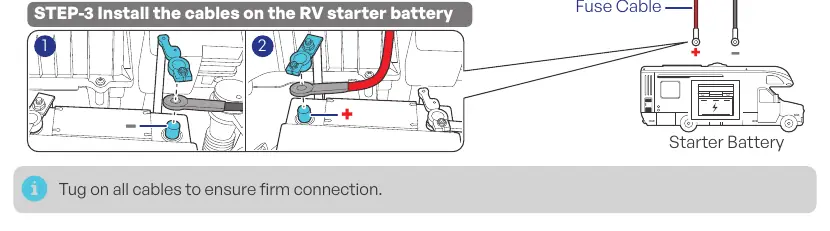
- Connections: Connect the negative and positive cables to the respective terminals on the charger and batteries. Tug on cables to ensure firm connections.
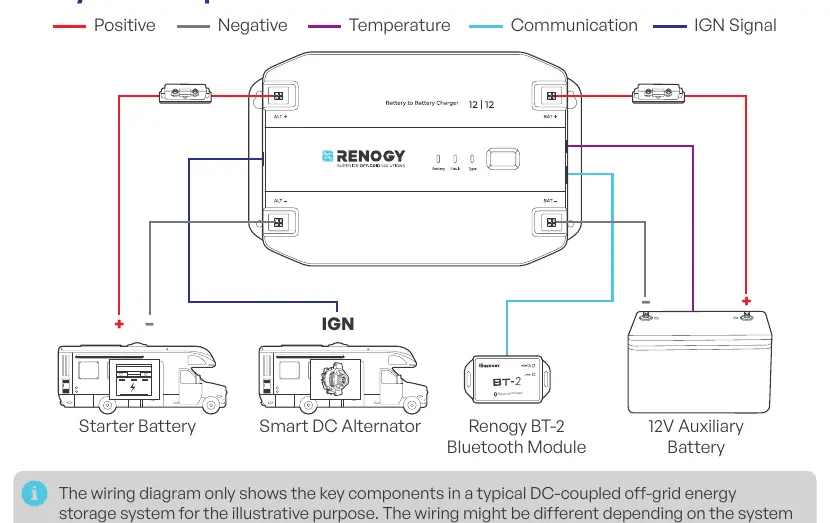
- IGN Signal: If using a smart alternator, connect the IGN signal wire to the charger's IGN port and the alternator's ignition signal port.
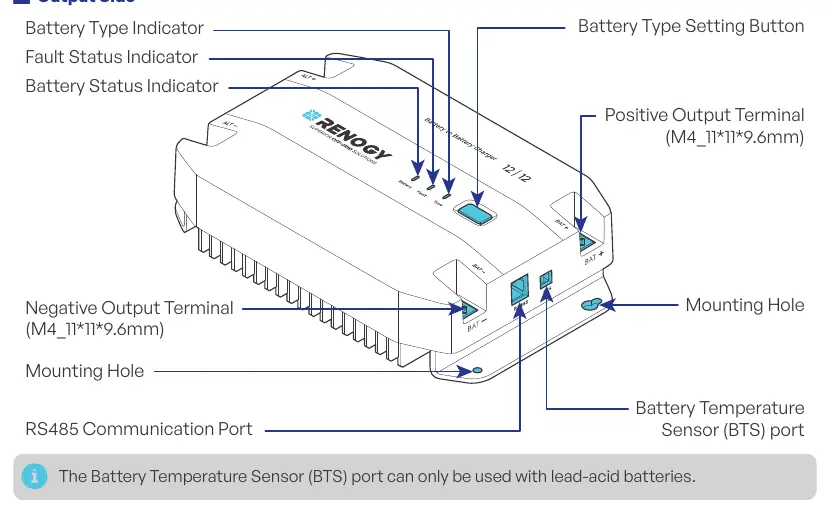
- Temperature Sensor: Install the battery temperature sensor in close proximity to the battery (do not use on LiFePO4 batteries with internal BMS).
Configuration
You can set the battery type using the Battery Type Setting Button on the device or via the Renogy app. The charger supports:
- SLD/AGM: Sealed Lead-Acid
- GEL: Gel Battery
- FLD: Flooded Battery
- LI: Lithium Iron Phosphate
- User Mode: Allows customization of charging parameters.
Monitoring
For real-time monitoring, connect the Renogy BT-2 Bluetooth Module to the RS485 port. You can then pair the charger with the Renogy app on your smartphone or with a Renogy ONE Core device.
Charging Logic
The charger utilizes a four-stage algorithm:
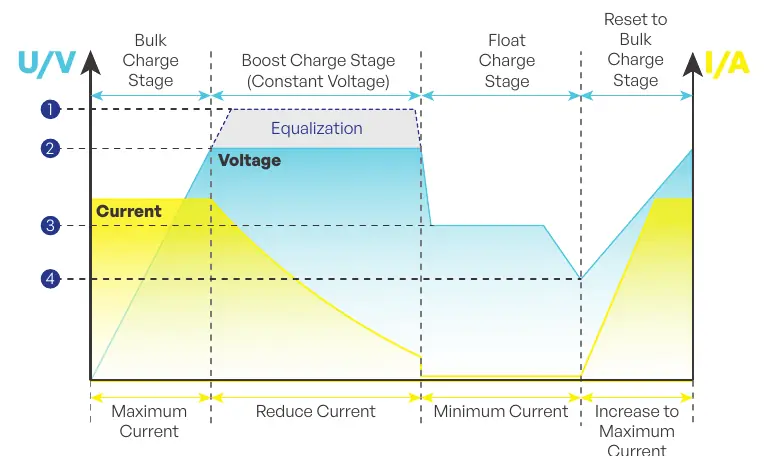
- Bulk Charge: Constant current until boost voltage is reached.
- Boost Charge: Constant voltage with reducing current.
- Float Charge: Trickle charging to maintain capacity.
- Equalization: High-voltage charging for specific lead-acid batteries (not for lithium).
Troubleshooting
The Fault Status indicator helps identify issues:
- Fast flash (red): Overvoltage protection for auxiliary battery.
- Jumping flash (red): Overdischarge shutdown protection.
- Solid red: Overtemperature protection for auxiliary battery.
- Slow flash (red): Overtemperature protection for charger or reverse contact protection.
Maintenance
Regularly inspect the charger for damage, loose connections, or corrosion. Keep ventilation holes clear. If cleaning is required, disconnect all cables and use a dry cloth or nonmetallic brush. Store in a well-ventilated, dry environment.
Practical help
Common problems
Overvoltage protection (Fast flash red)
Disconnect the auxiliary battery and check the battery voltage. Ensure it is within the specified range.
Overdischarge shutdown (Jumping flash red)
Allow the auxiliary battery to recharge to the Overdischarge Recover voltage.
Overtemperature protection (Solid/Slow flash red)
Turn off the charger, let it cool down, and ensure proper ventilation.
Reverse contact protection (Slow flash red)
Correct the battery connections to the proper polarity.
Before use
- Inspect the charger for visible damage.
- Verify the battery type (GEL, FLD, SLD/AGM, or LI).
- Prepare tools: Phillips screwdriver (#1), insulating gloves, measuring tape.
- Size fuses and wires according to the manual's tables.
- Ensure the installation site is dry, ventilated, and protected from direct sunlight.
Specs in practice
- Bulk Charge Stage
- Supplies constant current until the battery voltage reaches the boost voltage.
- Boost Charge Stage
- Supplies constant voltage and reduces current slowly.
- Float Charge Stage
- Maintains a constant voltage at a minimum current level to act as a trickle charger.
- Equalization
- Charges at a higher voltage to balance battery cells (only for specific lead-acid batteries).
Images and diagrams
- System Setup: Illustrates the connection between the starter battery, smart alternator, charger, and auxiliary battery.
- Output Side: Identifies the location of terminals, indicators, and ports on the charger.
Model compatibility
- Compatible with 12V systems.
- Supports GEL, FLD, SLD/AGM, and Lithium (LiFePO4) batteries.
- Smart alternator requires the IGN signal wire connection.
- Temperature sensor should not be used on LiFePO4 batteries with internal BMS.

Manual page author
David Miller
Documentation analyst
Organizes user manual content into clear summaries, with attention to model details, product context, and everyday usability.