Power / Batteries & Chargers
Renogy Dual Input DC-DC On-Board Battery Charger with MPPT User Manual
Comprehensive user manual for the Renogy Dual Input DC-DC On-Board Battery Charger with MPPT (RBC30D1S and RBC50D1S). Includes detailed installation instructions, wiring diagrams, charging logic, battery type settings, troubleshooting, and...
Table of contents
Manual images
Click an image to enlargeQuick guide from the manual
The Renogy Dual Input DC-DC On-Board Battery Charger with MPPT is designed to charge your auxiliary battery using either a solar panel or an automobile alternator. It supports multiple battery types including flooded, gel, AGM, and lithium. For remote monitoring and parameter modification, the device supports the Renogy BT-2 Bluetooth Module and the DC Home app.
Important Safety Information
- Install the charger on a vertical surface indoors, protected from direct sunlight, water, and high temperatures.
- Ensure at least 6 inches (150 mm) of clearance above and below the unit for ventilation.
- Never install in a sealed enclosure with flooded batteries.
- Confirm polarities before connection; reverse polarity can cause damage.
- Disconnect all connectors before maintenance or cleaning.
Wiring and Installation
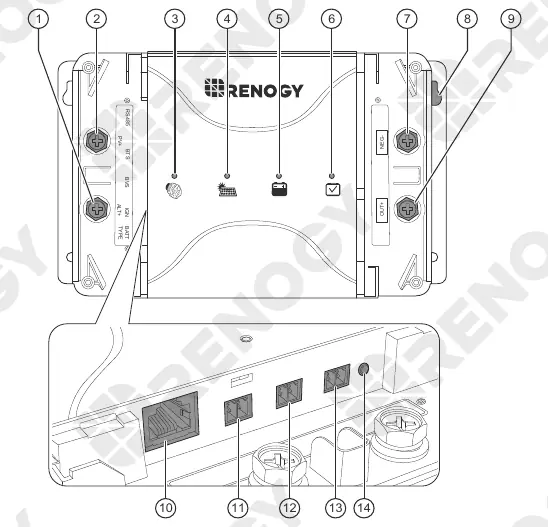
The charger requires proper cable and fuse sizing based on the model (30A or 50A) and cable length. Always install fuses at both input and output ends. The wiring process involves connecting the auxiliary battery, solar panel, and starter battery (if applicable) to the designated terminals. For smart alternators, the IGN signal wire must be connected to the vehicle's ignition.
Operation and Battery Types
You can select the battery type using the setting knob on the unit or via the DC Home app. Supported types include SLA (default), Gel, Lithium, User-defined, and Flooded. The charger features a four-stage charging algorithm: Bulk, Boost, Float, and Equalization.
Working Logic
The charger automatically determines the charging source. It can prioritize solar power and switch to hybrid charging (solar + alternator) if the solar input is insufficient to keep the auxiliary battery fully charged. Overvoltage protection is built-in for both solar and starter battery inputs.
Troubleshooting
- Alternator/Charging Indicator OFF: Check alternator input voltage (13.2V+ for traditional, 12V+ for smart). Ensure IGN signal wire, cables, and fuses are intact.
- Solar Charging Indicator OFF: Ensure the solar panel is not shaded and voltage is above 15V. Check electrical connections.
- Auxiliary Battery Indicator Solid Red: Turn off all loads connected to the battery and recharge the auxiliary battery.
Technical Specifications
The charger supports 12V DC systems with a battery voltage range of 9V to 16V. The 30A model (RBC30D1S) and 50A model (RBC50D1S) have specific solar input limits (30V/400W and 50V/660W respectively). Operating temperature range is -31°F to 149°F (-35°C to 65°C).
Practical help
Common problems
Alternator/Charging indicator is OFF
Check alternator input voltage (13.2V+ for traditional, 12V+ for smart). Ensure IGN signal wire, cables, and fuses are intact.
Solar Charging indicator is OFF
Ensure the solar panel is not shaded and voltage is above 15V. Check electrical connections.
Auxiliary Battery indicator is Solid Red
Turn off all loads connected to the battery and recharge the auxiliary battery.
Auxiliary Battery indicator is Fast Flashing Red
Ensure battery voltage is 12V, improve ventilation, avoid additional heating, and disconnect loads to allow cooling.
Before use
- Inspect charger for visible damage (cracks, dents).
- Verify battery type (SLA, Gel, Flooded, Li, User).
- Check cable and fuse sizing according to the manual.
- Ensure installation location has 6 inches of clearance.
- Confirm polarity before making connections.
- Ensure the charger is installed on a vertical surface.
Specs in practice
- Max. Solar Input Voltage
- 30V for RBC30D1S; 50V for RBC50D1S.
- Max. Solar Input Power
- 400W for RBC30D1S; 660W for RBC50D1S.
- Operating Temperature
- -31°F to 149°F (-35°C to 65°C).
- Charging Efficiency
- Up to 97%.
Images and diagrams
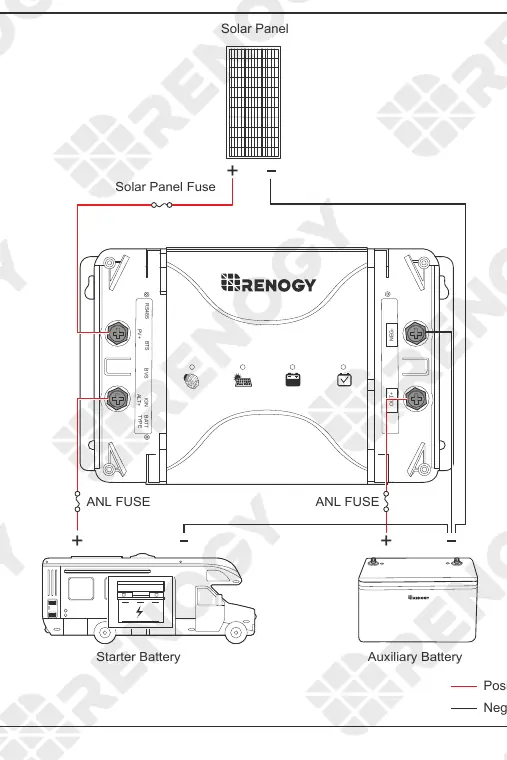
- The wiring diagram illustrates the connections for the Solar Panel, Starter Battery, and Auxiliary Battery, including the placement of ANL fuses and the Solar Panel fuse.
Model compatibility
- Compatible with 12V systems.
- Supports SLA, Gel, AGM, Flooded, and Lithium batteries.
- Requires BT-2 Bluetooth Module for app monitoring.

Manual page author
Emily Carter
User documentation editor
Prepares concise manual descriptions and highlights the most useful setup, operation, and maintenance information for readers.