Lighting / Fixtures
Installation Guide for Resistex Noclip LED Light
Comprehensive installation and wiring guide for the Resistex Noclip LED light. Includes step-by-step mounting instructions, wiring diagrams for ON/OFF, HF, BP, and DALI configurations, and essential safety precautions.
Table of contents
Manual images
Click an image to enlargeQuick Guide for Installation
The Resistex Noclip LED light requires professional installation. Ensure the power is disconnected before starting any work. The installation involves mounting the fixture using the provided brackets and connecting the electrical wiring according to the specific control type (ON/OFF, HF, BP, or DALI). Always verify the mounting distance (L) based on the length of your fixture (1200mm or 1500mm).
Safety Notes
- Power Off: Never work on the luminaire while it is under voltage.
- Professional Installation: The installation must be performed by a professional installer in compliance with electrical standards and regulations.
- ESD Protection: The device is sensitive to electrostatic discharges. Handle with precautions.
Installation and Mounting
Mount the fixture using the provided brackets. Ensure the mounting surface is stable and capable of supporting the fixture. The distance (L) between the mounting points depends on the fixture length:
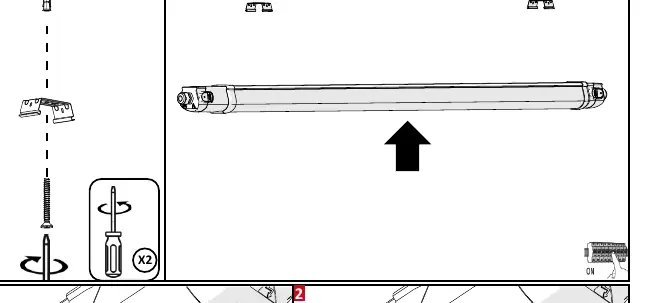
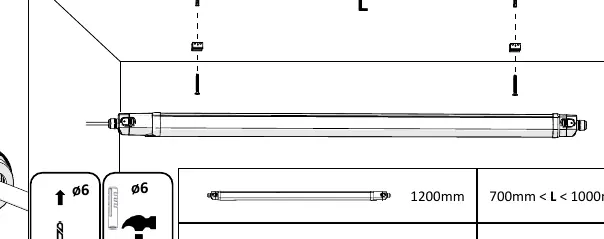
- For 1200mm fixtures: 700mm < L < 1000mm
- For 1500mm fixtures: 900mm < L < 1200mm
Electrical Connection
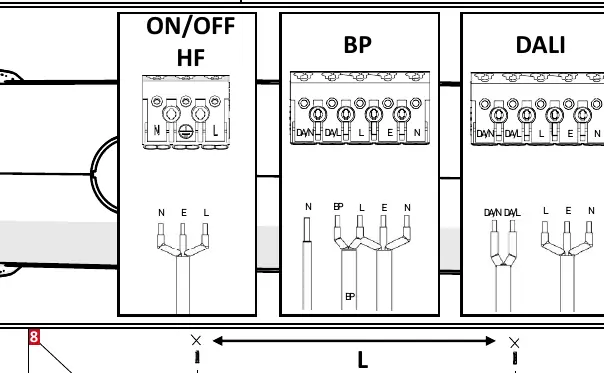
The fixture supports various wiring configurations. Follow the specific diagram for your model:
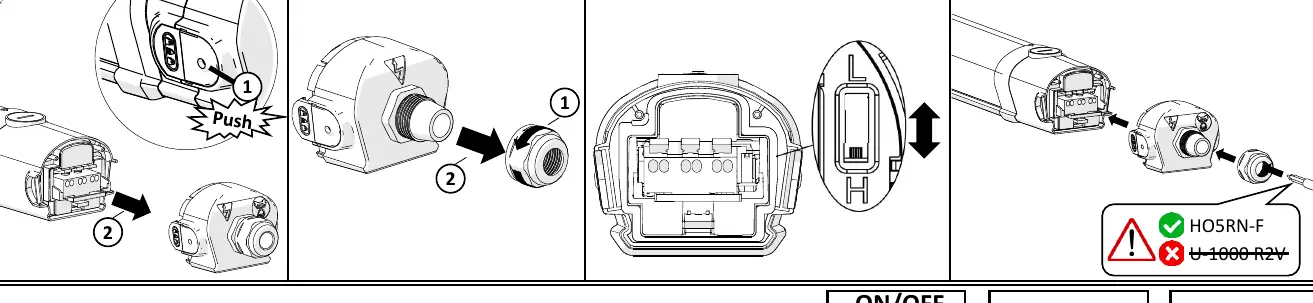
- Preparation: Open the end cap by pushing the release mechanism and unscrewing the cable gland. Insert the cable through the gland.
- Wiring: Connect the wires according to the terminal markings. The fixture supports ON/OFF, HF, BP, and DALI configurations. Refer to the specific wiring diagram on the fixture or in the manual for the exact terminal layout (L, N, E, DA/N, DA/L, BP).
- Cable Type: Use compatible cables such as HO5RN-F. Avoid using U-1000 R2V cables.
Maintenance
- Do not use chemicals or abrasive products to clean the luminaire.
- Keep these instructions for future dismantling or maintenance.
- For additional information, visit the manufacturer website at www.resistex-sa.com.
Technical Specifications
- IP Rating: IP65 (Dust-tight and protected against water jets)
- Impact Resistance: IK10
- Protection Class: Class II (Double insulated)
- Color Rendering Index: >80
- Warranty: 5 years
Official resources from the manual
Practical help
Common problems
Electrostatic discharge (ESD) risk
Handle the luminaire and its components with necessary precautions to avoid ESD damage during installation.
Incorrect mounting distance
Ensure the distance (L) between mounting brackets is between 700mm-1000mm for 1200mm fixtures, or 900mm-1200mm for 1500mm fixtures.
Incompatible cable type
Use HO5RN-F cables. Do not use U-1000 R2V cables.
Before use
- Ensure the main power supply is switched off.
- Verify that the installer is a qualified professional.
- Check that the mounting surface can support the fixture weight.
- Confirm the wiring configuration (ON/OFF, HF, BP, or DALI) matches your installation requirements.
- Ensure all cable glands are tightened properly after installation.
Images and diagrams
- Steps 1-2: Shows how to open the end cap and prepare the cable entry.
- Step 5: Provides wiring diagrams for ON/OFF, HF, BP, and DALI control systems.
- Step 8: Illustrates the required mounting distance (L) based on the fixture length.
Model compatibility
- Compatible with ON/OFF, HF, BP, and DALI control systems.
- Requires professional installation to maintain warranty and safety standards.

Manual page author
Emily Carter
User documentation editor
Prepares concise manual descriptions and highlights the most useful setup, operation, and maintenance information for readers.