Lighting / Fixtures
Installation Instructions for Resistex Trillon LED Wall Light
A comprehensive installation guide for the Resistex Trillon LED wall light. This manual covers safety precautions, step-by-step mounting procedures, wiring instructions, and maintenance guidelines.
Table of contents
Manual images
Click an image to enlargeQuick guide from the manual
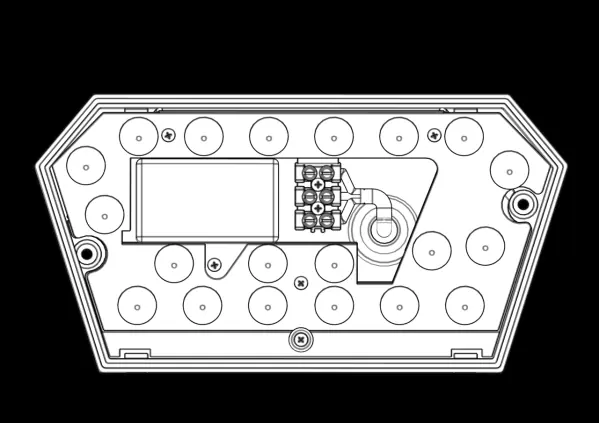
The Resistex Trillon is a wall-mounted LED fixture. Installation must be performed by a professional installer in compliance with local electrical standards. Ensure the power is disconnected before starting any work.
Safety Notes
- Power Off: Never work on the luminaire while it is under voltage.
- Professional Installation: Must be performed by a qualified installer.
- ESD Protection: The device is sensitive to electrostatic discharges (ESD). Handle with precautions.
Installation
Follow these steps to install the fixture:
- Turn off the power supply.
- Disassemble the fixture cover from the base.
- Mark the drilling points on the wall.
- Drill the holes and insert the anchors.
- Secure the base to the wall.
- Connect the electrical wires to the terminal block (ON/OFF).
- Secure the internal components.
- Fasten the base to the wall securely.
- Attach the cover back onto the base.
- Secure the cover using the provided screws.
- Ensure all connections are tight.
- Restore power.
Maintenance
To maintain the fixture:
- Do not use chemicals or abrasive products for cleaning.
- Keep this installation manual for future dismantling or maintenance.
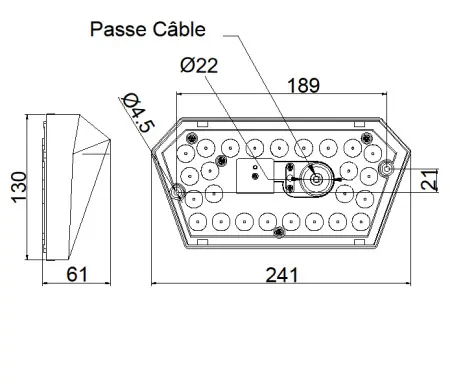
Dimensions
The fixture dimensions are 241mm in width, 130mm in height, and 61mm in depth. The cable entry point is marked as 'Passe Câble'.
Practical help
Common problems
Fixture does not light up
Verify that the power supply is connected correctly and the switch is in the ON position.
Electrostatic discharge risk
Handle the internal components with care and follow ESD precautions during installation.
Before use
- Ensure the main power supply is turned off.
- Verify that the installation surface is suitable for mounting.
- Ensure you have the necessary tools (drill, screwdriver).
- Confirm that a professional installer is available to perform the work.
Images and diagrams
- Steps 1-12 illustrate the complete mounting and wiring sequence.
- Step 6 specifically details the electrical wiring connection.
- Step 3 and 4 show the drilling and anchor installation process.
Model compatibility
- Designed for wall mounting.
- Must be installed in compliance with electrical installation standards.

Manual page author
Emily Carter
User documentation editor
Prepares concise manual descriptions and highlights the most useful setup, operation, and maintenance information for readers.