Electronics / Streaming Encoders
User Manual for RGBlink TAO 1mini
Comprehensive user guide for the RGBlink TAO 1mini streaming encoder and decoder. Learn how to set up connections, configure network settings, manage NDI/RTMP streams, and use the touch interface for recording and monitoring.
Quick answers from the manual
Quick answer
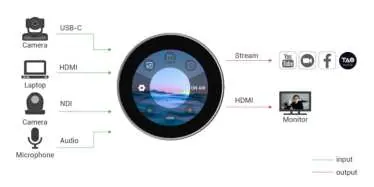
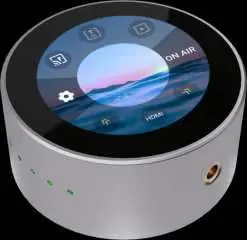
- The TAO 1mini is a multi-functional streaming device that acts as an encoder, decoder, switcher, and recorder. It supports HDMI/UVC inputs, NDI, and RTMP streaming, all controlled via a 2.1-inch touch screen. p. 7, 14
Key actions
- Connect Power p. 10
- Configure Network p. 11
- Start Streaming p. 34
First start
- Power on the device, connect your video source (HDMI/UVC), and configure network settings via the touch screen. p. 10, 11, 14
Problems and fixes
Device needs reset
Unplug the power supply, wait, and then turn on the device.
p. 43
Recording fails
Use a USB drive formatted to FAT32.
p. 43Maintenance and reset
- Factory Reset can be accessed via the 'About' menu. p. 33, 34
Technical specifications
| Parameter | Value | Meaning | Pages |
|---|---|---|---|
| Resolution | Up to 4K@60 | Maximum supported video resolution. | p. 7 |
| Power | 5~12V, 10W | Power input requirements. | p. 43 |
| Storage | USB 3.0 up to 2T | Maximum supported external storage capacity. | p. 9 |
Where to find it in the PDF
- Product Overview p. 6, 7, 8, 9
- Installation p. 10, 11, 12, 13
- Specifications p. 42, 43
Table of contents
Manual images
Click an image to enlargeQuick Guide
The RGBlink TAO 1mini is a compact, multi-functional device that serves as an NDI encoder/decoder, video switcher, and recorder. It features a 2.1-inch touch screen for real-time monitoring and control. To begin, connect your power source (USB-C or PoE), connect your video input (HDMI or UVC), and configure your network settings via the touch interface.
Product Overview
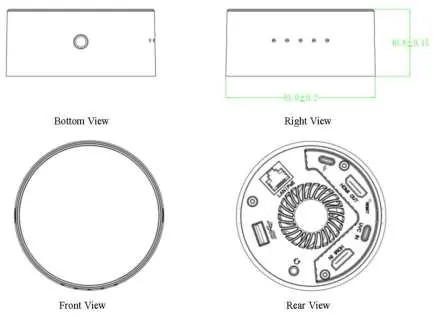
The TAO 1mini supports HDMI and UVC inputs, as well as full NDI gigabit Ethernet video stream codecs. It is designed for portability and can be mounted using standard camera screw holes.
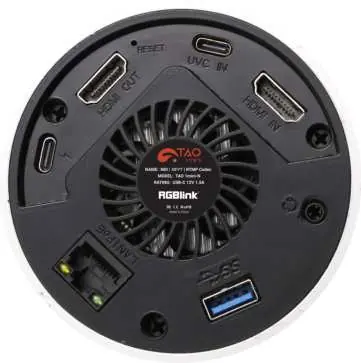
Connectors
- USB-C (Power): Supports PD protocol.
- HDMI-OUT: For real-time monitoring of inputs and outputs.
- USB-C (Input): For UVC capture (USB cameras) and reverse power supply.
- HDMI-IN: For receiving video signals.
- 3.5mm Audio Socket: For analog audio input and output monitoring.
- USB 3.0: For recording to hard disks (up to 2T).
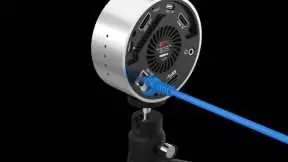
- LAN: Gigabit network port with PoE support.
Installation

Power Supply
The device can be powered via the included USB-C power adapter or through a PoE (Power over Ethernet) module.
Network Configuration
The TAO 1mini and your computer must be on the same LAN. You can use DHCP for automatic IP assignment or configure it manually in the Settings menu. The default IP address is 192.168.5.100.
Operation
Input Area
Access functions by tapping the icons on the touch screen. You can select HDMI, UVC, USB Player, RTMP Pull, or NDI Decoding. Note that NDI Encoding and NDI Decoding modes cannot work simultaneously.
Output Area
Manage your stream and recordings here. Options include RTMP Push, NDI Encoding, and Video Recording. For RTMP streaming, you can configure settings via the TAO APP or by using a configuration file (rtmp.ini) on a USB disk.
Settings
The Settings menu allows you to adjust:
- Network: Configure IP, DHCP, and WiFi.
- Bluetooth: Pair with your mobile phone for TAO APP integration.
- Fan Control: Adjust fan speed or set to Auto.
- Brightness: Adjust screen brightness and display rotation.
- About: Check device info, perform firmware upgrades, or factory reset.
Maintenance and Troubleshooting
If you encounter issues, ensure your USB drive is formatted to FAT32 (avoid EXFAT). If the device behaves abnormally, try unplugging the power supply and restarting. For streaming issues, ensure only one streaming function is active at a time.
Official resources from the manual
Practical help
Common problems
Recording fails or no file found
Ensure the USB drive is formatted to FAT32. Avoid using EXFAT format.
HDMI signal not recognized
The device does not support YUV444 or HDCP formats. Ensure the input source is set to RGB, YUV422, or YUV420.
Streaming/Encoding issues
Ensure only one streaming function (RTMP, NDI, etc.) is active at a time.
Before use
- Check package contents (Power adapter, USB-C cable, 1/4 screw, storage box).
- Ensure a stable power source (USB-C or PoE).
- Connect your video source (HDMI or UVC).
- Connect a network cable if streaming is required.
- Format your USB drive to FAT32 if you intend to record.
Images and diagrams
- System connection diagram illustrates inputs (Camera, Laptop, Microphone) and outputs (Stream, Monitor).
- Rear panel diagram identifies all physical ports including HDMI, USB, and LAN.
Model compatibility
- Supports resolutions up to 4K@60.
- USB recording supports drives up to 2T.
- Requires network connectivity for streaming functions.

Manual page author
David Miller
Documentation analyst
Organizes user manual content into clear summaries, with attention to model details, product context, and everyday usability.