Electronics / Amplifiers Receivers
User Manual for Rotel RC-1572MKII Stereo Control Amplifier
Comprehensive user manual for the Rotel RC-1572MKII Stereo Control Amplifier. Includes detailed setup instructions, connection diagrams for analog and digital sources, configuration of settings, and troubleshooting guidance.
Table of contents
Manual images
Click an image to enlargeQuick Guide and Safety
The Rotel RC-1572MKII is a high-performance stereo control amplifier. Before making any connections, ensure all components in your system are turned off. Always turn the volume control down before turning the amplifier on or off to protect your speakers. Ensure the unit has at least 10 cm of unobstructed clearance for ventilation. Do not use extension cords; connect the unit directly to a wall outlet.
Controls and Connections
The front panel features the Power switch, headphone output, source selection buttons, volume control, and menu navigation buttons. The rear panel contains a comprehensive array of inputs and outputs:
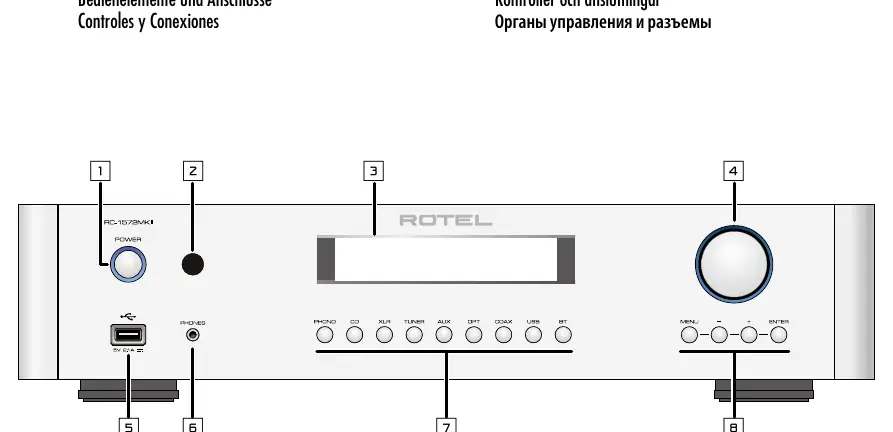
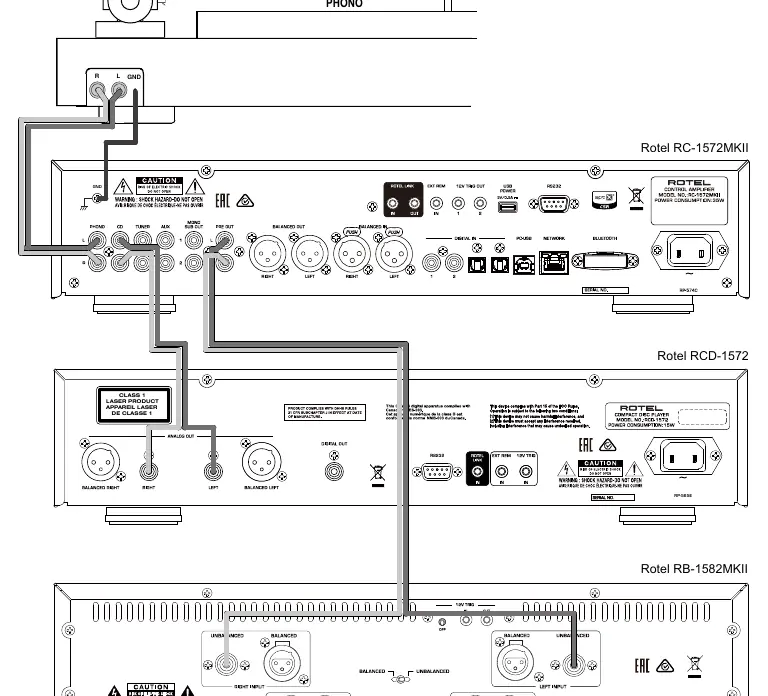
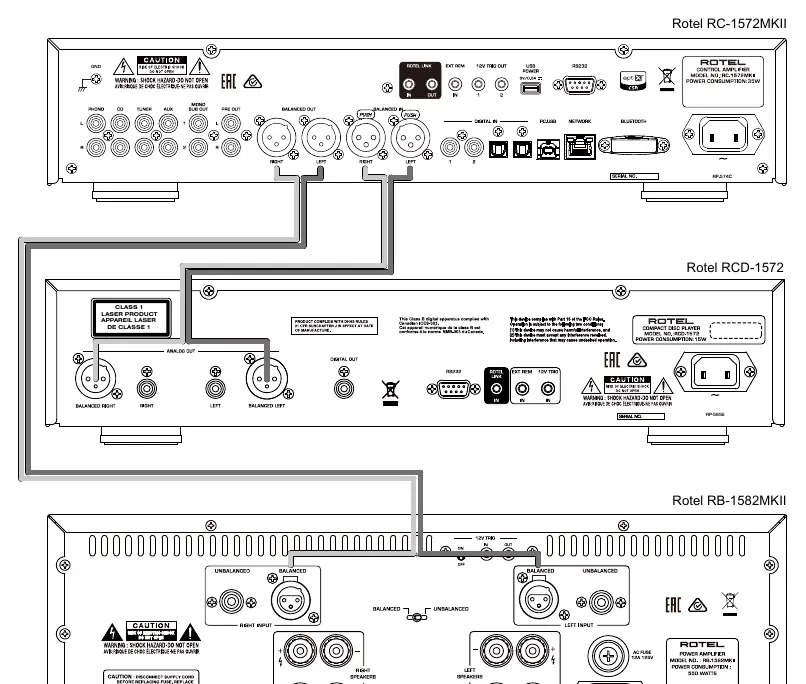
- Analog Inputs: Phono (with ground terminal), CD, Tuner, Aux, and Balanced (XLR) inputs.
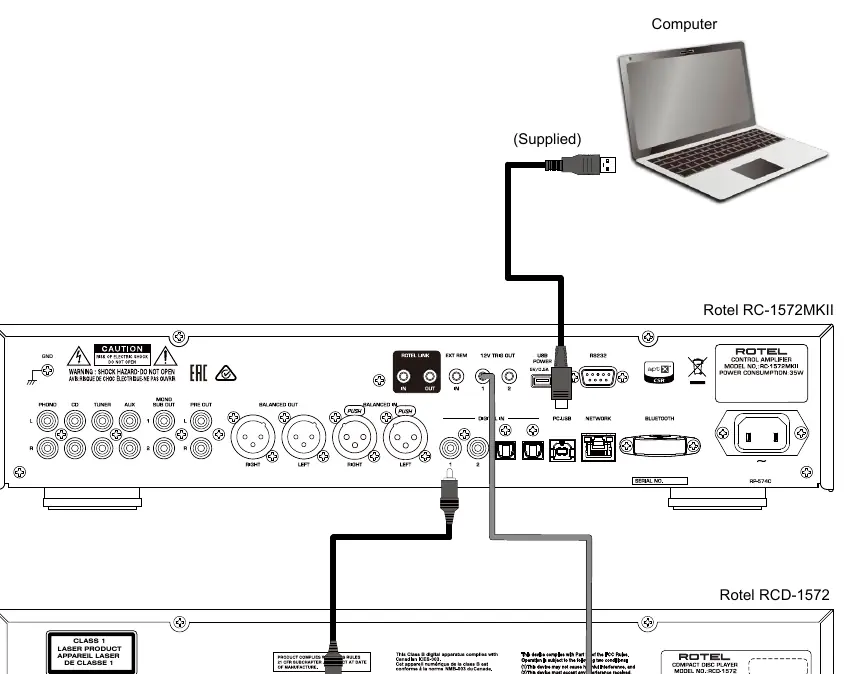
- Digital Inputs: Coaxial 1 & 2, Optical 1 & 2, and PC-USB.
- Outputs: Mono Subwoofer out, Preamp out, and Balanced (XLR) output.
- Control/Data: Rotel Link, EXT REM IN, 12V Trigger, RS232, and Network connection.
Setup and Installation
For optimal performance, place the unit on furniture designed to house audio components to reduce vibration. Keep power cords, digital cables, and analog signal cables separated to minimize interference. Use high-quality shielded cables for all connections. When connecting a turntable, use the Phono input and connect the ground wire to the ground terminal. For PC-USB, Windows users may need to install the provided driver for USB Audio Class 2.0 support.
Operation
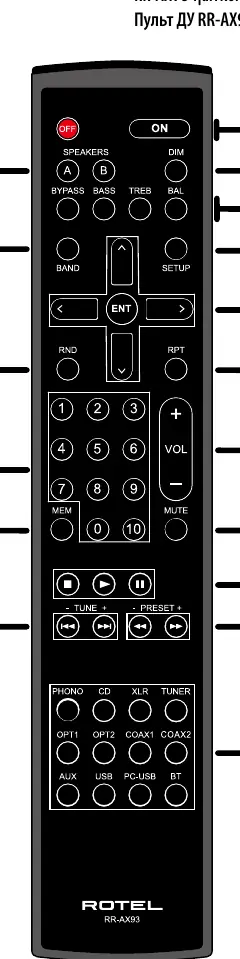
The unit can be operated via the front panel or the supplied RR-AX93 remote control. The display shows the selected source, volume level, and tone settings. You can adjust volume, balance, and tone controls (Bass/Treble). Tone controls can be bypassed for the purest sound. The display and power LED brightness can be adjusted via the Dimmer control.
Settings Menu
Access the settings menu by pressing the MENU button on the front panel or SETUP on the remote. Key settings include:
- Tone Control: Adjust Bass and Treble levels or enable Tone Bypass.
- Power Option: Configure for Normal or Quick power modes.
- USB Power: Set the rear USB port to provide power in standby mode.
- Auto Power Off: Set a timer for automatic standby.
- Fixed Gain: Configure a fixed volume level for specific inputs.
- Network: View status and configure IP settings.
- Main: Check software version and perform updates.
Troubleshooting
If you encounter issues, follow these steps:
- Power Indicator Not Illuminated: Check the power outlet and ensure the power switch is on. If it still fails, the internal fuse may be blown; contact your dealer.
- No Sound: Verify all cable connections between the source, amplifier, and speakers.
- Cannot Connect via Bluetooth: Delete the previous connection memory on both the amplifier and your device, then attempt to pair again.
Specifications
The RC-1572MKII features a highly regulated power supply with a custom toroidal transformer. It supports PCM audio up to 384kHz/32-bit via PC-USB and is Roon Tested. Detailed specifications regarding THD, frequency response, and input sensitivity are provided in the full manual.
Practical help
Common problems
Power indicator is not illuminated
Ensure the unit is plugged into a live wall outlet and the power switch is pressed in. If it still does not light up, the internal fuse may be blown; contact your authorized Rotel dealer.
No sound
Check that the signal source is functioning. Ensure all cables between the source, amplifier, and speakers are connected correctly and securely.
Cannot connect via Bluetooth
Delete the memory of the previous connection on both the RC-1572MKII and your Bluetooth device (often listed as 'Forget this Device'), then try to pair again.
Before use
- Turn off all system components before making or changing connections.
- Ensure at least 10 cm of clearance around the unit for ventilation.
- Install two UM-4/AAA batteries in the RR-AX93 remote control.
- Verify the AC voltage matches the requirements noted on the back panel.
- Use high-quality, shielded cables to prevent noise and interference.
Specs in practice
- Total Harmonic Distortion (< 0.004%)
- Indicates extremely low signal distortion, ensuring high-fidelity audio reproduction.
- Frequency Response (10Hz - 100kHz)
- The range of frequencies the amplifier can reproduce accurately; a wider range ensures better detail.
- Input Sensitivity (3mV Phono)
- Optimized for Moving Magnet (MM) phono cartridges.
Images and diagrams
- Figure 1: Front and rear panel layout identifying all inputs, outputs, and controls.
- Figure 3: Wiring diagram for analog input and output connections.
- Figure 4: Wiring diagram for balanced (XLR) input and output connections.
- Figure 5: Wiring diagram for digital inputs and 12V trigger connections.
Model compatibility
- PC-USB: Supports USB Audio Class 1.0 and 2.0. Driver installation is required for 2.0 on Windows.
- Bluetooth: Supports traditional Bluetooth, AAC, and APTX audio streaming.
- Phono Input: Designed specifically for Moving Magnet (MM) cartridges.

Manual page author
Michael Turner
Technical manual editor
Reviews PDF manuals for structure, safety notes, and practical product details so readers can find the right information quickly.