Home Appliances / Beverage Dispensers
User Manual for ROVSUN Split Type Air Conditioner
Quick guide for the ROVSUN Split Type Air Conditioner. Includes installation steps, remote control functions, maintenance, troubleshooting, and error codes.
Table of contents
Manual images
Click an image to enlargeImportant Information
This manual provides essential instructions for the installation, operation, and maintenance of the ROVSUN Split Type Air Conditioner. Always ensure the unit is installed by a qualified professional. Before operation, verify that the power supply matches the rating plate specifications and that the unit is properly grounded.
Safety Precautions
- Do not install the unit near flammable substances or in areas with poor ventilation.
- Ensure the outdoor unit base is firmly fixed and the drainage hose is unobstructed.
- Always disconnect the power supply before performing any cleaning or maintenance.
- Do not obstruct air inlets or outlets, as this reduces efficiency and may cause failures.
- Children should not play with the appliance; supervision is required for users with reduced capabilities.
Remote Control Operation
The remote control allows you to manage various modes and settings:
- Modes: AUTO, COOL, DRY, FAN, and HEAT.
- Fan Speed: Adjustable between Auto, Low, Mid, and High.
- Special Functions: TURBO for quick cooling/heating, SLEEP for comfort, ECO for energy saving, and MUTE for quiet operation.
- Swing: Adjusts horizontal flaps and vertical deflectors for airflow direction.
- Timer: Allows automatic switching on or off of the appliance.
Installation Guide
Proper installation is critical for performance and safety:
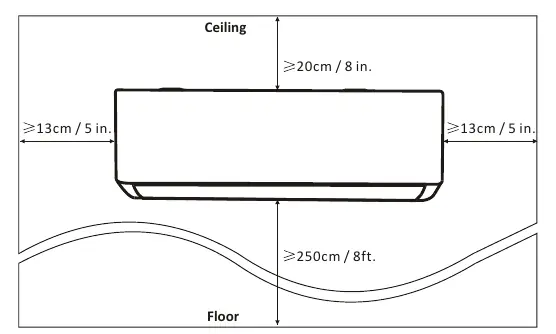
- Location: Ensure the indoor unit has sufficient clearance (at least 20cm from the ceiling and 13cm from side walls). The outdoor unit must be in a safe, solid location with adequate airflow.
- Mounting: Use a mounting plate that can withstand four times the unit's weight.
- Piping: Connect refrigerant pipes carefully, ensuring ports are clean. Use a torque wrench to tighten flare nuts according to the specified torque requirements.
- Wiring: Connect wires according to the diagram inside the wiring cover. Ensure all connections are secure.
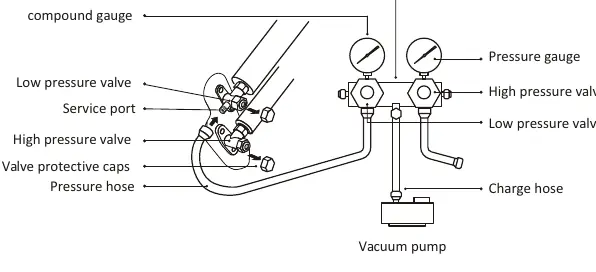
- Vacuum Pumping: Essential for removing air and moisture from the refrigerant system before operation.
Maintenance
Regular maintenance ensures efficient operation:
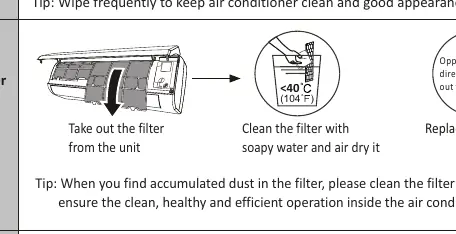
- Cleaning: Wipe the unit surface with a soft, dry cloth or a cloth dipped in neutral detergent. Never flush the unit with water.
- Filters: Clean the air filter regularly with soapy water and air dry it.
- Long-term Storage: Remove batteries from the remote control and disconnect the power supply.
Troubleshooting
If the unit malfunctions, check the following:
- Unit does not operate: Check for power failure, blown fuses, or active timer settings.
- Insufficient airflow: Check for dirty filters or obstructed intakes.
- Strange noises: Often caused by thermal expansion/contraction of the front panel.
- Remote not responding: Check batteries and ensure no obstacles are between the remote and the indoor unit.
If an error code appears on the display (e.g., E1, E2, E3), refer to the error code table in the manual to identify the specific sensor or component fault.
Practical help
Common problems
The appliance does not operate
Check for power failure, ensure the plug is connected, check fuses, or verify if the TIMER-ON function is active.
Insufficient airflow (hot or cold)
Clean the air filter, check for obstructed air intakes/outlets, or adjust the temperature setting.
Remote control does not respond
Replace the batteries, ensure the remote is close enough to the indoor unit, and remove any obstacles between them.
Strange noise during operation
This is often caused by the expansion or contraction of the front panel due to temperature changes and does not indicate a problem.
Before use
- Ensure the power supply voltage complies with the rating plate specifications.
- Verify that the air filter is properly mounted.
- Check that the drainage hose is unobstructed and placed obliquely downward.
- Ensure no obstacles are blocking the air inlet or outlet.
- Check that the remote control has fresh batteries installed.
Specs in practice
- T1/T3 Climate
- Refers to different ambient temperature operating ranges for cooling and heating modes.
- Torque Requirements
- Specific tightening force (in N*m or lbf-ft) required for refrigerant pipe flare nuts to prevent leaks.
- Vacuum Pumping
- A mandatory installation step using a vacuum pump to remove air and moisture from the refrigerant system.
Images and diagrams
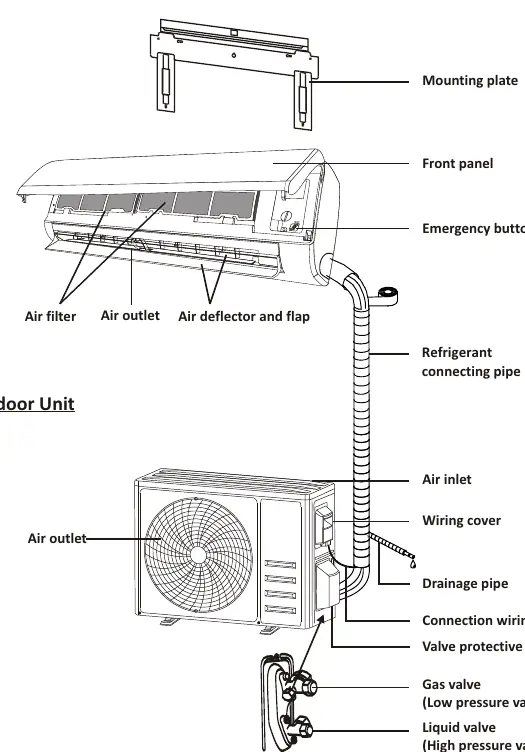
- Indoor Unit Parts: Identifies the mounting plate, front panel, air filter, and drainage ports.
- Remote Control Display: Shows symbols for modes (Cool, Heat, Dry, Fan, Auto) and functions (Turbo, Eco, Sleep).
- Wiring Diagram: Located inside the wiring cover for connecting indoor and outdoor units.
Model compatibility
- Heating pump models require specific drainage installation.
- Inverter models have different operating temperature ranges compared to fixed models.
- Some functions (e.g., Self-Clean, Health, Gentle Wind) are optional and depend on the specific model.

Manual page author
Michael Turner
Technical manual editor
Reviews PDF manuals for structure, safety notes, and practical product details so readers can find the right information quickly.