Power / Batteries & Chargers
User Manual for Schumacher 12-Volt Onboard Marine Battery Charger
Quick guide and user manual for the Schumacher 12-Volt Onboard Marine Battery Charger. Learn how to mount, wire, and operate your charger safely.
Table of contents
Manual images
Click an image to enlargeQuick Guide
To use the Schumacher Onboard Marine Battery Charger:
- Connect: Attach the black ring terminal to the negative battery post and the red ring terminal to the positive battery post.
- Power: Plug the charger into a live AC power outlet.
- Select Battery Type: The Power On and last used Battery Type LEDs will light. To change the type, press and hold the Select button for 3 seconds, then toggle to STD, AGM, or GEL. The LED will flash for 3 seconds, then turn solid.
- Charging: Charging begins automatically in 5 seconds if connected to a battery. When fully charged, all four LEDs will be solid.
Mounting Instructions
The charger can be permanently mounted in three positions: flat (floor), wall horizontal, or wall vertical.
- Location: Do not mount near fuel tanks or below the waterline. Ensure at least four inches of unobstructed area on all sides for airflow.
- Installation: Use the charger as a template to mark four holes. Drill using a #9 (7/32") bit for nuts and bolts or a 5/32" bit for #10 self-tapping screws. Mount with LEDs facing up.
DC Wiring Detail
When connecting to batteries:
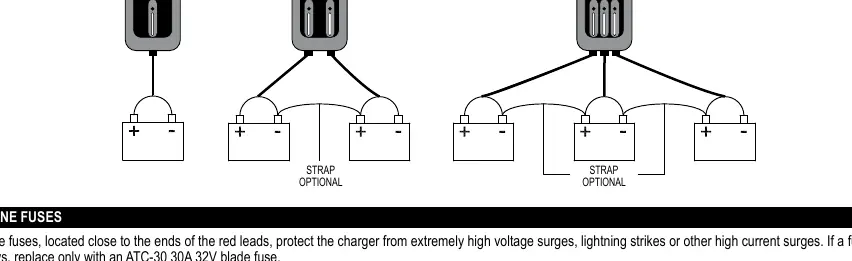
- Remove nuts on battery posts, place ring terminals, and replace nuts tightly.
- Connect black lead to negative post and red lead to positive post.
- For 2 and 3-bank chargers, connect each bank to its respective battery.
Control Panel
The control panel features a Select button and LED indicators:
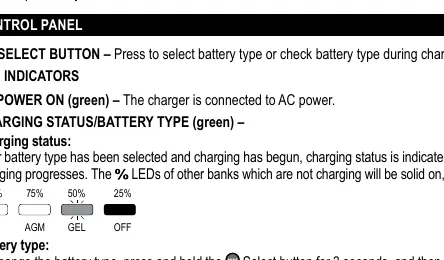
- Power On (Green): Indicates connection to AC power.
- Charging Status/Battery Type (Green): Indicates charging progress in 25% increments.
- Red LED Flashing: Reversed connections.
- Red LED Solid: Aborted charge, OFF selected, or battery not connected.
Maintenance and Care
- Clean ring terminals after each use to prevent corrosion.
- Wipe the charger case with a soft cloth.
- Coil input and output cords neatly when storing.
- Store in a cool, dry place in an upright position.
Troubleshooting
- Reversed Connections: Red LED flashes. Correct the wiring.
- Aborted Charge: Red LED solid. Charger output is shut off. Check battery condition.
- Not Charging: If battery voltage is too low, bank is off, or fuse is bad, check the fuse and battery status.
Specifications
- Input: 120V AC/60Hz, 3.7A
- Output: 12V DC@15A
- Ingress Protection: IP65
Practical help
Common problems
Red LED flashing
Connections are reversed. Reverse the connections.
Red LED solid
Aborted charge, OFF selected, or battery not connected. Check battery or press Select to activate bank.
Correctly connected but not charging
Battery voltage too low, bank is turned off, or bad fuse. Replace fuse or press Select to choose battery type.
Before use
- Turn off all boat accessories
- Clean battery terminals
- Ensure charger is unplugged from AC outlet
- Check battery voltage
- Ensure area is well ventilated
Specs in practice
- Ingress Protection
- IP65 (dust tight and water resistant)
Images and diagrams
- Wiring diagrams illustrate connections for 1, 2, and 3 batteries.
- Control panel layout shows LED indicators for charging status and battery type selection.
Model compatibility
- For 12V Lead-Acid batteries (STD, AGM, Gel, Deep-cycle).
- Not intended for dry-cell batteries.

Manual page author
David Miller
Documentation analyst
Organizes user manual content into clear summaries, with attention to model details, product context, and everyday usability.