Sports / Marine Equipment
User Manual for Sea Eagle EZLite 10 Kayak
Quick guide for the Sea Eagle EZLite 10 Kayak. Learn about setup, inflation, paddling, storage, troubleshooting, and repair procedures for your inflatable kayak.
Table of contents
Manual images
Click an image to enlargeQuick Guide
The Sea Eagle EZLite 10 is an inflatable kayak designed for near-shore recreational use. Before your first trip, ensure you have a USCG-approved PFD, a fully charged phone in a waterproof bag, and a manual pump. Always check inflation levels before heading out. The kayak uses a V-bottom Woven Drop Stitch floor and requires inflation to 5-10 psi. Always follow local boating regulations and never use air compressors designed for construction or tires.

Safety
Boating is inherently dangerous. Follow these safety guidelines:
- Always wear a USCG-approved PFD.
- Do not consume alcohol or drugs while boating.
- Do not exceed the maximum capacity of 325 lbs.
- Do not use air compressors; use only Sea Eagle recommended pumps.
- Always tell someone your float plan.
- Bring a whistle or horn.
- Carry a manual pump and repair kit on the water.
Setup and Inflation
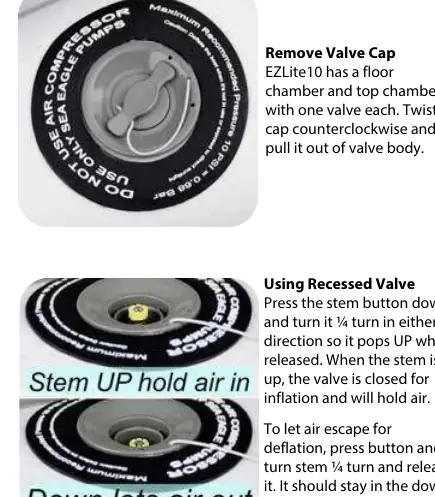
Valves: The kayak features recessed valves. To inflate, press the stem button and turn 1/4 turn so it pops UP. To deflate, press and turn 1/4 turn to lock it in the DOWN position.
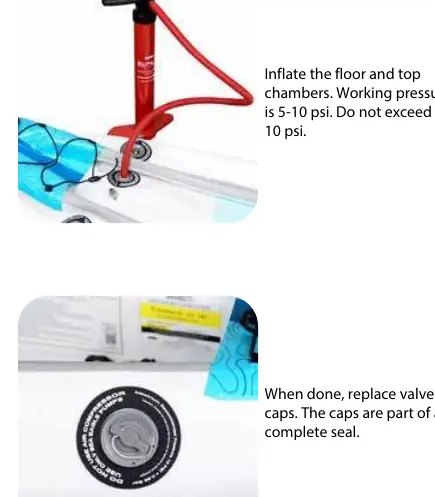
Inflation: Attach the hose with the hook-in adapter to the pump handle. Inflate the floor and top chambers to 5-10 psi. Do not exceed 10 psi. Always replace valve caps after inflation to ensure a complete seal.
Assembly
Pedals: Locate the right (R) and left (L) pedals and aluminum bars. Run the bar through the hole in the FlexBrace pedal, then through the pedal and into the end cap. Lock the bar by rotating the handle down into the locking hook.
Skeg: Flip the boat over and slide the skeg into the skeg base until the locking clip clicks into place.
Seat: Clip the seat straps to the D-rings. The upper straps attach to the forward D-rings.
Operating
Paddling: Sit up straight with hands wide enough that forearms are perpendicular to the shaft. Power should come from your torso. To minimize yaw (zig-zagging), ensure the skeg is installed.
Balance: The EZLite 10 is V-shaped and stable. If the boat rolls, keep your eyes on the horizon and hold the paddle out in front of you for balance.
Storage
Cleaning: Rinse with fresh water and dry thoroughly after each use to prevent mold. Use a general-purpose cleaner and scrub brush if needed.
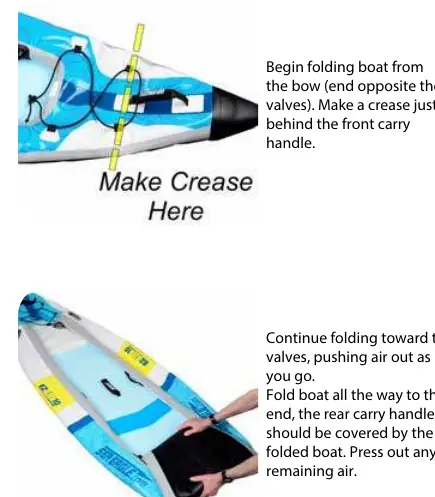
Folding: Remove the seat, pedals, and skeg. Fold the boat from the bow, making a crease behind the front carry handle. Continue folding toward the valves, pushing air out. Place the large folded portion on top of the rear portion to protect the skeg base.
Troubleshooting and Repairs
Leaks: If the boat loses pressure, perform a soapy water test. Mix dish soap with water, inflate the chamber, and spread the solution over the surface to locate bubbles.
Patching: Deflate the area. Trace a penny on the patch material and the boat. Cut the patch, apply PVC glue to both the patch and the boat, let dry for 15 minutes, then apply the patch. Smooth with a tool and heat with a hair dryer for 10-20 seconds for best results.
Practical help
Common problems
Loss of air pressure
Check for leaks using the soapy water test. Tighten one-way recessed valves using the valve wrench included in the repair kit.
Skeg base warped
Heat the base with a hair dryer and bend it back into shape. Do not hammer the skeg into a warped base.
Valve adapter will not turn
Remove the red gasket, twist it to stretch, and reinstall. Ensure the groove faces outward.
Before use
- Check inflation levels (5-10 psi)
- Wear a USCG-approved PFD
- Bring a fully charged phone in a waterproof bag
- Ensure paddle is assembled correctly
- Check weather conditions
- Tell someone your float plan
Specs in practice
- Working Pressure
- 5-10 psi (Do not exceed 10 psi)
Images and diagrams
- Valve operation: Press stem and turn 1/4 turn to open/close.
- Skeg installation: Slide into base until locking clip clicks.
- Patching: Trace penny, cut patch, apply glue, dry 15 mins.
Model compatibility
- Compatible with Bixpy K-1 motor (skeg mount)
- Use Sea Eagle recommended pumps only
- Do not use air compressors

Manual page author
Emily Carter
User documentation editor
Prepares concise manual descriptions and highlights the most useful setup, operation, and maintenance information for readers.