Sports / Water Sports
User Manual for Sea Eagle 124SMB Super Motormount Boat
Comprehensive user guide for the Sea Eagle 124SMB Super Motormount Boat. Includes setup, inflation, motor mounting, rowing instructions, safety tips, maintenance, and repair procedures.
Table of contents
Manual images
Click an image to enlargeQuick guide from the manual
The Sea Eagle 124SMB is a versatile inflatable boat designed for fishing, motoring, and rowing. Before use, ensure you have a USCG-approved PFD for every passenger. Always check inflation levels before heading out. The boat is rated for a maximum motor capacity of 6HP and 75 lbs. Do not use air compressors, as they can damage the boat; use only Sea Eagle recommended pumps.
Operating your boat
Fishing
The 124SMB is spacious enough for multiple fishermen and gear. Installing the optional floorboards increases stability, allowing you to stand and cast more easily.
Motoring
The boat is rated for small electric or gas motors up to 6HP (max 75 lbs). Never exceed these capacities. For gas motors, a 15-inch short shaft is recommended. For electric motors, a 12V deep cycle marine battery is required.
Rowing
The boat rows easily. Use the wooden bench seat for comfort. Place oars through the blue carry handles on the sides, which double as oarlocks. Keep blades fully immersed but close to the surface for better leverage.
Safety
- Always wear a USCG-approved PFD.
- Do not go boating alone.
- Do not consume alcohol while boating.
- Do not drag the boat over rocks or gravel.
- Do not use compressors, CO2, or compressed air for inflation.
- Do not sleep inside the boat while on the water.
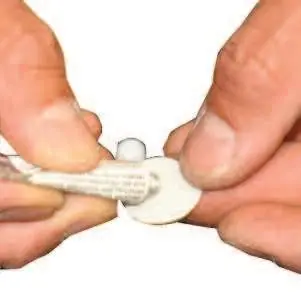
Inflation and assembly

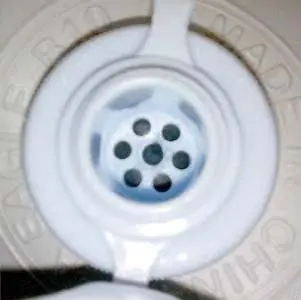
Inflation valves and pumps
Use the provided foot pump to inflate the boat. The triple nozzle adapter is needed for one-way air valves. Ensure the retainer ring is over the valve base and screwed in before inflating. Inflate to 1.1 PSI.
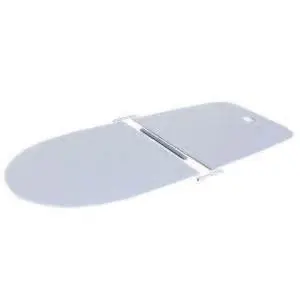
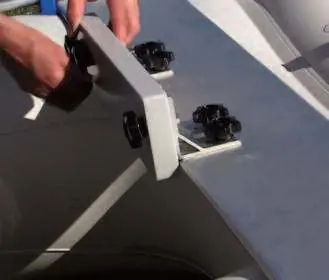
Floorboards
If installing floorboards, inflate chamber #1 to 50% capacity first to help the boat take shape. Place bow and stern pieces inside, overlapping in the middle. Connect them using the large center strut, then insert small struts on the sides.
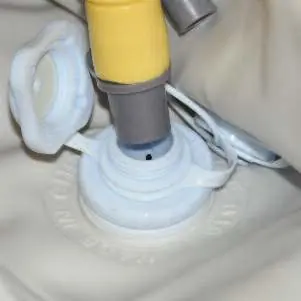
Motor mount installation
Slide aluminum rods through grommets on the bench seat and motor mount board. Secure with rod pins. Attach the L-bracket and wooden motor mount to the bench using the provided bolts and washers.
Storage and maintenance
Before storing for more than a few days, ensure the boat is dry to prevent mildew. Deflate by unscrewing the valves. Roll the boat tightly from bow to stern to force out remaining air. Store in a cool, dry place.
Troubleshooting and repairs
Troubleshooting
If the boat loses air, check for leaks by spraying soapy water on suspicious areas. Check valve tightness and ensure the O-ring base is free of dents. If the O-ring is dented, heat it with a hairdryer for about a minute.
Repairs
Small punctures (less than 1/8 inch) can be repaired with a drop of PVC-based glue. For larger leaks, use the provided patches. Clean and dry the area, trace the patch outline, apply adhesive to both the patch and the boat, and press firmly. Do not use a hair dryer on an inflated boat.
Practical help
Common problems
Boat losing air
Check valve tightness, inspect for leaks using soapy water, or check for temperature-related pressure drops.
Dents in O-Ring base
Heat the O-Ring with a hairdryer for about a minute until the dent eases.
Crossed threads on valves
Turn the outer cap back 1/4 turn before tightening to ensure proper alignment.
Before use
- Wear a USCG-approved PFD.
- Check inflation levels.
- Ensure boat is free of debris.
- Verify motor weight and HP limits (6HP max/75 lbs).
- Carry a repair kit and foot pump.
Specs in practice
- Motor Capacity
- 6HP maximum / 75 lbs maximum weight.
- Inflation Pressure
- 1.1 PSI.
Images and diagrams
- Inflation Valves: Shows how to use the one-way valve and foot pump.
- Floorboard Installation: Shows how to connect bow and stern pieces with struts.
- Motor Mount Installation: Shows bracket and rod assembly.
Model compatibility
- Not for use with air compressors (use Sea Eagle pumps only).
- Minn Kota, PowerFilm, and Torqeedo products have separate warranties.

Manual page author
David Miller
Documentation analyst
Organizes user manual content into clear summaries, with attention to model details, product context, and everyday usability.