Furniture / Storage Cabinets
Secomp 19-inch Rack Cabinet Assembly Instructions
Quick assembly guide for Secomp 19-inch rack cabinets. Includes step-by-step instructions for frame assembly, panel installation, and optional component mounting.
Table of contents
Quick guide from the manual
This document provides assembly instructions for the Secomp 19-inch rack cabinet. Ensure you have all components listed before beginning the assembly process. The assembly requires M5 screws and basic tools.
Package contents
The kit includes the following components:
- M5 screws
- Bottom door hinge
- Lock
- Profile rails (2x or 4x)
- Side frames (2x)
- Top cover
- Bottom cover
- Side panels (2x)
- Rear panel
- Glass door
Assembly steps
Step 1: Mounting profile rails
Attach the 2 or 4 profile rails to the side frames. Use 2 screws for each rail to ensure stability.
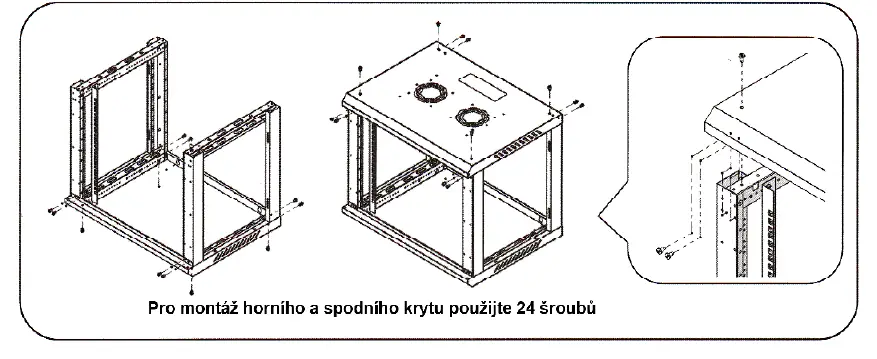
Step 2: Assembling side frames with covers
Connect the side frames to the bottom and top covers. Use a total of 24 screws to secure the top and bottom covers to the frame structure.
Step 3: Installing the lock and rear panel
Mount the lock mechanism into the glass door. Attach the rear panel to the side frames using 4 screws for 4U/6U models or 6 screws for 9U/12U/15U/18U models.
Step 4: Attaching doors and side panels
Slide the glass door and side panels into the designated slots on the assembled frame. Ensure they are properly aligned and secured.
Optional components
The cabinet supports the installation of optional casters or leveling feet. These can be attached to the bottom cover using the provided mounting points.
Practical help
Common problems
Difficulty aligning panels
Ensure the side frames are perfectly square before tightening the 24 screws connecting the top and bottom covers.
Incorrect screw count for rear panel
Use 4 screws for 4U/6U cabinets and 6 screws for larger 9U/12U/15U/18U cabinets.
Before use
- Verify all parts are present according to the package contents list.
- Ensure you have a screwdriver compatible with M5 screws.
- Clear a flat, stable workspace for assembly.
- Identify your specific rack height (U size) to determine the correct number of screws for the rear panel.
Specs in practice
- 4U/6U vs 9U/12U/15U/18U
- Determines the number of screws required for the rear panel (4 vs 6 screws).
Images and diagrams
- The assembly sequence follows a logical progression from the internal frame to the external panels.
- Detailed circular insets in the manual highlight the specific orientation of hinges and rail mounting points.
Model compatibility
- Casters and leveling feet are optional accessories and not included in all kits.

Manual page author
Emily Carter
User documentation editor
Prepares concise manual descriptions and highlights the most useful setup, operation, and maintenance information for readers.