Lighting / LED Drivers
Installation Guide for Sigor Nivo Recessed Luminaire fixed 111mm
Quick installation and usage guide for the Sigor Nivo Recessed Luminaire fixed 111mm. Includes mounting instructions, wiring, lens replacement, and safety warnings.
Table of contents
Manual images
Click an image to enlargeQuick guide from the manual
This document provides installation and usage instructions for the Sigor Nivo Recessed Luminaire fixed 111mm. Installation must be performed by a qualified electrician in accordance with VDE 0100 regulations. Ensure the power circuit is isolated before starting work.
Intended Use
The Nivo Recessed Luminaire is designed for indoor use on solid, stable surfaces. It features IP30 protection and must be operated with the included constant current driver (350 mA / DC 34 V). The luminaire is not intended to be covered with insulating materials such as mineral wool.
Installation
- Switch off the corresponding circuit and disconnect the power supply.
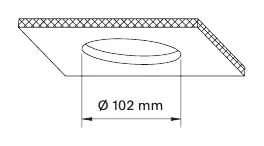
- Create a ceiling cutout with a diameter of 102 mm.
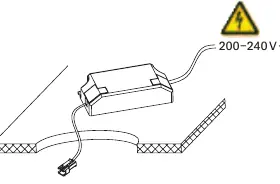
- Connect the LED driver's terminal block to the disconnected mains supply.
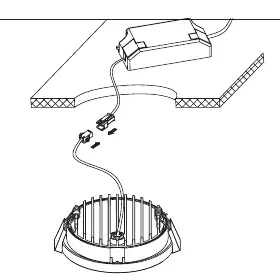
- Connect the driver and the lamp using the provided connectors.
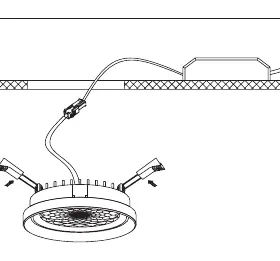
- Push both spring clips upwards and insert the downlight into the ceiling.
- Observe the recommended minimum distances in the ceiling for cooling. Do not cover the luminaire or driver with insulating material.
- Complete the initial operation to finish the installation.
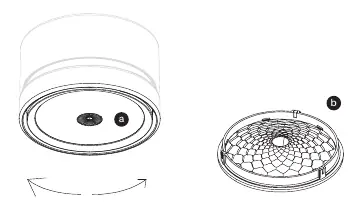
Lens Replacement
The lens insert is held in place by three magnets. To remove it, perform a slight rotation of the lens insert within the luminaire to separate the magnets, allowing the lens to fall out.
Safety and Maintenance
Warning: The luminaire head can reach temperatures up to 60°C during operation. Wait for the unit to cool down after switching off, or use the included cotton gloves to work on the luminaire immediately. The light source is not user-replaceable and must be serviced by Sigor Licht GmbH or a qualified technician.
Disposal and Warranty
Sigor luminaires are RoHS compliant and should be returned to a dealer or electronic waste collection point at the end of their service life. Do not dispose of them in household waste. The product includes a 5-year functional guarantee. For warranty claims, contact Sigor Licht GmbH at Eichenhofer Weg 81, 42279 Wuppertal, or via email at [email protected].
Practical help
Common problems
Luminaire head is too hot to touch
Wait for the luminaire to cool down after switching off, or use the included cotton gloves to handle it.
Need to replace the lens
Rotate the lens insert slightly within the luminaire to release the three holding magnets.
Before use
- Ensure installation is performed by a qualified electrician.
- Verify the ceiling cutout diameter is exactly 102 mm.
- Check the luminaire for any damage before commissioning.
- Ensure the power circuit is isolated following the five safety rules.
- Do not cover the luminaire or driver with insulating material like mineral wool.
Specs in practice
- 350 mA / DC 34 V
- Required constant current driver specifications for the luminaire.
Images and diagrams
- Step 1: Cutout diameter of 102 mm.
- Step 2: Wiring the LED driver to the mains.
- Step 3: Connecting the driver to the lamp.
- Step 4: Using spring clips to secure the lamp in the ceiling.
- Step 8: Rotating the lens to release magnets.
Model compatibility
- Not suitable for covering with insulating material.
- Requires the included HEP Driver G5LT15W350LR-Z.

Manual page author
Michael Turner
Technical manual editor
Reviews PDF manuals for structure, safety notes, and practical product details so readers can find the right information quickly.