Home Appliances / Sewing Machines
User Manual for Singer 4411 Sewing Machine
Quick guide for the Singer 4411 sewing machine. Learn how to thread the machine, wind the bobbin, adjust stitch settings, perform maintenance, and troubleshoot common sewing issues.
Table of contents
Manual images
Click an image to enlargeQuick guide from the manual
This manual provides essential instructions for operating the Singer 4411 sewing machine. Before starting, ensure the machine is placed on a stable surface and connected to a power source as illustrated. Always turn off the power switch when threading, changing needles, or performing maintenance. The machine is designed for household use only.
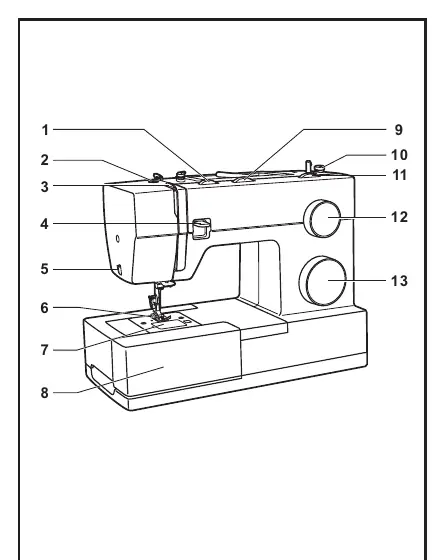
Machine Parts
The Singer 4411 features several key components for operation, including the thread tension dial, stitch width and length dials, pattern selector dial, and a three-needle position dial. The machine also includes a removable extension table that doubles as an accessory storage box. Familiarize yourself with the location of the thread take-up lever, reverse sewing lever, and the presser foot lifter before beginning your first project.
Setup and Preparation
Proper setup is crucial for smooth operation:
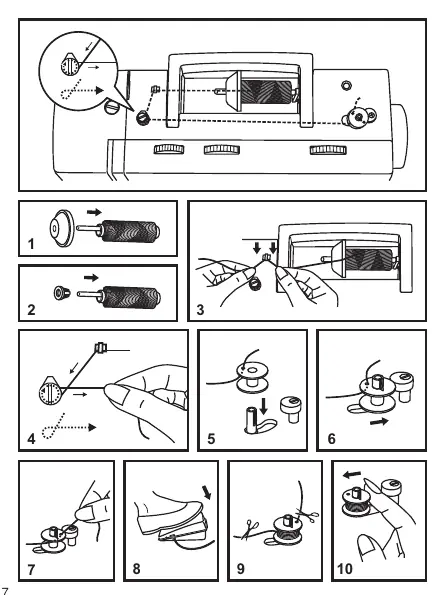
- Winding the Bobbin: Place the thread on the spool pin, snap it into the thread guide, and wind it clockwise around the bobbin winder tension discs. Push the bobbin spindle to the right to start winding.
- Inserting the Bobbin: Ensure the needle is fully raised. Insert the bobbin into the case with the thread running counterclockwise, pull the thread through the slit, and draw it until it slips into the notch.
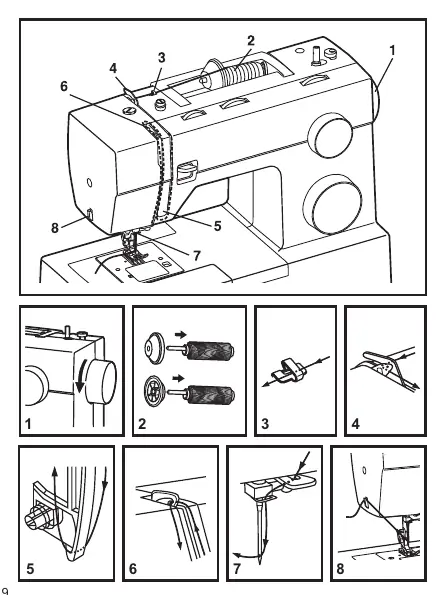
- Threading the Upper Thread: Raise the needle to its highest point. Follow the numbered path on the machine, passing the thread through the upper thread guide, tension module, take-up lever, and finally the needle eye from front to back.
Sewing Operations
The machine offers various stitch patterns selectable via the Pattern Selector Dial. Use the Stitch Length and Stitch Width dials to customize your stitches. For straight stitching, align the fabric edge with the seam guide on the needle plate. Use the reverse sewing lever to secure the beginning and end of seams. For buttonholes, follow the 4-step sequence indicated on the machine, adjusting the stitch density as needed.
Maintenance and Troubleshooting
Regular maintenance ensures longevity:
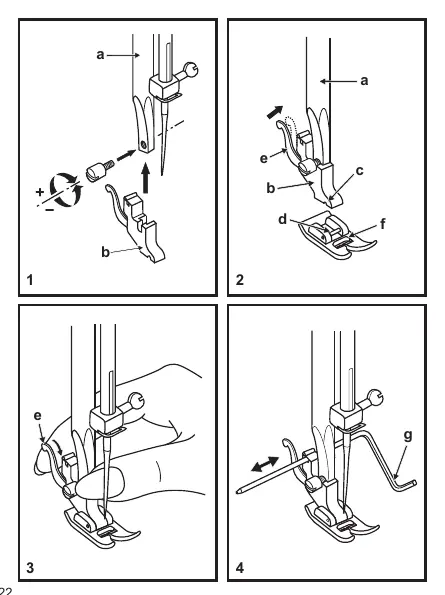
- Needle Care: Change needles regularly, especially if they show signs of wear or damage. Use the correct needle size for your fabric and thread type.
- Cleaning: Keep the hook and feed dog area free of lint and dust.
- Troubleshooting: If you encounter issues like skipped stitches, thread breakage, or loose stitches, refer to the troubleshooting guide. Most issues can be resolved by re-threading the machine, adjusting thread tension, or replacing the needle.
Manufacturer information
SINGER
Practical help
Common problems
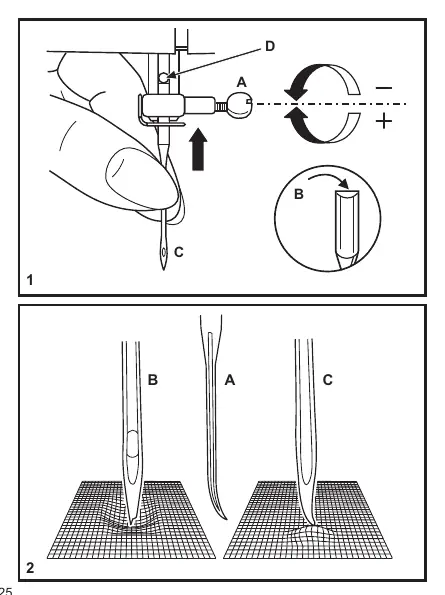
Upper thread breaks
Check if the machine is threaded correctly, reduce thread tension, select a larger needle, or replace a damaged needle.
Skipped stitches
Ensure the needle is inserted correctly (flat side back), replace the needle if damaged, or check that the presser foot is attached correctly.
Machine jams
Remove the upper thread and bobbin case, then turn the handwheel backwards and forwards by hand to remove the caught thread.
Needle breaks
Insert a new needle, ensure it is inserted correctly, or select a needle size appropriate for the fabric.
Before use
- Ensure the machine is unplugged when not in use.
- Check that the needle is not bent or blunt.
- Verify the correct needle plate is installed.
- Ensure ventilation openings are free from lint and dust.
- Turn off the power switch before threading or changing parts.
Specs in practice
- Stitch Width Dial
- Adjusts the width of the zigzag stitch (0-6mm).
- Stitch Length Dial
- Controls the length/density of the stitches.
- Three Needle Position Dial
- Allows shifting the needle position to Left, Middle, or Right.
- Thread Tension Dial
- Adjusts the tension of the upper thread (standard setting is 4).
Images and diagrams
- Principal Parts: Identifies all external controls, dials, and levers.
- Threading Path: Illustrates the correct sequence for upper threading.
- Bobbin Winding: Shows the path for winding the bobbin.
Model compatibility
- Use genuine Singer needles for best results.
- Match needle size to thread size and fabric weight.
- Use polyester threads for synthetic materials and cotton for natural woven fabrics.

Manual page author
Emily Carter
User documentation editor
Prepares concise manual descriptions and highlights the most useful setup, operation, and maintenance information for readers.